How to achieve esthetic success with opaque composite resins
Use the Goldilocks principal to mask dark underlying structures and obtain “just the right” result.


Contemporary materials in dentistry have evolved to become increasingly more cutting-edge and accessible whether helping to simplify procedures, enhance esthetics or advance our restorative techniques.
Composite resins are a great example. They’re becoming easier to handle, more durable and providing better esthetics for our patients. The newest generation of composites also features improved versatility and simplicity. In some cases, they give us the tools we need to mask dark underlying substrates while still achieving an esthetic final result.
While the benefits of opaque composite resins have been widely known for years, these materials have historically been available only in flowable viscosities. While there are some advantages to a flowable viscosity, there are also drawbacks.
Related reading: 3M introduces 3M Chairside Zirconia
Specifically, controlling the thickness may be challenging as well as controlling the placement of a lower viscosity resin. Gravity sometimes causes the material to run or slump away from the discolored area we’re attempting to mask.
Fortunately, 3M™ has designed a pink opaque (PO) shade, available with its newest universal composite, 3M™ Filtek™ Universal Restorative. The pink opaquer features a more viscous consistency, so the material is less likely to pull away from substrate needing to be masked and is easy to apply in a controlled thickness. Along with the consistency, the opaquer has been designed to block out dark substrates when applied in a layer only 1-mm thick.
Because the pigmentation has been designed to increase the opacity of the composite resin, you’ll need to increase the amount of time you spend light polymerizing the restoration (1 mm requires 20 seconds with an LED curing light versus 10 seconds for the Filtek Universal Restorative body shades). This will ensure enough light energy penetrates through the restoration to secure a successful polymerization.
Opaquers are essential to use in any situation where there’s underlying discoloration present. This discoloration can occur for a variety of reasons, such as dark existing tooth structure, amalgam restorations, implants or metal restorations where the ceramic has chipped off to name just a few.
This photo series showcases the use of Filtek Universal Restorative pink opaquer when applied using the Goldilocks principle: Applying a layer that is not too thick or too thin…but just right. Using the technique I’ve outlined below, you’ll be able to achieve highly esthetic outcomes using the new Filtek Universal Restorative Pink Opaquer in combination with Filtek Universal Restorative body shades.
Proper use and application of pink opaquer as a function of thickness
In order to successfully mask dark discolorations when placing direct composites, the pink opaquer should be carefully applied. If applied in too thin a layer, the opaquer will not properly hide the dark underlying structure. If applied in too thick a layer, there will not be enough room for the body shades of the composite to cover the opaquer and the final esthetics will be less than ideal. However, when applied correctly, the opaquer will mask the discoloration while the composite resin will match the natural tooth structure, resulting in a restoration with an optimum esthetic outcome. When used judiciously, the Filtek Universal Restorative Pink Opaquer appears to raise the value of a restoration providing a more natural final result.
When it comes to fractured teeth, the most conservative approach generally leads to better long-term outcomes. In this example, the tooth has an amalgam restoration that is still intact with sufficient remaining tooth structure to warrant a successful repair (assuming enamel etching and retentive features within the amalgam which interlock with the new composite). However, the dark underlying structure needs to be masked. With the proper application of the pink opaquer, it’s possible to achieve an esthetic result while conserving the remaining natural tooth structure.
Continued on page two...


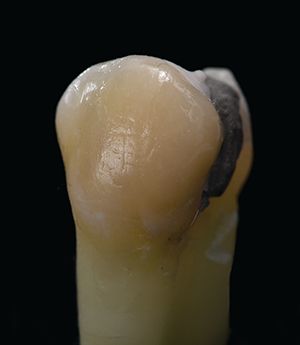
Fig. 2 - Amalgam restoration with facial fracture and retentive features shown.
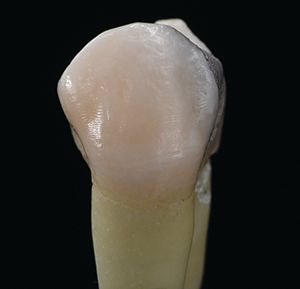


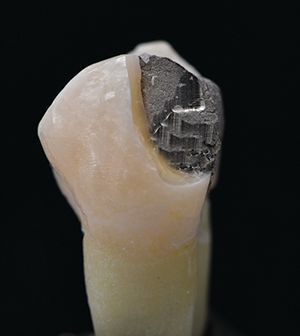
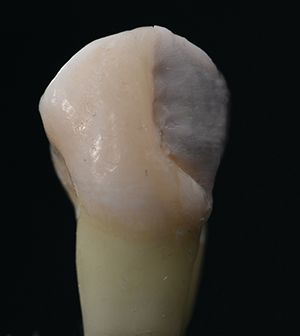
Fig. 1 - Premolar tooth restored with a proximal amalgam restoration.

.")
FIg. 4 - Thin layer of pink opaquer has been applied. Layer of opaquer is roughly 0.5 to 0.7 mm in thickness
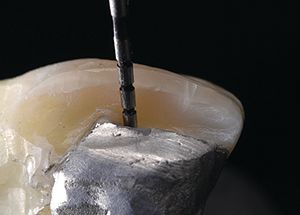


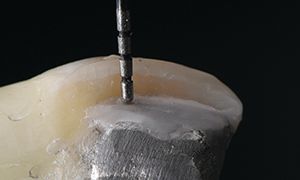
Fig. 3 - Showing the depths of the prepared cavity (entire depth is roughly 3 mm).

Fig. 6 - Final result of the thin layer of the pink opaquer (facial view).

.")
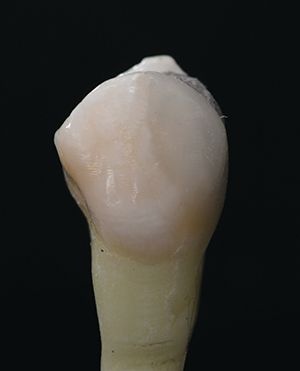
Fig. 5 - Facial view of thin pink opaquer layer.

.")
Fig. 7 - Final result of the thin layer of the pink opaquer (side view).
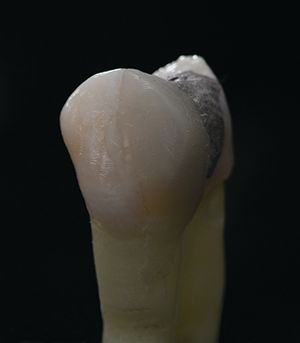
Fig. 7 - Final result of the thin layer of the pink opaquer (side view).
Continued on page three...
Cavity Preparation:
Step 1: After evaluating the soundness of the tooth, the shade is determined prior to any preparation (in this case, the shade was A2), add retentive features within the amalgam and ensure the presence of an enamel bond. In order to optimize the bond of the composite to the amalgam, retentive features may be added through mechanical or interlocking grooves, roughening the surface with a diamond bur, or sandblasting the area to be restored (Figs. 1-3).
Too thin pink opaquer:
To showcase what happens when we apply the pink opaquer in too thin a layer, roughly 0.5 mm of the opaquer was placed into the cavity. The final outcome is a restoration that didn’t successfully block out the silver amalgam restoration underlying the composite and resulted in a tooth with a grayish hue (Figs. 4-7).
Too thick pink opaquer:
On the other hand, applying too thick a layer of pink opaque will result in a final esthetic result that appears too opaque. To demonstrate this phenomenon, 2.5 to 2.7 mm of the pink opaquer was applied to the tooth and cured in 1-mm increments per the instructions for use. Keep in mind the entire cavity is roughly 3 mm. As a result, approximately a 0.3- to 0.5-mm space remained for the final body shade of Filtek Universal Restorative. While the thick layer of pink opaquer successfully blocked out the dark amalgam, the final layer of composite was too thin to mask the pink opaquer, which resulted in a final restoration that lacks vitality (Figs. 8-10).
Related reading: 3 tips for overcoming common challenges of shade matching
Ideal Application:
Now that you’ve seen the results of pink opaquer application that was both too thick and too thin, I’ll highlight an esthetic restoration you can achieve with the proper application.
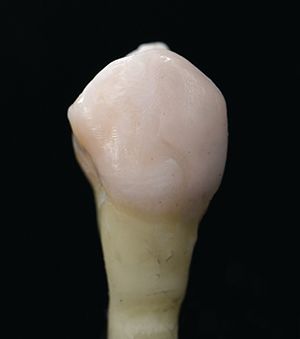
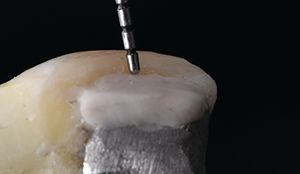
For a 3-mm cavity, the ideal layer of the pink opaquer is roughly 1-mm in thickness. This will leave around 1.5- to 2-mm of space for the body shade of Filtek Universal Restorative to be placed on top of the pink opaquer. The final result is a restoration that mimics the natural tooth structure and effectively masks the amalgam restoration (Figs. 11-13).
Conclusion
One of the challenges we tackle when working with composite resin materials is to achieve esthetic outcomes for our patients. To achieve the best result, we must manage the depth of the composite layers. Knowing we’ll need roughly 1-mm of space to apply the pink opaquer to mask dark tooth structure or metal, it’s important to measure the entire depth of the cavity prior to placing the opaquer.
This will ensure you’re able to apply the pink opaquer to the proper level of thickness in order to leave enough room for the conventional composite to mask the opaque layer (1.5–2 mm is optimal).
This photo series demonstrates the highly esthetic results that are possible when using Filtek Universal Restorative Pink Opaque. However, if too much opaquer is used, the final restoration will look dull and lifeless. If too little opaquer is used, the final result may be too gray due to the shine through of dark dentin or metal.
However, when the proper layer of opaquer is applied, the final result is a highly esthetic restoration that properly covers the underlying dark substrate and mimics the brightness and vitality of natural tooth structure.
Continued on page four...


Fig. 8 - Thick layer of pink opaquer has been applied. Layer of opaquer is roughly 2.5 to 2.7 mm in thickness.
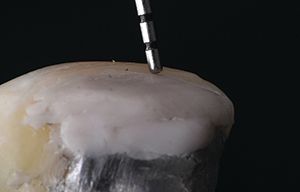
Fig. 8 - Thick layer of pink opaquer has been applied. Layer of opaquer is roughly 2.5 to 2.7 mm in thickness

.")
Fig. 10 - Final result of the thick layer of the pink opaquer (side view).

.")
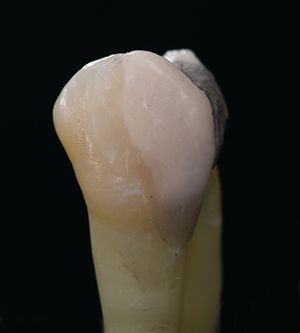
Fig. 9 - Final result of the thick pink opaquer layer (facial view).


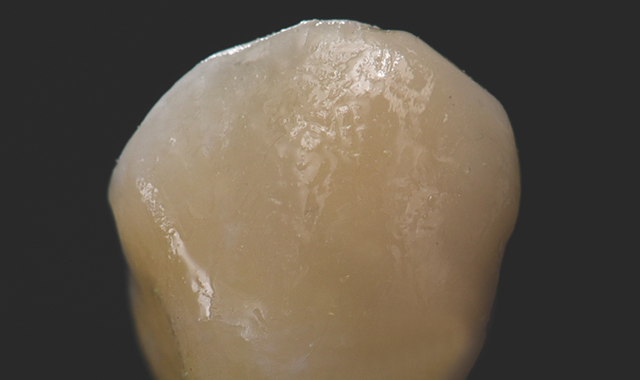
Fig. 12 - Final result of the ideal pink opaquer layer (facial view).

.")
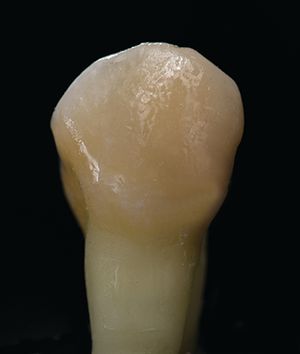
Fig. 11 - Ideal layer of pink opaquer has been applied. Layer of opaquer is roughly 1.0 mm in thickness, which leaves ~1.5 to 2.0 mm of space for conventional composite resin to be added on top of pink opaquer.

.")
Fig. 13 - Final result of the ideal pink opaquer layer (side view).