How to simplify the restorative process with Zenostar and the IPS e.max system [VIDEO]
The design of this case was complex. But by using digital design it was possible to design the implant abutments at the same time as the final restorations.
The design of this case was complex. But by using digital design it was possible to design the implant abutments at the same time as the final restorations.
The Wieland Zenostar Zr Translucent Zirconia has allowed us to see an increase in both strength and overall esthetic potential in complex cases like this. With this material, the need for layering is minimized, thus maximizing the overall percentage of very high strength ceramic material that makes up these restorations.


Conventional porcelain fused to metal is a weaker, less esthetic choice that is much more likely to chip or fail. Additionally, Ivoclar Vivadent’s IPS e.max system can help to simplify the restoration process.
Case presentation
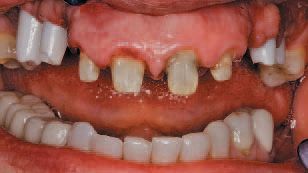
The patient initially presented about four years ago with failing crowns that resulted from micro-leakage and poor communication between the patient and her previous dentist. She disliked the crowns and was never asked what she desired esthetically before or during treatment.
The patient also was wearing a “flipper” partial that had become increasingly frustrating to wear. One implant failed on tooth No. 5 and had to be grafted before being replaced. The buccal plate was too thin to place an implant on tooth No. 6.
Tooth No. 11 was lost because of decay mid-treatment during implant healing. The patient elected not to place an additional implant in the tooth No. 11 position because of the delay in finalizing her case and the financial burden it would cause.
Additionally, much of the clinical crown of No. 7 was also lost due to recurrent decay during temporization. A fiber post (DENTSPLY Caulk) was bonded to retain the core in


the final restoration. Implants were from Zimmer.
Step 1
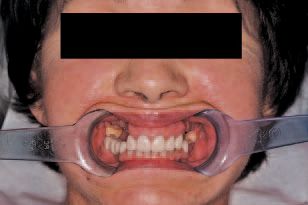
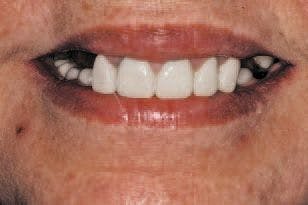
A fully retracted pre-op photo was provided by the clinician to assist the ceramist in creating a diagnostic waxup with proper midline position and to help avoid a maxillary cant (Fig. 1). It’s important to include the eyes in the photo and that the assistant holds retractors parallel to the horizon.
Step 2
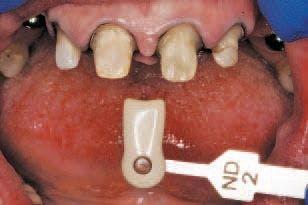
Stump shade was matched to assist in proper ingot selection (Fig. 2).
Step 3
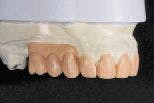
A diagnostic waxup formed from Zenotec wax was completed idealizing form and function to be pressed out of the IPS e.max system (Fig. 3).


A silicone matrix of this waxup was used to fabricate provisional restorations in the patient’s mouth. Note the tissue discrepancy in the edentulous areas. The need to replace the space occupied by gingiva was part of the material selection and planning process.
Step 4
The provisional restorations in the mouth were photographed and impressed to provide models to the lab that showed the shape and position of the temporary restorations in the mouth (Fig. 4).
This provisional model was digitally scanned at the lab with the


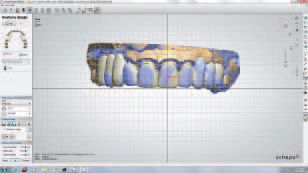
at the same time that a prepared tooth model and the mandibular models were scanned. All three models can be used interactively in the digital design software.
In the photo you can see the provisional restorations represented in blue superimposed on a preliminary design of the definitive restorations.
The cross hairs in the photo can be oriented with a full-face photograph to help with facial orientation. The design was subsequently refined to more closely follow the position and shape of the provisional restorations.
Step 5
Long-term provisionals (approximately three years) were placed while the patient’s implants were healing. Tooth No. 11 was lost due to recurrent decay during provisional phase (Fig. 5).

Step 6
Broad contact areas were created between cuspids and laterals to help with anti-rotation on seating and subgingival margins from previous failing restorations (Fig. 6).

RMGI cement was used due to lack of ideal isolation for bonding. Plenty of thickness of ceramic ensures the strength of the restorations.
Step 7
At the lab, a full-contour design was completed with the 3Shape software (Fig. 7). The Zenostar bridges are shown in white and the IPS e.max lithium disilicate restorations
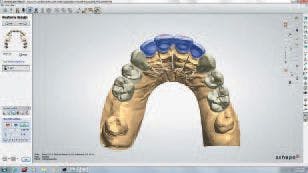

are indicated in blue. The zirconia comes in six shades of translucent and one more opaque white shade that we use for abutments to prevent show through of the screw or titanium chimney within the abutment.
Both the translucent and opaque zirconia are shaded with Zenostar color Zr to create color gradient within the zirconia. This coloring step is done after milling but before sintering the zirconia.
Continued on the Next Page ...
Once a full contour design is complete, the implant abutments are digitally optimized to match the full contour design and the software splits the file into individual crowns or bridges over the implant abutments and the abutments themselves. These are then tasked to the Mini mill with three different materials.
The abutments are milled in the more opaque zirconia, the bridges over the abutments are milled in the translucent zirconia, with slight facial cutback if they are anterior units or full monolithic design if strength is more of a concern than esthetics (this case had facial cutback).
All of the individual restorations that are going to be IPS e.max are milled in the Zenotec wax and then pressed with HT IPS e.max. The split file design is a time-saver, but occasionally results in a bridge that doesn’t fit on the implants.
To avoid this, a more conservative approach can be taken where the implant abutments are designed first by consulting the temp model overlay in the software, then the abutments can be milled, placed on the model and rescanned to fabricate the bridges.

This is always accurate, where the split file can be hit or miss on bridges.
The split file always works great with single units on implants.
Step 8
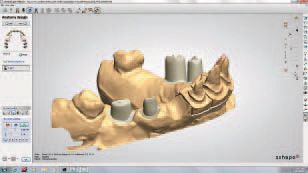
Hybrid titanium zirconia implant abutments were designed within the full contour design, thus allowing proper shape and position of the abutments relative to the final tooth position (Fig. 8). You can also see the ovate pontic preparation for the cantilevered pontic is visible in the No. 11 position.
Step 9
The virtual articulator is used to check excursive and protrusive movements (Fig. 9).
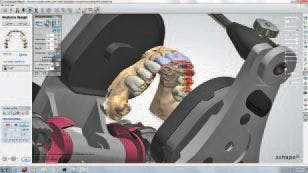

The mandibular model is turned off to allow the viewer to see the collision areas in the design. These were adjusted to allow anterior guidance without posterior working or balancing interferences.
Step 10
The master model with the zirconia abutments in place (Fig. 10).


Titanium sleeves support the zirconia and provide metal seats for the screws, greatly increasing the overall strength and reliability of the abutments without sacrificing the trans-illumination potential of the zirconia.
Step 11
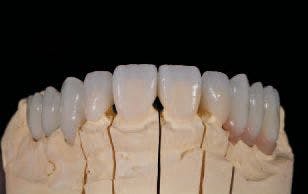
The digital design for the anterior lithium disilicate crowns was outsourced to Wieland Precision Technology for milling. The zirconia bridges were milled inhouse on a Wieland Zeno Mini mill. All restorations were fit to the master model.
Contacts, occlusion and surface morphology were verified on the IPS e.max restorations prior to crystallizing.
Step 12
Zirliner was applied to the bridges in areas where IPS e.max Ceram layering was planned (Fig. 12).
Step 13
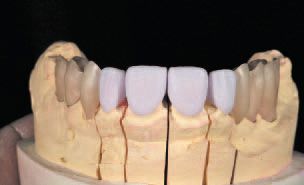
The full contour IPS e.max Ceram buildup of the bridges was completed (Fig. 13). The degree of trans-illumination possible with zirconia abutments and translucent zirconia bridges is visible.


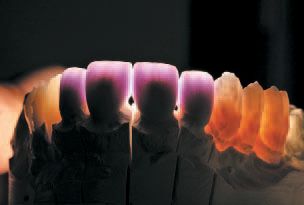
These bridges were only cut back 0.6 mm on the facial for esthetic layering. All occlusal, lingual and gingival surfaces were left in zirconia. With the higher translucency exhibited by Wieland’s new zirconia, very minimal layering is needed for esthetics. This results in a much stronger final restoration. The strength gained by this minimal layering approach is vastly increasing the usability of zirconia as a restorative material.


Step 14
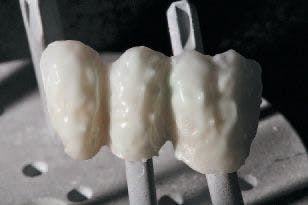
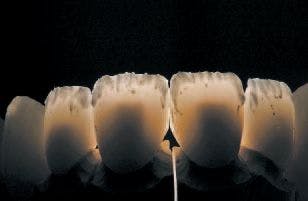
Prior to crystallizing, the IPS e.max HT restorations were cut back 0.2 mm-0.4 mm for incisal effect layering (Fig. 14).
The initial IPS e.max Ceram effect powders are in place on the crystallized restorations. The color control in the HT zirconia provides nice esthetics while reducing the need for layering ceramic. Monolithic posteriors are possible with acceptable esthetic results and minimal layering produces exceptional results.
Step 15
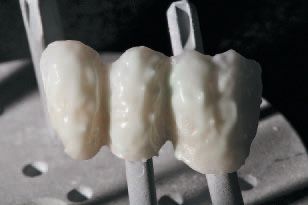
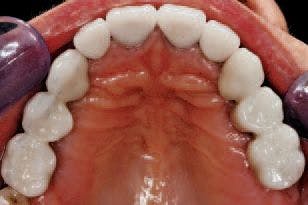
The finished case on the master model shows the zirconia occlusion (Fig. 15).


Step 10
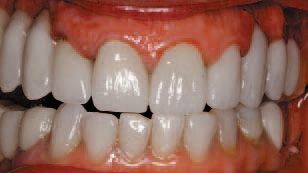
Pink porcelain was used on the right side due to a large tissue defect that resulted from prior trauma and was exacerbated by a failed implant on tooth No. 5. Ideal edge-to-edge position was achieved in protrusive. Note the excellent blend of color with lower whitened natural dentition (Fig. 16).

Step 10
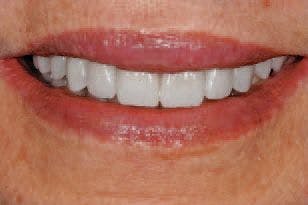
The completed restoration achieved excellent shade transition from IPS e.max to zirconia from laterals to cuspid (Fig. 17), even with minimal cutback of zirconia.

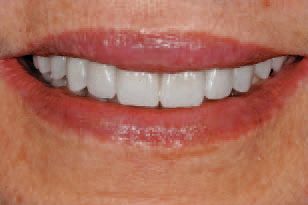
Note the ideal incisal edge position following contours of lower lip (Fig. 18).
Closing thought
The combination of good restorative treatment planning, good clinical execution, gathering appropriate models, bites and photos and having a systematic, sequential approach to the final outcome of the case is what‘s really important.
All of the technology and great materials in the world won’t result in successful desired results for the patient if the restorative process isn’t completely visualized and pre-planned prior to starting the case and the plan is followed step-by-step in a logical, sequential manner with constant input from the patient as to expectations and desires of all parties involved.


