How to achieve beauty, form and function using the stamp technique
Follow these steps to create a great restoration and gain the "stamp of approval."


If it’s working, why change? If we have a functioning occlusal surface, why do we feel the need to take a chance rebuilding it by hand? There’s no reason to reinvent the wheel with these situations. We’re usually no better than Mother Nature.
The other factor that must be considered is the labor involved with creation of the tooth’s anatomy. When one either sculpts the anatomy by hand or carves the surface by grinding it in after the material has been placed and cured, it isn’t an easy task-it takes time.
A much better and more efficient way to restore these teeth is to record the pre-op occlusal anatomy. This can be done during the down time when we’re waiting for anesthesia to take effect.
Preserving what’s there
A mold of the occlusal surface can be taken by injecting a clear polyvinyl material such as EXACLEAR bite registration from GC America in the stamp tray, then placing this over the quadrant to be treated and allowed to set. This mold, or stamp, can then be used to reproduce what we’ve removed in the excavation process, restoring the form and beauty, and restoring the tooth to function.
Many times you’ll experience a tooth that looks pretty good, until you start to peel back the layers. Fluoride is a great benefit to our patients in the prevention of decay by strengthening the enamel and making it more resistant to damage. This hardened layer of enamel can also mask what lies underneath. Decay blossoms out, which results in creating a larger defect to restore when it’s completely removed.
Related reading: Top 3 tips for using bulk fills
What was expected and reality are two different things-something you thought was going to be simple may turn out to be complex. As our restorations become larger, we have to keep in mind the physical properties of the materials we use in our treatment. The depth of cure and the volumetric shrinkage as material cures all have to be accounted for as we restore the tooth.
Material issues


Failing to respect the science of the material will end up with premature failure of your-or, I should say, your patient’s-restoration. A composite restoration isn’t a simple one. For long-lasting results, it requires perfect technique and plenty of thought.
As a small business, we have economic pressures on all procedures we perform and we must look at the fees we can charge, the costs of materials we use and the time it takes to complete the tasks in our office. For the PPO-driven office, many times our hands are tied when it comes to the fees for the procedures.
Unfortunately, this puts pressure on the dentist to cut the cost of materials, or even worse, try to take shortcuts with the hope of saving time. Shortcuts in dentistry sometimes deliver unwanted consequences for the treatment (i.e., poor esthetics, or worse, a shorter usable lifetime.)
Choosing the right material
For the majority of the restoration, a bulk-filled material has many benefits that help with the process. Bulk-filled materials have the ability to be placed in larger increments because the chemistry mitigates the volumetric shrinkage from curing. These materials also have mechanisms to enhance the depth of cure, allowing for thicker layers to be placed at one time.
Continue reading on page two...
From the dentist’s standpoint, these add up to increased efficiency for your composite visit. The acceptable thickness for a layer of a conventional composite is 2 mm. A complete cure can be ensured with minimized stresses from curing at this thickness. Layers up to 4 mm thick can be cured with bulk-filled materials, allowing for fewer layers for the restoration.
These clinical situations are where Tetric EvoFlow Bulk Fill from Ivoclar Vivadent really shines and multiple benefits are brought to your appointment to benefit you and your patient. Being it’s a flowable composite, it adapts well to irregularities in the preparation and is self-leveling to create a flat pulpal floor on which the remainder of the restoration may be built.
Tetric EvoFlow Bulk Fill benefits from Aessencio technology, which helps to ensure a natural-looking, esthetic result. When uncured, it’s a semi-translucent material that then becomes more opaque as it’s cured. The result is a material with a low translucency mimicking dentin. The shades available-IVA, IVB and IVW-are unique due to these optical properties. Universal A, B and White shades are how they’re intended to be used, as this simplifies the inventory one needs to keep in his or her office.
These shades are designed to reproduce the dentin this layer of composite replaces. A critical component leading to its success is Ivocerin, as it enhances the depth of cure (up to 4 mm) but also acts as a stress reliever to minimize the effects from polymerization.
Trending article: Key upgrades make for easier intraoral scanning
Because you can cure up to 4 mm layers, a large cavity can be restored in a minimal number of layers. Minimal layers and using a quality, high-powered curing light allow for a very efficient restorative visit.
Warming up for the stamp
To complete the restoration, once the base layer of the flowable has been placed and cured, we need to cap it with a dense, esthetic layer of composite. Composite can be dense and difficult to manipulate when at room temperature, which when one is sculpting the occlusal surface by hand can be a benefit.
Warming the composite helps with decreasing the viscosity-a benefit for the stamp technique-which means less force needs to be applied to the polyvinyl stamp to form the desired occlusal anatomy. This decreases the chance of deformation and possible errors with recreating the occlusion on the new restoration.
Warm Tetric EvoCeram is placed in the cavity preparation, then the occlusion is created by placing the stamp back over the occlusal of the prepared teeth. Firm pressure is applied, and the composite is then cured with the application of a strong curing light for 30 seconds through the stamp.
Warming the composite enhances its handling characteristics, simplifying the stamp process and increasing the detail in the final restoration. Warming also has a positive effect on the properties of the composite and increases the marginal adaptation.
Continue to page three...
The monomer conversion of a light-cured dental composite at room temperature has been measured at 31.6 percent. When the dental composite is warmed to 60º C, the monomer conversion has been measured at 67.3 percent.1 This significant increase in monomer conversion results in a harder and strong restoration.
Heating not only creates a stronger harder composite, but the dynamics involved have an effect on the shrinkage of the composite as it cures. You might make the assumption when there’s more monomer conversion, there’s more crosslinking of the polymer. This would lead to more shrinkage and more stress placed into the filling and the tooth composite interface. Research has demonstrated the opposite is true. Composite preheating significantly reduces shrinkage force formation of high-viscosity bulk-filled and conventional resin composites.2
.Warming the composite gives it a higher flow. This higher flow has multiple benefits for the stamp technique. It allows the composite to flow into the anatomy captured by the polyvinyl material. It also has a benefit that translates to a better restoration for your patient. It allows the composite to adapt to the intricacies of the cavity preparation, lowering the total gap surface area.3
Safely warming composites
There are a number of different systems available to safely warm composite and maintain it at a specified temperature. A popular device is the Calset warmer from AdDent. This device has three preset temperatures-37º, 54º and 68º C-to choose from. This can be configured with a number of attachments for the system, allowing you to use it with compules, syringes and even your operative instruments.
Trending article: Using technology for better esthetic outcomes
Finishing the process
After the stamp has been removed, it’s important to cure the composite further. While the clear polyvinyl material allows light to transmit through it, the material and the increased distance of material from the light source will diminish the energy the composite receives.
As the anatomy and the occlusion are predictably delivered with use of the stamp, we still need to check the occlusion and finish the restoration without destroying all the anatomy we want to keep.
Optrapol points and cups can give a great luster quickly and efficiently. These are great on larger flat and convex surfaces. In a few short seconds, they’re able to give your restoration a high luster without the excessive removal of material associated with three step systems. This is followed with the 3M Sof-Lex™ Spiral Wheels. These discs allow for polishing the grooves of the restoration without the destruction on the anatomy imprinted into the composite. All these steps are done in a minimal amount of time.
Continue reading on page four...
Step-by-step workflow
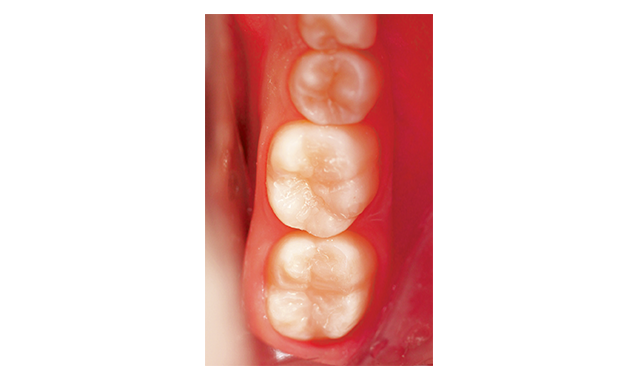
The patient presented with occlusal decay on the mandibular molars (Fig. 1).
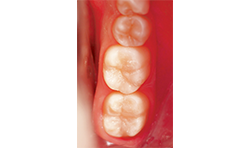
A mold of the occlusal surface is captured using a clear PVS bite registration material (Fig. 2).
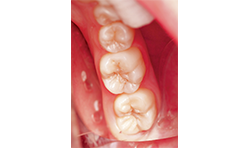
Fig. 1


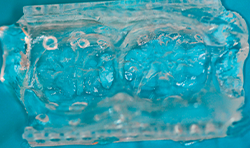
Fig. 2Fig. 1
The teeth are prepared and the decay is removed (Figs. 3 and 4).

Fig. 3
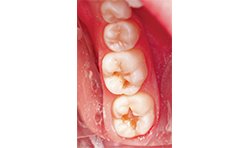

Fig. 4
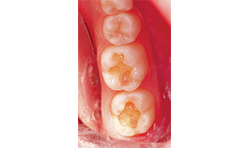
Fig. 3
A bulk fill composite is used to fill the preparation to just below the occlusion (Fig. 5).
The composite is warmed to approximately 60º C.
The warm composite is placed into the preparation, and the occlusal surface mold is placed on top and pressed down before the material is cured through the stamp for 30 seconds.
The stamp is removed and the material is cured directly.

Fig. 5
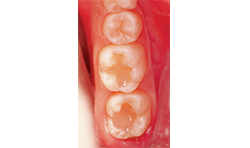
Fig. 6
Fig. 5
Occlusion is checked and the restoration is finished and polished (Fig. 6).
The finished restoration looks beautiful, and by following a few simple steps and utilizing material optimized for efficiency, it was accomplished quickly and easily.
Continue reading on the next page...
Time savings
Anatomy stacked by hand is demanding and technique-sensitive. It takes time to develop the art. For those who bulk fill and cut back, the detailed anatomy produced by the stamp technique can’t be recreated with rotary instruments. This too can take time.
Time is a major component in making a procedure financially viable for your office. So, let’s compare the total steps needed to complete a clinical case. Assumptions taken for the process are as follows:
Both a traditional hand-stacked composite case versus a warm composite stamp technique are compared. Anesthesia time, isolation and preparation time are the same for both techniques. The traditional composite will use both flowable and nanofilled composite. Cure depths for the flowable and the composite are in 2 mm increments. Anatomy is hand stacked, requiring multiple placements and cures. Curing time for each layer is 10 seconds with a Bluephase Style curing light. The cure time is consistent for the conventional and the bulk-filled workflows.
The time line for anesthesia and preparation is the same for both techniques. The only difference is the stamp is fabricated as you wait for the anesthesia to start to work on the patient-no net change.
Related reading: What does filler size have to do with composites? More than you think
The time lines start to deviate with the delivery of the restorative material. Conventional composite, due to its physical properties, has limitations, forcing the operator to use more layers in many cases. Each layer requires the physical placement and positioning of the material and then the application of the curing light.
As mentioned above, the use of bulk-filled materials allows for less layering as the tooth is restored, and this leads to a large time savings over the course of a long day in the operatory. Less layering also leads to a more homogeneous restoration-better quality resulting in a longer-lasting restoration for your patient. The stamp technique allows you to preserve the natural occlusal features, eliminating the need to sculpt new anatomy prior to or after curing the composite.
References
1. Journal of Dental Research:. 2005 Jul;84(7):663-7. Daronch M1, Rueggeberg FA, De Goes MF.
2. Journal of Dentistry:. 2015 Nov;43(11):1358-64 : Tauböck TT1, Tarle Z2, Marovic D2, Attin T3.
3. Journal of Conservative Dentistry:.Volume 14(2); Apr-Jun 201 : V Gopikrishna.