Technique: Creating an immediate load denture using digital tools
The dental industry is currently experiencing a major revolutionary shift in the laboratory design process, slowly but surely transitioning from the traditional physical model to a new age of digital design.
At Express Dental Laboratory, we pride ourselves on being an industry leader by utilizing many innovative new technologies available from Dentsply Sirona in order to manage our workload more efficiently and, in turn, providing our dental partners with a streamlined process of communication and superior deliverables.


A recent case that we prepared for Dr. Steven Park showcases the true power and potential of digital design and communication. To better understand the endless potential benefits of available digital technologies, we will take an in-depth look at this particular denture case, and how a seamless digital workflow is changing the landscape of communication between dentists and labs while producing truly superior results in regards to form, function and esthetics.
Click the next button to go step-by-step ...


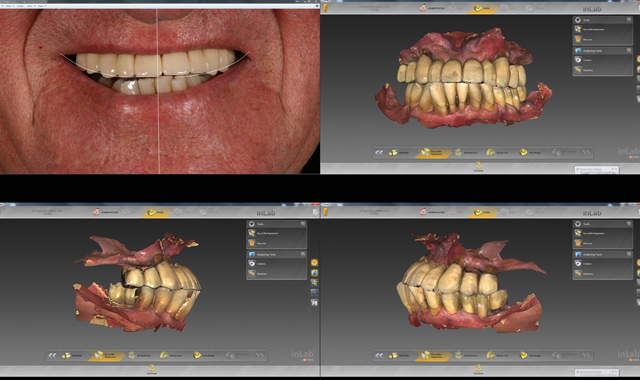
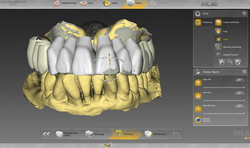
Fig. 1
Case Presentation:
A 77-year-old male patient presented a class three bite, complaints of a mobile/loose upper bridge and periodontal disease. (Fig. 1) In a traditional workflow, Dr. Park would have to take a physical impression for an immediate denture and then send it to a denture laboratory for fabrication. Upon return, Dr. Park would schedule the patient for surgery and perform a chairside conversion of the denture. In addition to a more involved fabrication and operative process, the traditional denture also has its issues, as individual denture teeth can pop off or the immediate denture can crack, especially with the type of bite the patient presented with.
Q&A: Dentsply Sirona's solutions for a changing world
Treatment plan:
Our plan was to design and create a complete upper denture via a completely digital workflow-a seamless and precise transfer of information from the doctor via Sirona Connect, digitally design the denture with the inLab SW15, and then mill and create the design on the inLab MC X5 wet/dry CAD/CAM milling system.


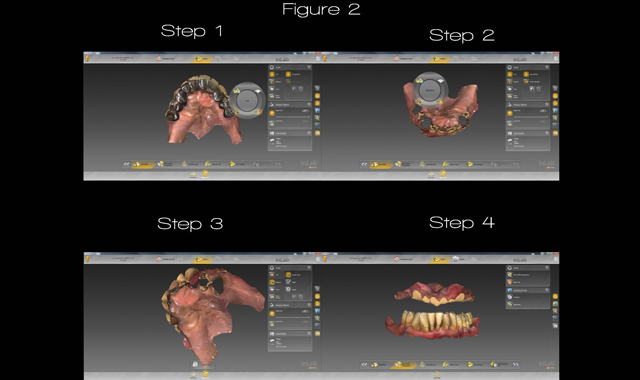
Fig. 2
Overview:
Due to the evident oral condition and numerous defects, Dr. Park could not take any form of traditional impression for fear of the bridge removal during the impression-taking process. This circumstance called for an innovative solution. Dr. Park simply used the CEREC® Omnicam to take a digital impression of the patient’s mouth.
Related technique: An integrated surgical guide workflow
From there, Dr. Park sent his digital impression via Sirona Connect to Express Dental Laboratory where we were able to quickly and efficiently built the patient an upper denture out of Monolithic Poly Methyl Methacrylate (PMMA) material. Thus, Dr. Park could easily correct the patient's bite and retrofit it to the patient using a conversion process commonly used in immediate implant load procedures. Our process in building the new milled immediate denture is composed of three general steps: design, mill, and process.
Step-by-step process:
Once we obtained the digital impression from Dr. Park via Sirona Connect, we immediately started our design phase by downloading the scanned impression into Dentsply Sirona’s inLab SW 15, our go-to design software. From there, we began to recreate the digital impression in the administration phase.
Cover story: Unpacking the differences between intraoral scanning solutions
Here, we select what kind of model we will create (in this case a maxillary bridge), whether or not we want gingiva (in this case we did), and what teeth we want involved in the digital model work. After the administration phase, we edit the model by completely removing the digital data of the patient's failing maxillary bridge and replacing the voids created using the software’s replace tool. (Fig. 2)

Fig. 3
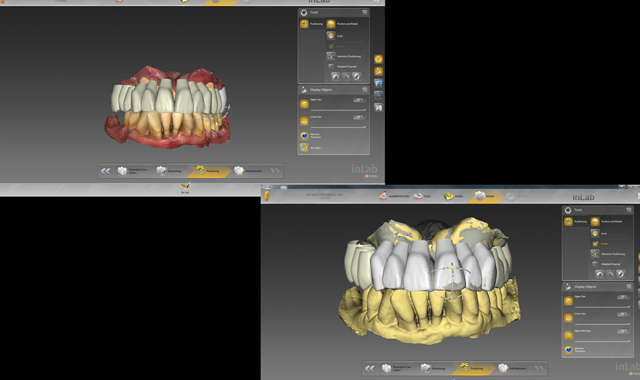
Fig. 3
Once the digital model preparation is complete, we can then move onto the model axis phase. Figure 3 shows how we adjust the jawline to the correct position for a natural, individualized, appropriate bite.

Fig. 4
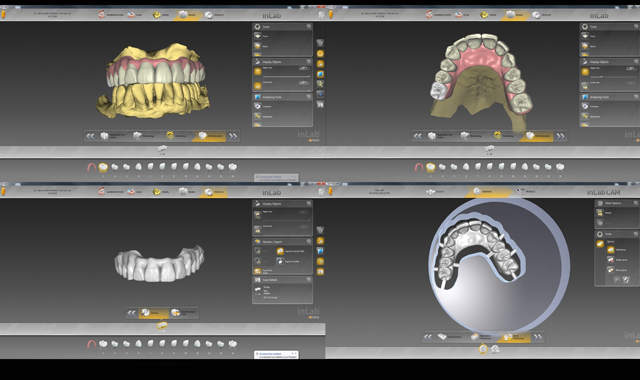
Fig. 4
We are then ready to move onto the design phase where we can then adjust the morphology and positioning of each individual tooth in the model. In this phase, we look to create natural-looking teeth while correcting any irregularities in the case. (Fig. 4)

Fig. 5
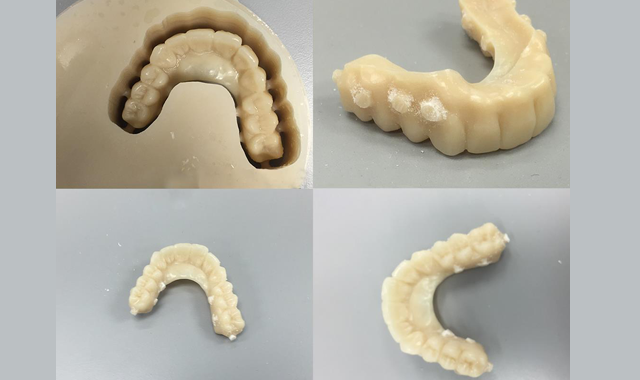
Fig. 5
Once the design phase is complete, we send the data that we created using inLab SW 15 to the inLab MC X5, a 5-axis wet/dry mill from Dentply Sirona. From there, the milling procedure begins to create the denture tooth set-up that we originally designed as a monolithic PMMA bridge. The tooth was completely adapted to the proposed patient’s tissue location following tooth removal. (Fig. 5)

Fig. 6
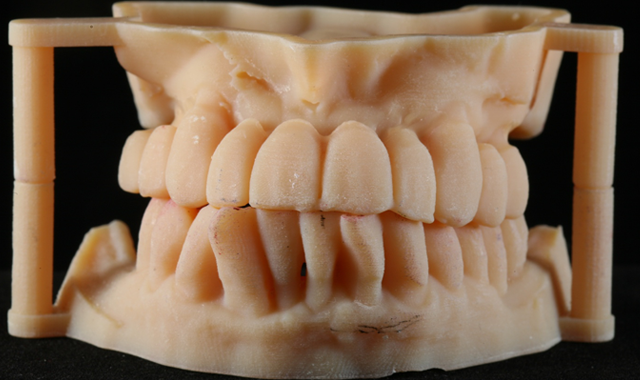
Fig. 6
In addition to the milling procedure, we also had a 3D printer print a model of the case so that we could have a complete and accurate representation of the patient’s original structure and bite along with the edited model which is later duplicated into stone and used to process acrylic to the PMMA bridge. (Fig. 6)

Fig. 7

Fig. 7
Now that the milling process is complete and the 3D physical model has been created, the next step is to undergo the acrylic processing and finishing step. Here, we equilibrate the bite and prepare the PMMA bridge for processing using the Dentsply Sirona’s Success System. We create undercuts in the flange of the gingiva of the bridge to increase retentive strength of the acrylic. We then wax the tissue, flask the setup and then boil out the wax and inject the acrylic. (Fig. 7)

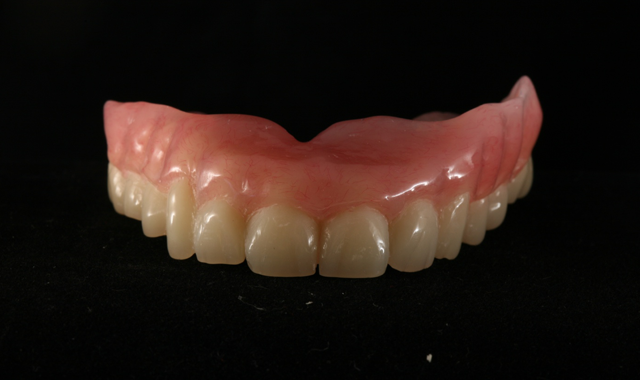
Fig. 8
After injecting the acrylic, the case is de-flasked and finished, just like a traditional denture. (Fig. 8)

Fig. 9
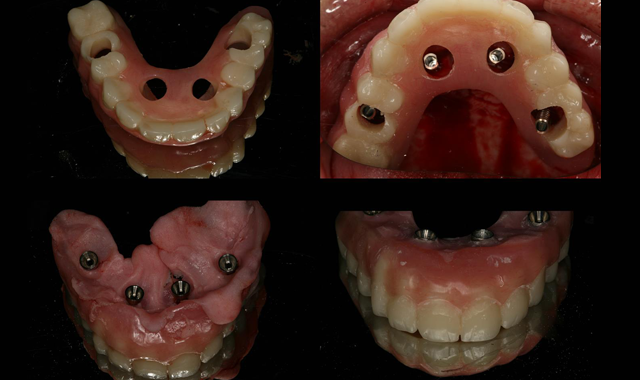
Fig. 9
After being scanned for impressions, designed on the inLab SW 15, milled on the inLab MC X5, and finished and processed, the denture was now ready for placement by Dr. Park. (Fig. 9) Without Dentsply Sirona’s advanced technology and our implementation of these tools to create our restoration through digital design, the procedure for this case would have been much more difficult and problematic for Dr. Park.

Fig. 10
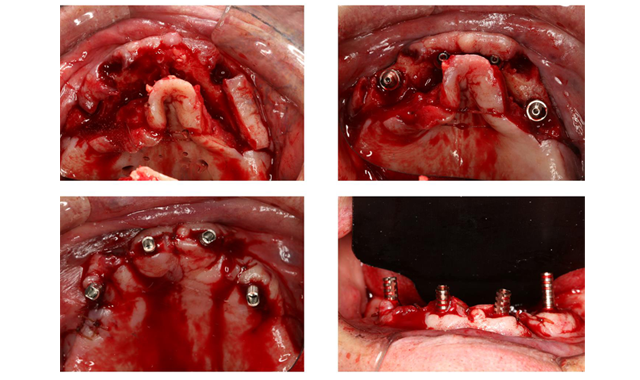
Fig. 10
Surgical procedures:
Under local anesthesia, a full thickness mucoperiosteal flap was raised to visualize the root of the remaining teeth and the alveolar ridge. The loose fixed partial denture the patient presented with was removed along with all the remaining teeth #6, 11 and 13 followed by alveoloplasty to shape the residual ridge. All osteotomies were underprepared up to 3.0mm twist drill to the correct depth with copious amount of saline irrigation. Two 4.0mm x 18mm Nobel Speedy implants were placed at an angle or 45 degrees to avoid the maxillary sinus in the posterior region and two 4.0mm x 13mm Nobel Speedy implants were placed in the anterior region in a traditional angle. To correct the angulation for the two posterior implants 35degree multi-unit abutments were placed and two straight multi-unit abutments were used for the anterior. 4-0 Chromic sutures were placed for primary closure and hemostasis was achieved. (Fig. 10)
Post-surgical procedure for All-On-Four immediate loading:
After the surgical placement of dental implants using the All-On-Four surgical protocol and placement of angled multi-unit abutment to correct the angulation, the previously fabricated interim denture is used to convert to an interim implant supported bridge by following protocol:
- With the angled abutments in place blue bite material was used to mark the location of the implants abutment.
- Using acrylic bur, the locations of the implants are marked on the intaglio surface and holes are made in the interim prosthesis
- The holes are enlarged to fit all the temporary cylinders.
- Cold Cure pink acrylic is mixed and used to reline the interim prosthesis chair side and intra orally cured. Additional acrylic is used to fill in the voids and to create convex intaglio surface.
- All the excess acrylic is trimmed and the interim prosthesis.
The electronic transfer of the information and the use of digital design and fabrication allowed the patient to receive their immediate load denture in a quick and efficient manner thanks to the help of Express Dental Laboratory's use of digital solutions provided by Dentsply Sirona and their inLab SW 15, inLab MC X5 wet/dry milling unit and Success Systems.
Follow the authors on Instagram and Twitter! Check out @xdentallab and @implantguru.


