Ivoclar Vivadent's IvoBase System delivers precision press technology for dentures
Bill Barton, CDT, demonstrates Ivoclar Vivadent's IvoBase System.
Bill Barton, CDT, demonstrates Ivoclar Vivadent's IvoBase System.
For more than 30 years, Ivoclar Vivadent is a world leader in precision press technology in the dental market, and as a result continues to pioneer new applications. The recent launch of the IvoBase Precision Press System represents the latest use of press technology for removable prosthetic restorations.
The IvoBase press unit utilizes smart thermo technology to process specially formulated acrylic resin with superior accuracy and nearly zero polymerization shrinkage.
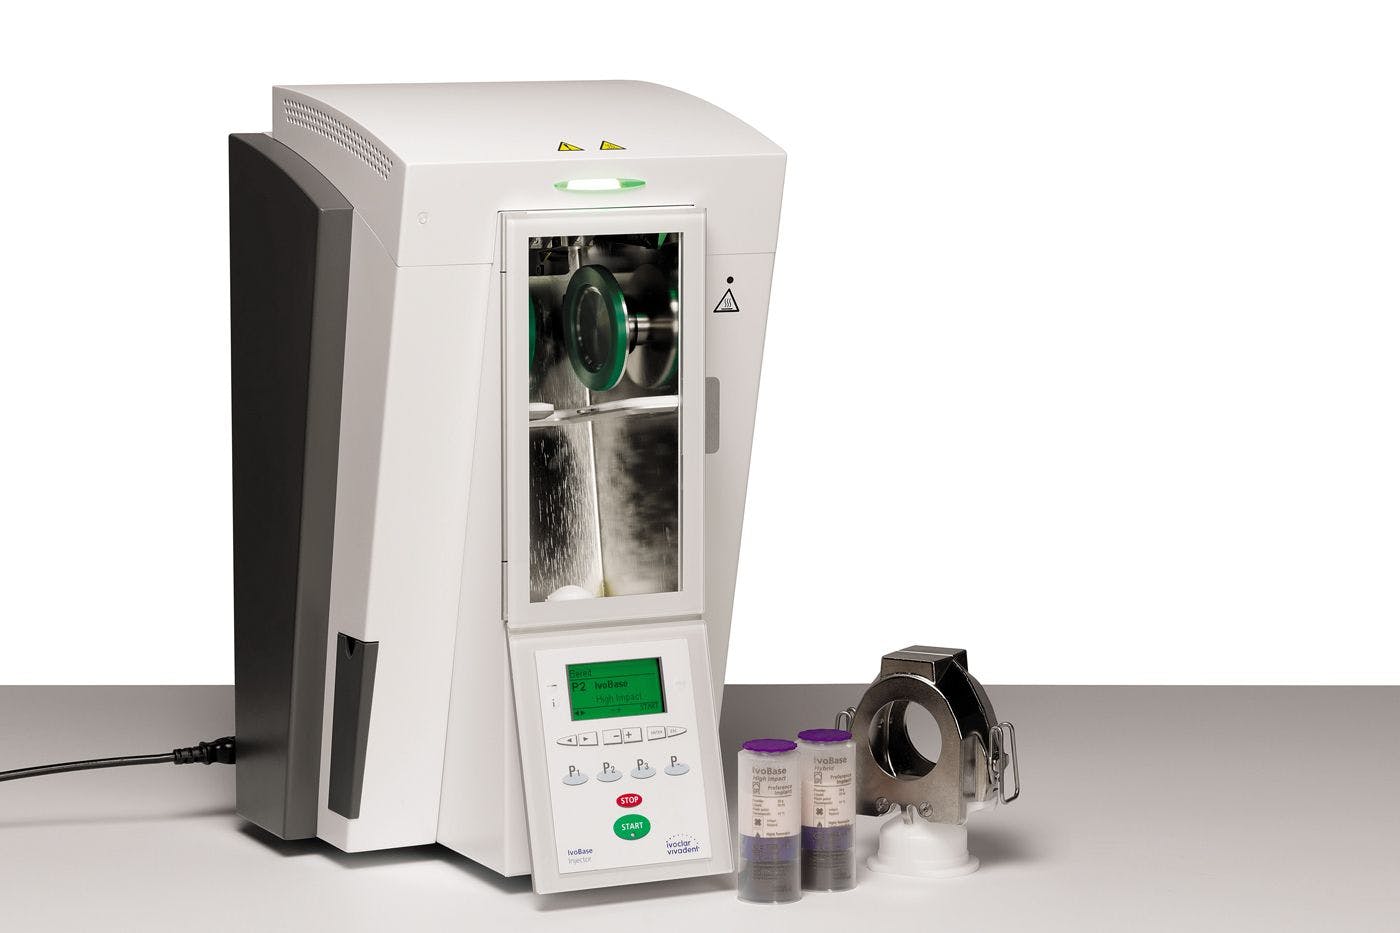
The fully automated processing chamber handles all processing from press to cure, and shows the current status at a glance. The system incorporates the IvoBase Press unit, flasks and two types of acrylic, Hybrid for universal applications and high impact.
About the system
The IvoBase Hybrid is used for universal applications, and the IvoBase® High Impact for load-bearing dentures, including implant hybrids. Both acrylics are available in several natural shades, including the popular Preference Shade.
The acrylics integrate the benefits of both heat and cold/warm-curing materials. Unlike conventional cold curing, heat curing penetrates the polymethylmethacrylate (PMMA) tooth base and produces low residual monomer content, good clinical resistance, and a good bond to the denture teeth. However, cold-curing offers easier denture base handling, shorter processing times, and more accurate fits. IvoBase materials being warm-cured provide the best of both worlds, resulting in a very good bond to the denture teeth, very good clinical resistance, minimal polymerization and thermal distortions resulting in superior fits, and shorter processing and working times.


The flask halves are identical, so both halves can be used for either the upper or the lower flask half. The injection wax (sprue), aeration component, and aeration filter must be used with the IvoBase® materials. Because of the auto-polymerization characteristic of the material, failure to allow the air to escape during injection results in porosity and incomplete injections.
The IvoBase Technique
The following is a quick overview of the IvoBase processing technique.
1 To prepare the flask, thinly coat the inner surfaces of the clean flask halves with petroleum jelly (Vaseline). Place the “flask cover,” “investment aid,” and wax component flush in the flask half for model investment from the inside (Fig. A).
2 Apply separator to the model and invest using a conventional dental stone (Class III). Observe a space of at least 10 mm between the front part of the denture and the flask housing (Fig. B). Wipe off excess stone flush with the model and edge of the flask half, and remove remaining excess stone from the plastic components and the “flask housing.” The stone edge must be flush with the “investment aid.”
3 Allow the stone to set thoroughly (Fig. C). Remove the “investment aid” and place the access former aid.
4 For the maxillary denture, place the injection wax component to the center of the palate, and one sprue each to the vestibular side of the two most posterior areas behind the cusps. For the mandibular denture, place the injection wax component with the sprues to the most posterior lingual area, below the retromolar pad (Fig. D). Press the injection wax components into the investment aid so it’s positioned in such a way that the conical tip of the investment aid is covered.
5 Position aeration channels and press the aeration wax component with the aeration channel to the center of the filter wax component (Fig. E). The aeration channels must not contact the flask housing to ensure the tightness of the flask and prevent acrylic from leaking out.
6 To aid in the deflasking process and protect the teeth from fracturing, cover the wax-up with silicone (Fig. F). Do not cover the occlusal surfaces and the incisal edges of the teeth so that they may be held firmly in stone. Apply retentive patterns to the silicone surface before it sets so the silicone pattern is anchored in the stone. For optimum results, use a low-viscosity, addition-reaction silicone (A-silicone) with Shore A >70. Isolate the stone-to-stone contact surfaces with separating fluid.
7 Position the upper flask half and lock using the quick clamps (Fig. G). Mix conventional dental stone (Class III) according to the manufacturer’s instructions and flow into the opening of the flask using a vibrator. Wipe off excess stone flush with the flask so no stone protrudes from the flask opening. Prevent air from being trapped in the stone when pouring the upper flask half to ensure even heat transmission during polymerization.
8 Once the stone has thoroughly set, preheat the flask in a water bath at 90 °C (194 °F) for approximately 3-to-5-minutes (Fig. H). Then, open the flask and roughly remove the wax using a wax knife. Thoroughly boil out the inner surfaces with clean, boiling water. Use pure water without additives (e.g. wax solvent, cleaning agent) for boiling out. Additives may cause denture discoloration.
9 Allow the flask halves to cool to room temperature (<30 °C / 86 °F) before isolation. If the stone has dried out, the flask halves must be soaked in cold water for approximately 5 minutes before isolation. Remove stone residue from the flask edge and the isolation shoulder, as well as from the recess for the aeration filter. Isolate the clear surfaces of the stone model with two coats of separating fluid (Fig. I). Avoid pooling (e.g., in the gingivo-buccal fold). Allow the isolation layer to dry for 10 minutes after applying the second coat.
10 Insert the aeration filter flush into the corresponding recess in the flask (Fig. J).
11 Insert the IvoBase funnel into the centering insert until it stops. Place the centering insert with the inserted funnel in the lower flask half. Ensure that no stone residue is left in the injection area. Assemble the flask halves and lock using the quick clamps (Fig. K). Check again that the aeration filter has been correctly placed before closing the flasks.
12 The quantity contained in one capsule is sufficient for injecting a complete maxillary or mandibular denture. Remove the monomer container from the capsule and protective capsule lid, then open the screw-cap and pour the liquid of the monomer container into the open capsule. A short blast of compressed air between the monomer container and the capsule loosens the monomer container so it can be removed. Mix the monomer and polymer in the capsule to a homogeneous mixture using the spatula for approximately 20-to-30-seconds (Fig. L). Insufficient mixing may cause streaks in the denture base. The polymer must be entirely wetted with monomer.
13 Immediately slide the open capsule into the centering insert from below using slight pressure so the capsule is locked in place with the funnel. Don’t tilt the flask with the capsule before polymerization to prevent the capsule from spilling. The capsule must securely rest in the centering insert when the flask is lifted. Open the door of the Injector and slide the flask with the capsule into the polymerization chamber until it is locked in place via the flask holder. Close the door of the Injector (Fig. M).
14 Select the corresponding program and the “RMR” (Residual Monomer Reduction) function if desired (Fig. N). The initial residual monomer content (according to ISO 20795-1) can be reduced to below 1% by activating the “RMR” key. Press “Start.” At the end of the program, an acoustic signal sounds. Use the thermal glove to remove the hot flask from the injector by holding it by the isolation shoulder. The injector is ready for the next polymerization immediately after the flask is removed. The specific polymerization cycle begins with the dough phase and runs fully automated to injection and polymerization.
15 Cool the flask under cold running water for at least 15 minutes (Fig. 0). As an alternative, cooling may take place overnight in the injector. If the flask is not cooled and is opened at too high a temperature, inaccuracies of fit may result.
16 To facilitate deflasking, place the flask under a dental press or bar clamp to secure the divesting aid between stone and pressing plate. Slide a broad screw driver or plaster knife into the joint between the two flask halves and lever the upper flask half upwards. Remove the flask from the press/clamp, flip the flask over, and repeat the procedure. Remove the stone core with the capsule and separate the capsule at the sprue using a separating disk, bur, or saw. Divest the denture from the stone core as usual with stone tongs (Fig. P).
17 Gently remove flasking stone with an air chisel or plaster snips. The denture now can be finished with cross-cut tungsten carbide burs, sandpaper, pumice, and other polishing media normally used for other denture base materials (Fig. Q).
Conclusion
With the IvoBase System, the result is a precision denture base with high fracture toughness, low thermal shrinkage, and low residual monomer content.


