How to: Trim and Shape Bis-Acryl Provisional Restorations
May 2010 | Dental Products Report Clinical 360°: provisional technique The take-aways Strength and esthetics are the most important considerations when choosing a veneering material. The right material, good communication and the proper education are key to successful outcomes. How to: Trim and Shape Bis-Acryl Provisional Restorations With the right tools at hand you can cut down the time required to prepare provisional restorations.
May 2010 | Dental Products Report
Clinical 360°: provisional technique
The take-aways
- Strength and esthetics are the most important considerations when choosing a veneering material.
- The right material, good communication and the proper education are key to successful outcomes.
How to: Trim and Shape Bis-Acryl Provisional Restorations
With the right tools at hand you can cut down the time required to prepare provisional restorations.
by Dr. Thomas R. McDonald
Information provided by KOMET USA.
The ability to efficiently fabricate precise, esthetic provisional restorations can take a restorative practice to another level. For some clinicians, trimming and shaping provisional materials can be the most time-consuming step. A step-wise technique and the use of proper instruments can streamline this process.
It should be noted that a precise pre-operative matrix and strict adaptation could render a restoration that requires very little trimming; however, all provisional restorations, especially multiple teeth, require some trimming and shaping to establish proper gingival contours.
Technique and materials
In recent years, bis-acryl provisional materials have become quite versatile for many restorative applications. Modern bis-acryl materials have physical properties that provide direct application for the following:
Single or multiple teeth
Anterior or posterior restorations
Partial or full-coverage crowns
Esthetic reconstructions
Short- or long-term provisionalization
The most precise and efficient technique currently uses a pre-operative matrix of the unprepared teeth with a thermal-plastic material (single tooth) or silicone putty (multiple teeth). Restorations may be fabricated directly in the mouth or indirectly on a preparation cast.
KOMET USA recently introduced the Thomas R. McDonald, DMD Provisional System Kit. The kit contains five instruments (four tungsten carbide instruments and one honeycomb spiral reinforced diamond disc) and is designed for trimming bis-acryl provisional materials. The bur shapes and fluting designs are selected for ease of use, precision and efficiency.
Single-tooth trimming and shaping procedure
Following the fabrication and removal of the restoration with 3M ESPE’s Protemp™ Plus (3mespe.com) from the matrix, it is wiped liberally with alcohol gauze, removing the air-inhibited layer. Margins and the proximal contact areas are marked with a wax pencil (Fig. 1). Any voids in the restoration are repaired with flowable composite (Filtek™ Supreme Plus Flowable Restorative from 3M ESPE) before trimming.
A full-coverage or partial-coverage single-tooth restoration is trimmed and shaped with one bur. The fluting design and cross-cutting of H79GE.HP.070 makes this bur well suited for trimming bis-acryl materials without “chattering” and/or “grabbing” the material while rendering a smooth surface. All trimming should be done while viewing the restoration from the inside and straight down onto the margins. The H79GE.HP.070 bur is held parallel to the external surface of the tooth, creating a straight emergence profile.
Trimming begins at the distal-proximal line angle and is continued to the mesial-proximal line angle (Fig. 2).
The bur is reoriented, allowing for trimming below the contact area (Fig. 3).
Margin trimming is completed and the coronal aspect of the contact area is shaped to remove peripheral excess (Fig. 4).
With the H1.HP.023 round bur, occlusal anatomy is accentuated and internal surfaces are relieved (Fig. 5).
The use of this step-wise technique allows clinicians to trim a single-tooth restoration in less than one minute (Fig. 6).
Multiple teeth trimming and shaping procedure
Trimming multiple unit restorations can be a time-consuming experience. Clinicians can avoid inefficiency by orienting the restoration to allow trimming while viewing the margins and by trimming every accessible margin before repositioning the restoration.
Margins and proximal contacts are marked and the restoration is held by the proximal surfaces. From this orientation the entire lingual surface and margins are shaped with the H251ACR.060 bur (Fig. 7), allowing for precise margin shaping and an initial approach to the proximal embrasures.
The restoration is reoriented and the proximal margin (under the contact area) is trimmed carefully with the greatest convexity of the bur (Fig. 8).
Facial margins are trimmed in the same manner to render a restoration that only requires proximal embrasure contouring and shaping of the pontic space (Fig. 9).
There are many options in the realm of “all porcelain” restorative materials available to today’s cosmetic dentist. But when it comes to veneers, where esthetics are paramount, some of these materials are best left to posterior applications.
At a glance

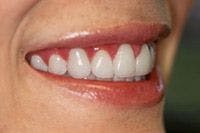
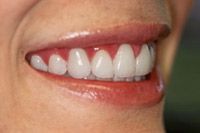
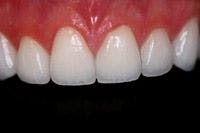

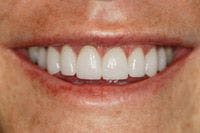


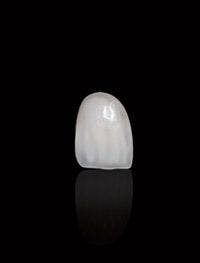
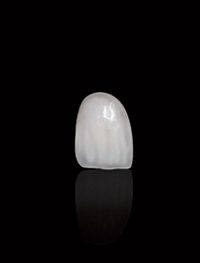

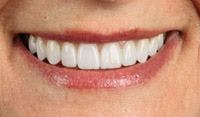

FIGS. 1-5 Side view of a leucite-reinforced IPS Empress (Ivoclar Vivadent) veneer case. Dentistry by Dr. Kalfas and lab work by Quint Whipple of Phoenician Dental Studios (Fig. 1). A close-up view of a leucite-reinforced Empress veneer case. Dentistry by Dr. Kalfas and lab work by Quint Whipple of Phoenician Dental Studios (Fig. 2). A front view of a leucite-reinforced Empress veneer case. Dentistry by Dr. Kalfas and lab work by Micro Dental Lab (Fig. 3). A lithium disilicate veneer (IPS e.max) from Ivoclar Vivadent (Fig. 4). A full smile view of an IPS e.max veneer case. Dentistry by Dr. Frankie Shull and lab work by Matt Roberts (Fig. 5).


Click here for a slideshow with larger images of Figs. 1-5.
In your veneer cases, strength is important, yet esthetic outcomes are the highest priority. Your goal is to achieve both. But with all the available options, it can be difficult to determine which veneer material will best meet this goal. This article will give you an overview of what’s available, making it easier for you to determine what works best for your patients and your practice.
It should look natural
When discussing esthetic properties, our goal with veneers is to mimic, as closely as possible, the properties found in natural enamel. Translucency tops the list of the most important esthetic properties. This quality separates the life-like veneer from the life-less PFM. The flow of light through the enamel layer and into the dentin truly defines vitality in the restoration. Blocking the light, even when a restoration is beautifully finished, is almost always apparent at the margin. The subsequent “dark root,” even though it may be subgingival, can be evident.
For that reason, I will eliminate opaque “all porcelain” cores, such as zirconia and alumina, from this discussion. And because I want to discuss veneers crafted by skilled technicians, I also will not include “no-prep” Cerinate veneers, whose chemistry is guarded and the work outsourced. This brings us to three choices worthy of examination: feldspathic (stacked) porcelain, leucite-reinforced porcelain and lithium disilicate.
What to consider first
Before discussing material options, we are pressed to identify the qualities important to our veneer goals. In veneering a tooth, we are replacing enamel, that layer of hard, translucent, shaded hydroxyapatite covering the dentin. We therefore need to consider strength, translucency and color management. Proper adhesive bonding of porcelain to dentin dramatically increases the restoration’s strength. However, while we have achieved fabulous esthetic results for years at the hands of highly skilled technicians, advances in technology are occurring mainly in the area of flexural strength.
CONTINUED ON NEXT PAGE
{NEW_PAGE}
Option No. 1: Feldspathic porcelain
For best results…
There can’t be enough emphasis placed on the importance of working with a knowledgeable, skilled and artistic laboratory technician in obtaining optimal results with veneers. The lab technicians need to know their systems, and you need to know your lab. Communication is crucial to success, both with the lab and with your patient.
Feldspathic porcelain has long set the standard for esthetics in dental restoratives. Feldspathic veneers are hand-crafted, meaning the esthetics are dependant entirely on the technician’s artistic skill. Powders of numerous shades and translucencies are brush-applied using either the refractory model or platinum foil techniques. Layering various opacities provides depth and the subsequent distinction of the dentin and enamel layers found in natural teeth.
The draw-back with feldspathic porcelain is two-fold. First is the lack of flexural strength. Although at 90 MPa it is stronger than enamel (50 MPa), it does not compare favorably with newer materials. The percentage of crystalline structure is an important factor in determining the strength of porcelains. The higher the crystalline structure, the more resilient to crack propagation the material will be. At only 20%, feldspathic porcelain is considerably weak, particularly at the thin marginal edges. The second drawback to feldspathic is its high fusing temperature. Subsequent firings of the finished restoration, to add stain or a contact for instance, almost certainly result in fracture.
Option No. 2: Leucite-reinforced ceramics
In the early 1990s we were introduced to leucite-reinforced ceramics. With a higher percentage of crystals (40%), the flexural strength nearly doubles to 140 MPa. The configuration of the leucite crystals inhibits crack propagation. This material comes in several forms: powders, blocks for pressing, and blanks for milling (CAD/CAM). The pressed technique uses the lost wax technique. The restoration is waxed, invested and burnt-out as with cast metal. However, the material, in the form of an ingot, is then melted and pressed into the void with a special plunger at pressure in a pressing furnace.
What you should look for
Remember you are replacing enamel when you are veneering a tooth. Here’s what you need to consider when determining the best veneering material for your patients?
- Strength
- Translucency
- Color management
There are many ingot choices, with varying shades and translucency levels. The ingots are monochromatic, however, so characterization is added through cut-backs and layering and firing with powdered leucite-reinforced porcelain. While some prefer milled cores, the pressing procedure creates a slightly stronger restoration, eliminating porosity and inconsistencies.
Option No. 3: Lithium disilicate porcelain
The final material is lithium disilicate porcelain. Similar to the leucite-reinforced material, this may be pressed or milled. This ceramic’s crystals are needle-like, so when they are compressed they line up very tightly. This results in a much stronger restoration. The flexural strength is in the 360-400 MPa range, with a 70% crystalline structure composition. Again, the tight crystal alignment makes the material resilient to crack propagation, and the material’s edge-strength is extremely high. The material remains stable even after several firings, which means adding contacts or staining is not an issue.
As with the leucite material, the lithium disilicate ingots and blanks come in a full range of shades and opacities. Esthetic core cut-backs and layering also can be done with this material, and here a powdered fluorapatite ceramic is used.
The importance of ingots
How strong is your veneer material?
Here’s a breakdown of each material’s flexural strength and crystalline structure:
Feldspathic porcelain
Flexural strength: 90 MPa
Crystalline structure: 20%
Leucite-reinforced ceramics
Flexural strength: 140 MPa
Crystalline structure: 40%
Lithium disilicate
Flexural strength: 360-400 MPa
Crystalline structure: 70%
The ingot options are an important feature in the pressed and milled materials. Again, we are trying to replace enamel and allow light to flow into the dentin and through the tooth. While a translucent shade may seem optimal, sometimes the more translucent shades inherently have a lower value. And of course there are times when we need more opacity to block a darker underlying dentin shade, whether it’s a result of tetracycline staining, a dark endodontically-treated tooth, or, as we see more and more, patients requesting “super” white bleach shades. In this case, more opaque cores not only block underlying tooth color, but offer a higher value. In any case, lab communication is very important, and it is especially important to communicate the “stump shade” of the tooth you’re restoring.
Getting there
With today’s materials there is no reason we cannot meet our patients’ esthetic desires and our own requirements for longevity in our restorations. Education is key to making this happen. There are excellent continuing education opportunities available for today’s dentist to learn more about cosmetic dentistry. Dental schools typically do not focus on this highly demanded area, making post-graduate courses a must. Proper knowledge of the materials and techniques, and selecting a skilled laboratory technician, are vital to successful veneer cases. And with the advances in material technology, success is that much more attainable.
Dr. Lisa Kalfas is a 1987 graduate of the University of Colorado School of Dentistry and has completed several post-doctoral programs in cosmetic dentistry at the Las Vegas Institute for Advanced Dental Studies. She joined the faculty in 1999 and teaches post-doctoral courses in cosmetic and advanced dentistry. Dr. Kalfas has practiced in Boulder, Colo. since 1989 and is a member of several dental associations.
RELATED slideshow
- Click here for slideshow of products that can help you achieve veneer success.


