How to: How a tablet computer can help with esthetics
Lorena Lighthart, product manager at Whip Mix, explains how the MaxAlign App can improve esthetic results and workflow through digital photography and a tablet computer.
According to research, people speak on average 16,000 words per day. Yet among all those words, all too often important details are left uncommunicated. Fortunately, some of these details can be shared through photography.


It has been said that approximately 80 percent of restorative cases are being sent to the lab without any type of patient photography. Also often missing are bite records and facebow registration records. Without this information, the lab technician may be left to guess the best place to mount models on an articulator.
Cover story: Understanding the latest breakthroughs in dental technology
There are three results that can happen if one guesses where to mount the models:
- the lab tech was really good at guessing and the restoration created on the model fits well
- the dentist will need to use valuable chairtime to adjust the restoration in the mouth
- the restoration will be sent back to the lab to be reworked, causing the dentist and patient both to reschedule their time
Technique: How going digital can revolutionize dental esthetics
In 2015, Whip Mix introduced new technology into the dental market to help make it easier to capture some of this patient information. The new product is an app called MaxAlign, which uses photography taken on a tablet to capture vital patient landmarks that show the relationship between the upper teeth and the patient’s head. This photo with landmarks can then be sent to the laboratory for mounting models on most Denar, Hanau and Whip Mix articulators.
Head to the next page to learn about this helpful procedure ...


Max in the dental office
Max can be used in the practice for many cases, including esthetic, edentulous and three-plus unit restorations. Max, through photography, will capture the patient’s facial midline, horizontal cant and anterior/posterior angle.
Procedure
Set the tablet parallel to and about 8-10 inches away from the patient’s face. It is recommended that the patient use retractors to give you the most accurate view of the teeth.


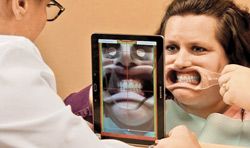
Fig. 01 Taking the photograph of the patient.
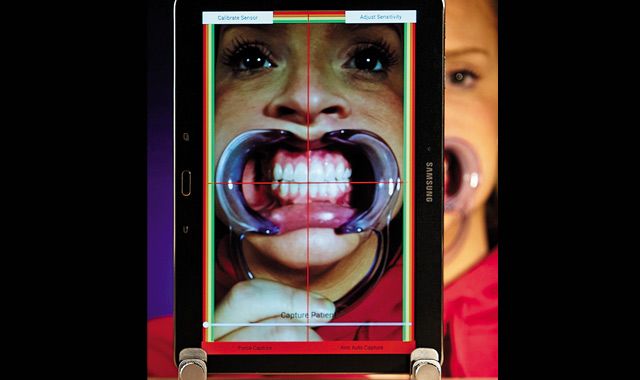
Fig. 01 Taking the photograph of the patient.
Next, line up the patient’s facial midline with the vertical red line, and the horizontal edge of the centrals with the red horizontal line. Click “Arm Auto Capture” to take the photo (Fig. 1). There will be a two-second delay before the picture is taken.

Fig. 02 Properly measuring the image.
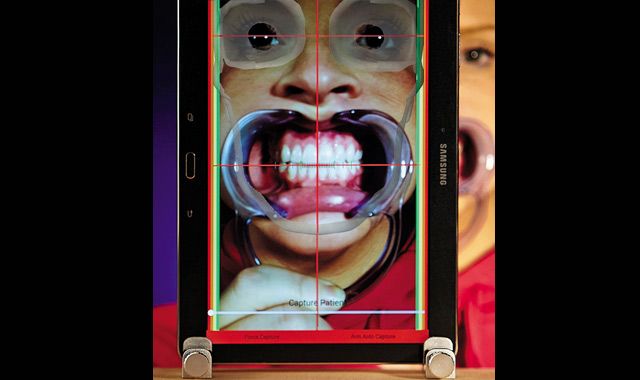
Fig. 02 Properly measuring the image.
To complete the next step, measure the width of the patient’s central in millimeters. This measurement will be used to size the photo that you have taken (Fig. 2).
Step-by-step: Creating surgical guides with the digital workflow
Increase or decrease the size of the photo until the patient’s centrals fit inside the skeleton of the teeth. Press “OK” to save the photo. This step will ensure that the focal point of the camera gives the lab a correct 1:1 ratio from the tablet to the mounting stand.


Fig. 03 Determining the first point of contact and the width of the centrals.
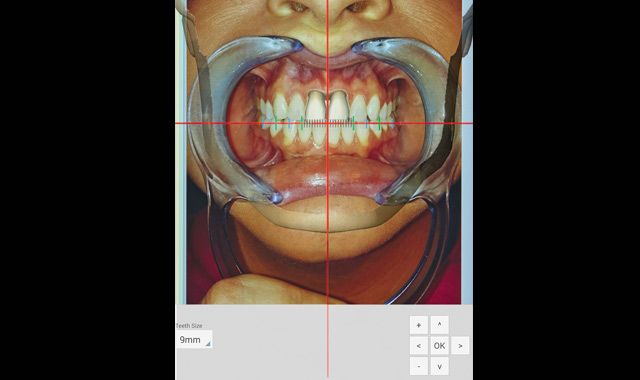
Fig. 03 Determining the first point of contact and the width of the centrals.
If mounting the models in centric relation, determine the patient’s first point of contact. Document this on page three (Fig. 3). The lab will then be able to confirm this contact on the models when they are both mounted. Otherwise, leave blank, and save.
With these three easy steps, photography and records establishing the relationship between the upper teeth and patient’s head have been captured and saved to be used in mounting the models as well as for patient documentation.
Max in the lab
Having this information in the lab will help ensure that the model is not mounted incorrectly causing the final restorations to be canted, or the midline be off, or both.

Fig. 04 A mounted case that looks right, but isn't.
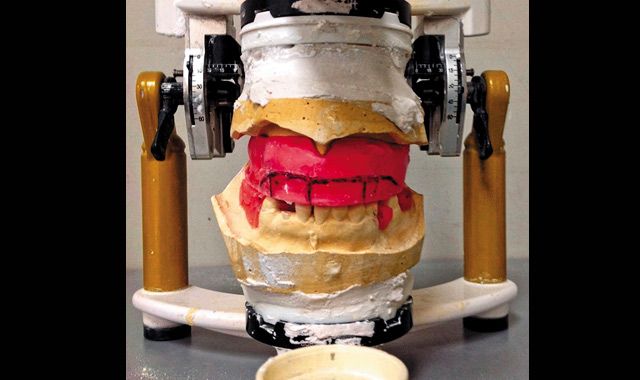
Fig. 04 A mounted case that looks right, but isn't.
This case was mounted from impressions without any photography or records. With the information available, the mounting looks accurate (Fig. 4).
In reality, both the facial midline and mandibular midline are off center. The actual patient’s facial midline is the black line to the left of the frenulum in the pink, and the mandibular midline is between the second and third teeth starting from the left. Imagine how a restoration made from this mounting would fit.
Lab set up
The dental lab will use the tablet attached to a labstand that should sit on a stable counter that is high enough so the lab technician can sit directly in front of the tablet. The labstand can be attached to the counter if desired for additional stability. The lab technician will look through the image on the tablet, and putting both arms around the tablet, adjust the model on the occlusal stand behind the tablet.
Procedure

Fig. 05 Using MaxAlign in the lab with a stand.
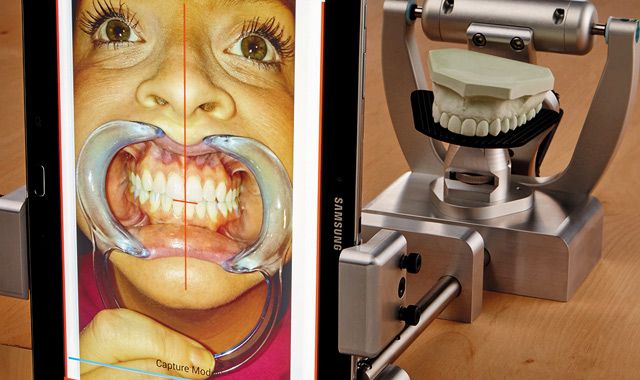
Fig. 05 Using MaxAlign in the lab with a stand.
The lab will use Max in conjunction with a labstand for mounting the maxillary model (Fig. 5). While looking through the photo of the patient, the model on the lab stand will also be visible. By moving the blue capture bar from one side to the other, the transparency of both images can be increased or decreased.
The lab technician will tilt the stand so that the model on the stand is in the exact same position as the teeth are positioned in the photo.

Fig. 06 The lab uses a model for verifications via the MaxAlign.
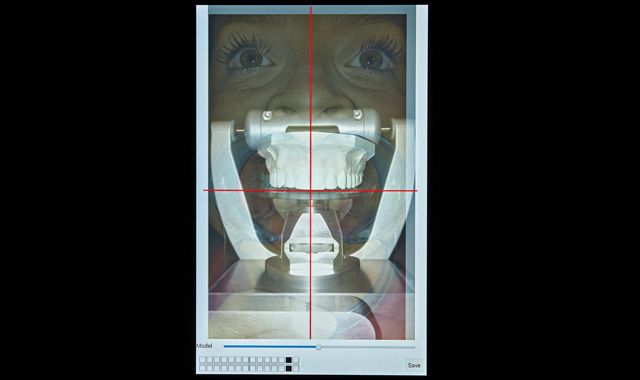
Fig. 06 The lab uses a model for verifications via the MaxAlign.
Once the model is positioned correctly on the stand, the lab technician will take a photo of the model for verifications (Fig. 6). Both the photo of the patient and the photo of the model can then be enlarged to ensure the mounting is accurate.
Conclusion
The photography and records captured by Max take minutes to do, and may save a great deal of time and stress later if the restoration needs to be reworked.
Q&A: The reality of technology in the modern workflow
Max is an easy and fun communication tool for both the dentist and the lab to share the needs of the patient, and to document the patient’s case. This information, when received, helps everyone produce great looking and fitting results. Save a thousand words each day with every picture taken by Max.