Technique Touch-Ups
Experts from across the industry share their favorite tips, tricks, and solutions to make dental care better for patients and easier for you. [ complied by Noah Levine ]


Tip: Make Accessing Your Practice Convenient


From: Ryan Hungate, DDS, orthodontist and founder of Simplifeye
Before I became a dentist, I worked for Apple and helped design the in-store customer workflow that is still used today. I apply the same philosophy of moving people efficiently to the dental practice workflow.
Tip #1: Make it easy for patients to schedule with you. Nobody wants to pick up the phone anymore. Plus, a lot of people are online looking for a dentist at night and on weekends when your office is probably closed. The solution is to add a 24/7 live chat to your website. Simplifeye’s chat team can schedule directly into most practice management systems or forward the information to the practice to finalize the appointment details.
Another way to make scheduling easy: Add a direct scheduling button to your website and your listings on Google, Yelp, and Facebook. Only use a vendor such as Simplifeye that gives you full control over your schedule. That way, patients can only self-schedule for the times and services you allow.
Tip #2: Make it easy for patients to pay you. If you’re still asking patients to go to the front desk to pay, get a wireless card-processing terminal, such as Simplifeye’s, so you can take their payment and print out their receipt while they’re in the chair or consultation room. Simplifeye’s payments product also allows you to run soft credit checks, set up automated monthly payment plans, and send text-to-pay invoices, which typically get paid up to 80% faster than paper invoices. By making it easy for patients to pay, you’re making it easy for them to say “Yes” to the treatment they need.
Tip: Soft-Tissue Control for Crown and Bridge Impressions


From: Taylor Manalili, DDS
The main objectives for achieving better soft-tissue control on crown and bridge cases include minimizing damage, optimizing visualization of the preparation, and maintaining soft-tissue health long term. With these goals in mind, clinicians can develop a predictable technique that can be implemented time and time again.
During tooth preparation, mechanical displacement of the soft tissue and adequate tooth reduction will help maintain soft-tissue health. To mechanically displace the tissue, place cord or utilize an instrument such as a gingival protector shield. In esthetic zones, the use of a 000-size cord can vertically displace the gingival margin approximately 0.5 mm subgingival without damaging the tissue. Instruments such as a gingival protector shield can be used as an alternative to cord or as an addition and can be placed into the sulcus to act as a shield between the tissue and the bur. Proper preparation reduction will allow the creation of a correctly contoured provisional and definitive restoration, which will promote the maintenance of the soft tissue. For adequate reduction, understand the minimal preparation requirements of the restorative material (Figure 1).
The final impression should capture 0.5 mm to 1 mm of tooth structure apical to the prepared margin. When using a retraction cord, the double cord technique is most effective. The first cord, typically 000 or 00, is placed at the base of the sulcus. This cord stays in place during the impression, allowing for the vertical retraction of the tissue and acting as a Band-Aid to limit sulcular fluid. The second cord is placed on top of the first and is usually a size 1 or 2. This serves as horizontal retraction of the tissue and is removed during the impression. If used with epinephrine, the top cord should stay in place for only 3 to 8 minutes. Placement of the cord should be along the long axis of the tooth with a gentle rolling motion; be sure to avoid excessive force, which will help prevent damage to the capillaries or undesirable postimpression recession (Figure 2).
After the final impression, it is important to work on maintaining soft-tissue health long term through provisionalization and definitive material selection. Provisional restorations help maintain the position of the prepared tooth. A well-contoured and polished provisional will aid in the management of the tissue so that it remains healthy, with no inflammation throughout the provisional phase. The provisional is designed to be a template for the final restoration. Selecting a definitive material such as BruxZir® Esthetic from Glidewell Dental will provide the strength, natural beauty, and great soft-tissue response desired. BruxZir Esthetic exhibits an average flexural strength of 870 MPa, an increase of 74% over lithium disilicate. It exhibits high-color translucency in the warm-color wavelength, which offers more lifelike restorations for patients. The soft-tissue response to zirconia restorations is comparable to the soft tissue around natural teeth, providing long-term gingival health (Figure 3).
Tip: Provisionalizing the Worn Dentition Tip


From: Todd C. Snyder, DDS, FAACD, FIADFE, ASDA, ABAD
For years I have been implementing a technique I created where I can provisionalize teeth with little to no cleanup or bite adjustment. I call it a “bead line provisional technique.” It is an overimpression of a diagnostic model; a small 0.5-mm to 1-mm groove has been cut into the model along the facial and lingual margins where the restorations will end to make a pressure-point line that separates the excess material from the final provisional restorations on the teeth. This process reduces or eliminates any excess material cleanup or bite adjustments. I use this technique to fabricate provisionals for my cosmetic and large restorative cases.
Over the years, the technique has changed only slightly to make it even more predictable and accurate so that no excess needs cleaned up. Recently, 1 addition to the technique has been to address the extremely worn or damaged dentition because we need higher-strength material properties if someone is still having parafunctional wear issues. I have been implementing LuxaCrown provisional material from DMG America and have not seen any failures. It is said to be approximately 30% stronger and has been created for higher strength and long-term durability of up to 5 years.
Comprehensive strength of DMG America’s Luxatemp Ultra is 220 MPa and significantly higher at 333 MPa for LuxaCrown. If you look at the flexural strength of Luxatemp Ultra at 127 MPa compared to LuxaCrown at 154 MPa, again you can see a substantial increase in physical properties. The material looks incredible and has increased strength properties for when you have a case that is big or small that demands higher physical strength properties out of a provisional material—whether it be for short-term use or many months or years. The technique along with these materials can make provisionalizing cases easy and predictable.
An article I put together outlining this technique in more detail, as well as my first case putting it to use, can be found here: bit.ly/BeadlineProvisionals
Tip: A Composite Engineered With Warming in Mind


From: Mark Geissberger, DDS
Adaptation of composite resin material to the internal surfaces of a cavity preparation has been a challenge since the inception of its use as a restorative material. Material formulations have changed to enhance their wear resistance and decrease their overall volumetric shrinkage, but those changes have produced materials that are quite thixotropic and difficult to adapt to a cavity preparation. To overcome this challenge, many clinicians turn to composite warming technology to decrease the viscosity of their chosen materials, making them easier to adapt to the internal surface of a cavity preparation. Several studies have demonstrated the handling improvements that occur with warming composite,1,2 and additionally, warmed composites have been shown to have greater monomer conversion compared with their room temperature counterparts.3
Other strategies have been utilized to aid with material adaptation. One such strategy is the use of a flowable composite resin. Although this will improve adaptability to the cavity surface, this technique has 2 significant limitations. The first is shrinkage. In general, flowable composites shrink considerably more than their highly filled counterparts. The second is a lack of ability to sculpt. Flowables do not allow the clinician any ability to sculpt and create anatomy prior to curing; rather, they tend to level or flatten once placed.
The ideal composite would behave like a flowable and adapt effortlessly to the cavity preparation when initially placed. The material would then change to a much more rigid consistency that could be easily sculpted and shaped to create proper tooth contours and morphology. VOCO has created this material with VisCalor bulk, designed to be used with a composite warmer or custom dispenser. Even though other materials have been validated for use in a composite warmer, VisCalor bulk is the first material to be engineered for use in a composite warmer or warming dispenser exclusively. When warmed, the material behaves just like a flowable composite. After the initial placement and adaptation, VisCalor bulk returns to a sculptable state that holds its form beautifully, allowing the clinician to create lifelike contours.
The technique for restoring operative preparations with VisCalor bulk can be divided into 4 simple steps.
1) Warm VisCalor bulk in the VOCO composite caps warmer or dispenser to 155 ºF.
2) Place the material into the cavity preparation in its warmed state for easy adaptation.
3) In seconds, the material returns to its packable state; immediately sculpt the anatomy.
4) Light cure the VisCalor bulk for 10 seconds for Universal shade, 20 seconds for A1, A2, and A3 shades.
Clinical Case: This demonstrates the technique for placing VisCalor bulk composite. Figure 1 demonstrates the placement of the warmed composite resin directly into the cavity preparation. The material will behave like a flowable composite in this warmed state and aid in the easy adaptation to the cavity walls. Figure 2 shows the sculpting of the material after initial placement and adaptation. During this phase of the treatment, the material can be easily sculpted and shaped with no risk of slumping or loss of anatomy. Figure 3 shows the cured and polished restoration.
References
- Bausch JR, de Lange C, Davidson CL. The influence of temperature on some physical properties of dental composites. J Oral Rehabil. 1981;8(4): 309-317. doi:10.1111/j.1365-2842.1981.tb00505.x
- Castro FL, Pazinatto FB, de Lima É, Cesar PF, Reges RV. The effect of preheating and opacity on the sorption and solubility of a composite resin. Gen Dent. 2016;64(4):57-61.
- El-Korashy DI. Post-gel shrinkage strain and degree of conversion of preheated resin composite cured using different regimens. Oper Dent. 2010;35(2):172-179. doi:10.2341/09-072-L
Tip: Simplicity and Utility in a Single Shade Composite


From: Peter Auster, DMD
I am a huge supporter of single-shade composites. I was an early adapter of OMNICHROMA from Tokuyama Dental America, and it is simply a miraculous material. I use it for a huge amount of my Class I and Class II restorations and all Class V and Class III restorations. They have never looked this good. Equally as important, there is less cost/less waste than having to buy and watch dozens of shades of composite expire. There is also less cross contamination because multiple shades don’t sit on the countertop; only 1 does.
My preferences now: OMNICHROMA Flow under OMNICHROMA or OMNICHROMA Blocker Flow under OMNICHROMA.
The best unkept secret: No other materials cover a screw hole or post hole the way OMNICHROMA does (Figure 1). If done correctly, not only is there no screw hole showing, but the gray that shows when any other product is used does not show. It’s as if there were never a hole there (Figure 2). I use porcelain etch, Monobond Plus, and Tokuyama Universal Bond; then I add plumber’s tape in 1- to 2-in amounts, leaving 4 mm of space. I fill 1 mm with blocker and then the next 3 mm with OMNICHROMA. It’s as simple as that.
Tip: Teamwork For Efficient Porcelain Cementation


From: Devin McClintock, DDS
When it comes to all dental procedures, reliability and efficiency are key. Reliability comes with establishing protocols based on research and science. Efficiency comes with developing those protocols with your team. This is especially true when bonding ceramic restorations; specifically, lithium disilicate, feldspathic, and leucite-reinforced restorations.
Ensuring optimal bond with cementation of porcelain restorations can be both reliable and efficient—and centers around teamwork. The assistant’s roll is critical in achieving success. Included below are steps to optimize the in-operatory efficiency specifically for lithium disilicate, feldspathic, and leucite-reinforced restorations. Protocols for cementation of other restorations such as zirconia, porcelain fused to zirconia (or PFZ), and metal ceramic, though similar, require different steps unique to the material being cemented.
Step 1. Remove the provisional restoration, and ensure the fit of the final restoration. Make any adjustments to the restoration as needed.
Step 2. Once the fit is confirmed, start the cementation protocol.
Step 3. Apply porcelain etch (9.5% hydrofluoric acid) to the intaglio surface of the crown (Figure 1). While you’re applying the etch, the assistant is preparing the silane. After 15 seconds (for lithium disilicate) or 60 seconds (for feldspathic or leucite reinforced), rinse out the etch with copious water and air dry. The surface should appear chalky (Figure 2).
Step 4.Apply a thin layer of silane to the intaglio surface of the crown. Then place the crown under a piece of gauze or in a dark box to keep it out of the light.
Step 5.Prepare the tooth for cementation under rubber dam isolation.
Step 6.Clean the surface with microabrasion (Figure 3). Etch the tooth for 15 seconds (35% phosphoric acid with benzalkonium chloride; Figure 4). While etching the tooth, the assistant dispenses BISCO’s All-Bond Universal® in the dish and covers. Rinse with copious water for 5 seconds and blot dry with cotton. Be careful not to overdry the tooth.
Step 7.Scrub All-Bond Universal onto the prepped tooth in two 20-second intervals (Figure 5). The assistant holds out extra bond near the site for easy reapplication. Air thin only after the second coat for 10 seconds. Light cure for another 10 seconds (Figure 6).
Step 8.As you’re curing the bond, the assistant loads the crown with the Dual-Link Universal™ cement from BISCO and holds out the crown ready for placement as soon as the light shuts off.
Step 9.Place the crown (Figure 7), and tack cure the cement for 5 seconds on facial and lingual. Remove the cement with an explorer, and floss through both contacts.
Step 10.Set atimer for 5 minutes, and allow the cement to fully polymerize. Take off the rubber dam, and finalize the occlusion and polish (Figure 8).
Speed and efficiency are important in dentistry. However, speed at the cost of quality is never acceptable. Know your materials inside and out. Understand the science. Understand the materials of the restorations. Set your protocols, unique to the restorative material being used, and review and revise them frequently. Bring team members into the conversation on how to make improvements. Develop systems that expedite the work without compromising the integrity of your procedures. Dentistry is a team sport—and when done successfully, everyone wins.
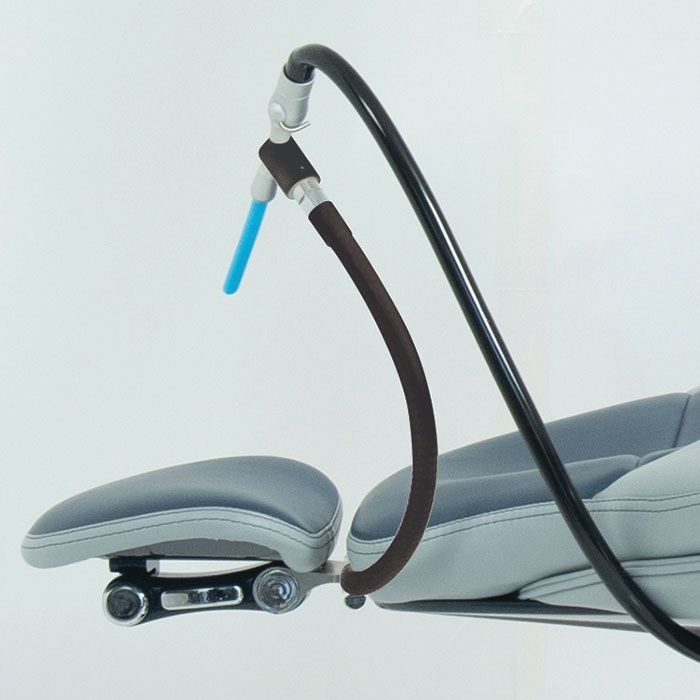
Tip: HVE Without an Extra Set of Hands

From: Peter Certo, DMD


Due to the COVID-19 pandemic, we dentists must do our part to lessen the spread of this disease. Arguably, aerosol mitigation tops the list of safety measures protecting our patients and staff.
There are numerous aerosol-mitigating devices available, but none integrate into our existing armamentarium as easily as the DENTALEZ Hands-Free HVE holder. It installs as easy as sliding the bracket onto the neck of our chair’s head rest and switching out the HVE valve assembly. Simply snap the HVE valve into the Hands-Free HVE holder, and it is like having your chairside assistant there.
Having these in every operatory frees up my assistant for other work, as well as dramatically reducing aerosols in my practice. There are several large intraoral mobile systems that cost thousands of dollars and weigh up to 60 pounds, and sometimes more. My recommendation is to go with a less intrusive, less expensive option in the DENTALEZ Hands-Free HVE to help with aerosol mitigation in your offices.
Tip: Easier Prophies With a Cordless Handpiece


From: Allison Moye, RDH


I’ve been working as a hygienist for 9½ years, and I’ve always been so used to regular corded prophy angles. The iStar prophy is the first cordless one that I’ve had a chance to try.
I love how easy the cordless prophy is to use and maneuver around the patient’s mouth. I found myself moving faster and easier without fighting a cord the whole time. I love how lightweight the cordless prophy is, and it’s easy to hold. I find myself still looking for a pedal on the floor just out of habit, but the on and off switch is easy to use as you work around the mouth.
I really love this iStar cordless prophy, and my patients have commented that it feels more comfortable and there is less splatter for them too. I definitely recommend the iStar cordless prophy from DENTALEZ. It makes my job so much faster and easier, and any hygienist would love to have this.
Tip: A Build-up Material That Fits the Bill


From: Ron Kaminer, DDS
When doing a core buildup, I’m very impressed lately by the results I’m getting using a phenomenal material from GC America called everX Flow™. It’s a fiber-reinforced dentin replacement, and the material—when put into the tooth—places like no other material ever.
In this case, my patient has a fractured tooth requiring removal of a large amalgam (Figure 1). I’m going to do a buildup using everX Flow. The material kind of flows but sits. This fiber-reinforced material is extremely strong, so when I cut on it, it cuts just like tooth structure. It’s really an incredible material. I don’t always get overwhelmed with a dentin replacement/core buildup, but this really fits the bill.
After removing the amalgam, I’m going to selective etch the enamel with some Ultra-Etch™ from Ultradent Products (Figure 2). Then I’m going to wait approximately 10 seconds and rinse off thoroughly.
Then I apply G-Premio Bond™, which is GC America’s universal adhesive. The trick with these universals is I not only need to put multiple layers but also need to really scrub it into the dentin (Figure 3). By scrubbing into the dentin, I’m activating that material into the tubules and making sure I get a complete adhesive process. After doing this for approximately 20 seconds, lightly air-dry. I’m going to start farther away just to blow off the monomer and then get closer and air dry. When I air-dry, I should see a shiny tooth that tells me the adhesive is in place (Figure 4).
Then I’m going to take my VALO™ Grand curing light from Ultradent and light cure this, making sure I rotate the angle so I’m curing all sides.
Now I’m going to use the everX Flow. I say it kind of flows like Vaseline, but it’s a moldable, flowable material that I can literally massage or mold onto the side of the tooth. I can manipulate it. I can place it where I want it (Figure 5).
Then in a couple of increments, I’m going to fill the entire tooth. But the beautiful thing with this dentin replacement material is that it flows magnificently, and once placed, it just sits there (Figure 6).
Now I take my plastic instrument, and I can manipulate the material any way I want, making sure my gingival margin is totally sealed, maneuvering around the buccal. I can literally move it wherever I want to move it (Figure 7).
After curing, I prep it back and adjust it (Figure 8). This material will prep just like tooth structure. That’s the beauty of this material. There are no nooks and no stepping. It’ll just prep off really easily.
I would encourage you to incorporate this new product into practice. For a video of this technique, visit bit.ly/KaminerBuildup.
Tip: A Tube With the Right Tools


From: Howard Golan, DDS
This innovative Surgical Tube from Ditron Dental is a handy new addition for implant surgery. Many times in the operatory, we don’t need the entire surgical kit that contains all the drills for every implant diameter and length, multiple drivers, and various ancillary parts. This new Surgical Tube is an abbreviated kit that is perfect for single unit cases or as a second kit if you have back-to-back surgeries with minimal implants.


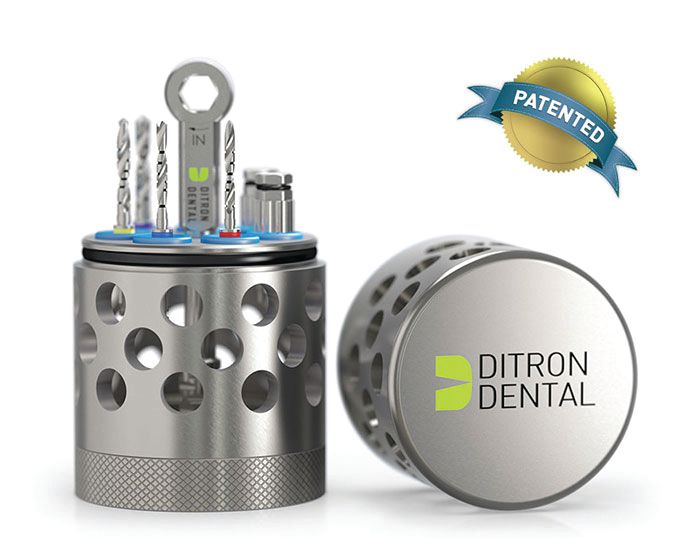
The kit has all your basics; marking drill, twist drills from 2 mm to 3.8 mm diameters, implant driver, ratchet, 1.25 mm driver, and it has a removable bottom that can be used as a dappen dish to place used drills and components during your implant procedures. Having only the drills and instrumentation you need saves time during both surgery and clean up, making your practice more efficient. No needless cleaning and autoclaving of the whole kit, which saves staff time and eliminates unnecessary steps while also prolonging the life of the unused drills.
The new kit has been a welcome addition to my implant protocols and procedures in the office. I recommend that you check them out.
Tip: Think Pink When It’s Time to Opaque

From: Marcos Vargas, DDS
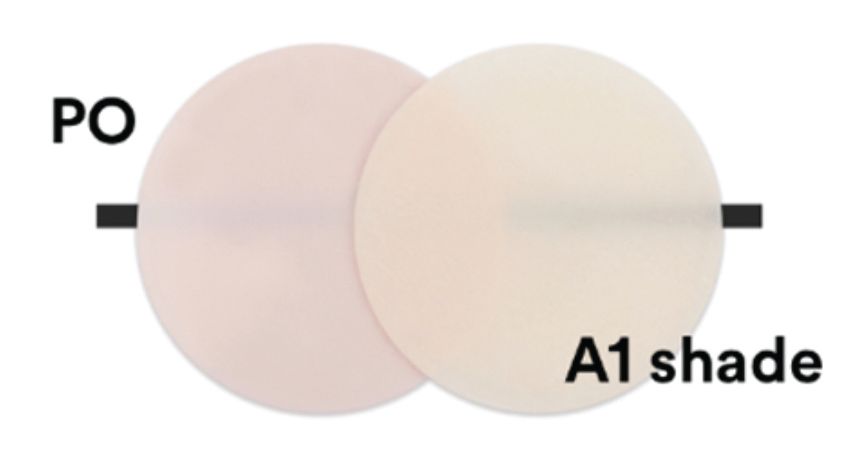
Opaquers are a great addition to any dentist’s armamentarium. They act by blocking the undesirable appearance of dark materials and tooth discolorations, allowing the creation of lifelike direct restorations. Both pink and white opaquers block dark substrates and increase value, but only pink opaquers impart warmness and thus require less or no need for stain to increase chroma.
I like to use pink opaquer to mask a variety of discolorations: amalgam dentin discolorations (commonly called amalgam tattoos), dark dentin in abfraction lesions, metal when repairing an anterior porcelain fused to metal (PFM) crown, and while doing a resin veneer on an anterior tooth while masking an underlying discoloration. Pink opaquer can be used under both conventional and bulk fill materials. Another consideration is that darkness under resin restorations can be confused with recurrent decay or a sign of failure; application of these opaquers can minimize this occurrence.
I have welcomed the addition of conventional viscosity opaquers such as 3M™ Filtek™ Universal Restorative Pink Opaquer to my armamentarium. Pink opaquers are available in conventional viscosity and flowable form. I find the conventional viscosity form helps facilitate placement compared with its flowable counterpart. This conventional viscosity material does not slump, and it is not sticky, which allows ease of placement with conventional instruments.


A 1-mm-thick layer of opaquer should be used to block the darkest of materials such as amalgam or when repairing a PFM crown. Less dark discolorations require thinner increments. An advantage of the conventional viscosity pink opaquer is the ability to control the thickness more easily compared with multiple layers with flowable materials.
In addition to considering the thickness requirement to mask darkness, it is important to remember the space requirement for the overlaying restorative material. One must provide enough room in the preparation for both materials. In my experience, at least 1 mm of room is also required for the final overlaying material, such as in the case of Filtek Universal Restorative.
Light polymerization of opaque materials is also important to consider. Opaque materials block light and therefore require longer exposure to the curing light to ensure adequate polymerization. A 1-mm-thick layer of 3M Filtek Universal Pink Opaquer requires at least 20 seconds for output 1000+ mW/cm2 and 40 seconds for output of 550 to 1000 mW/cm2 of light curing.
In summary, I highly recommend you have a pink opaquer in your practice. There are many esthetic applications of this material, and practice will provide your definitive guide for their use. Eventually your satisfaction will increase as you conquer the use of these materials.
Do you have tips or best practices you’d like to share with your colleagues?
Send us your best practices in a short article, step-by-step list, or even a video—we plan to continue publishing Technique Touch-ups online at dentalproductsreport.com as well as in future issues of Dental Products Report®. Send your Technique Touch-ups to: nlevine@mjhlifesciences.com.