Technique: How to create simple direct resin restorations
Dr. Gregori M. Kurtzman, DDS, MAGD, shows how to use products from Tokuyama Dental America, Inc., to create esthetic, simple direct restorations.
Direct resin restorations have changed drastically since I graduated dental school 30 years ago. Adhesives no longer require acid etching of the dentin and enamel to achieve a bond. Self-etch adhesives were a step forward and advanced to achieve comparable bond strengths to dentin that were being reported with total-etch adhesives. Yet, enamel still required some treatment (acid etching or mechanical) to get a predictable bond to this surface with the self-etch adhesives. The next step forward, selective-etch allows the practitioner to decide when and where to etch depending on the clinical situation.
Bond Force® (Tokuyama Dental America, Encinitas, California) a seventh generation self-etch adhesive single component, fluoride releasing bonding agent provides an extremely strong bond to enamel and dentin with a patented SR (Self Reinforcing) monomer.1 This SR monomer cross-links to apatite and calcium ions on the tooth surface forming a strong bonding layer when light cured. Requiring only a single application, it can be used on both cut/uncut enamel and dentin, allowing a selective-etch approach. Fluoride releasing by the adhesive modifies adjacent dentin, resulting in secondary caries prevention with an acid-base resistant zone (super dentin) is observed under the hybrid layer of the bonded zone.2 Bond Force offers low technique sensitivity allowing its use in moist, wet or dry conditions with a low film thickness.
Related technique: How to use Estelite Sigma Quick in your practice


Estelite® Sigma Quick (Tokuyama Dental America), a universal, 100% spherically filled composite, with a filler weight of 82% (71% volume) uses a supra-nano monodispersing spherical filler. The supra-nano monodispersing spherical filler particles easily produce an extremely high surface gloss when polished. As the filler particle diameters are relatively uniform, and the particle size can be controlled by filler synthesis reaction times.
The catalyst technology adopted for Estelite Sigma Quick composite is the Radical Amplified Photo-polymerization initiator (RAP technology™).6 This initiator balances the high polymerization activity needed to cure the resin with short exposure times (one-third of that required by conventional products), but provides stability in ambient lighting so premature setting isn’t initiated before the practitioner is ready to light cure the material.
Next page: Go step-by-step ...


Fig. 1 Patient presented with complaint that the left lateral incisor was slightly palatal in comparison to the adjacent central incisor and canine and gave the tooth a slightly darker tone as a result.
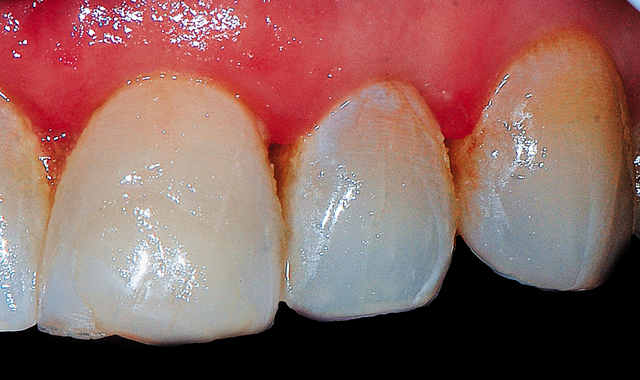
Fig. 1 Patient presented with complaint that the left lateral incisor was slightly palatal in comparison to the adjacent central incisor and canine and gave the tooth a slightly darker tone as a result.
Case 1: Anterior direct veneer
The patient presented with the esthetic complaint that her left lateral incisor appeared slightly darker than the central incisor adjacent to it and the edge was “too rounded.” Examination noted no previous restorative material on the lateral incisor and no evidence of current caries. The tooth was set slightly palatally compared to the adjacent teeth, giving it a slightly darker appearance due to how the light reflected from its surface.
The latest in technology: What are the differences in intraoral scanning options?
The incisal embrasure space between the lateral and canine was wide, giving the tooth the appearance of a portion of the incisal edge might be missing esthetically (Fig. 1). As the tooth was intact and an esthetic change desired, the patient’s treatment was planned for a direct resin veneer to build out the facial surface to bring it to the same contour as the adjacent teeth and to create a better incisal edge anatomy.


Fig. 2 Teflon tape placed and adapted to the adjacent teeth.
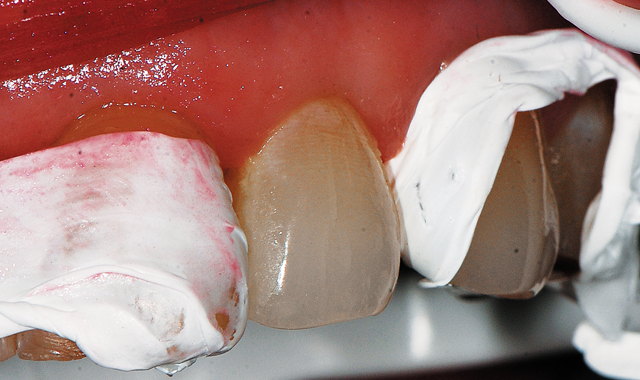
Fig. 2 Teflon tape placed and adapted to the adjacent teeth.
The tooth was isolated with cotton rolls and Teflon (plumbers) tape placed interproximally to prevent bonding to the adjacent teeth (Fig. 2). Teflon tape is an ideal interproximal matrix, as it is extremely thin so it does not have the potential to leave an open contact. Additionally, as it has no memory adapting to the adjacent teeth it will not hamper treatment on the tooth that will receive the direct restoration. Due to its slippery nature, it is easily removed when needed in the treatment procedure.

Fig. 3 37% phosphoric acid etching gel was applied to the enamel to chemically roughen the surface.
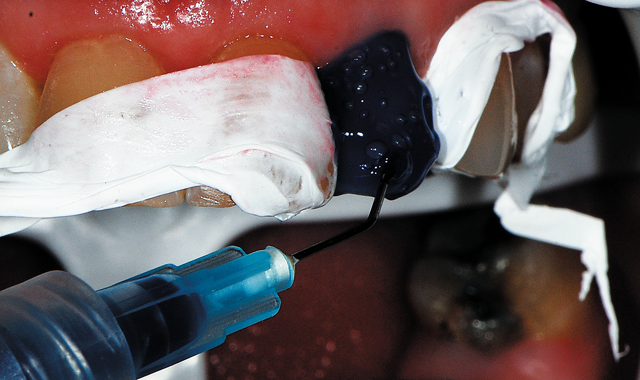
Fig. 3 37% phosphoric acid etching gel was applied to the enamel to chemically roughen the surface.
The restoration would be solely on enamel, which would require this surface be treated to enhance bonding of the resin. A 37% phosphoric acid gel (Centrix Dental, Shelton, Connecticut) was applied to the tooth for 30 seconds (Fig. 3).

Fig. 4 Following acid etching of the enamel for 30 seconds, the tooth was rinsed and dried demonstrating an etched surface for better adhesion of the bonding.
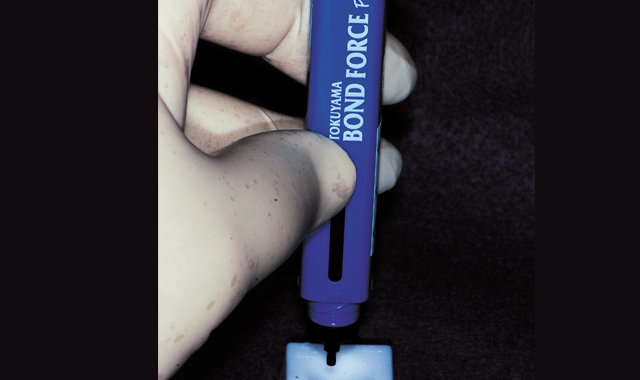
Fig. 4 Following acid etching of the enamel for 30 seconds, the tooth was rinsed and dried demonstrating an etched surface for better adhesion of the bonding.
The tooth was rinsed and air dried, leaving a frosted appearance to the enamel and improving bonding by mechanical retention around the enamel rods on the surface (Fig. 4).

Fig. 5 Bond Force adhesive is dispensed from the pen into a dappen dish when ready to apply to the tooth.
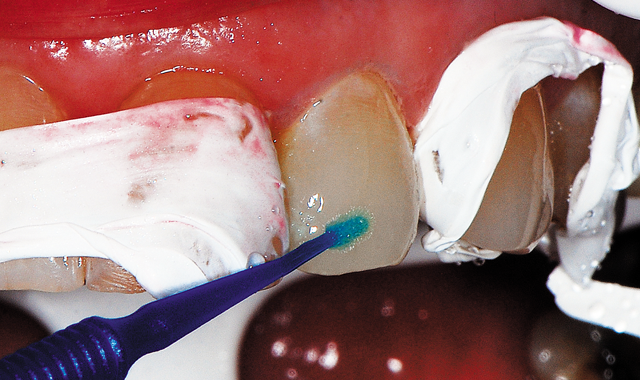
Fig. 5 Bond Force adhesive is dispensed from the pen into a dappen dish when ready to apply to the tooth.
Bond Force was dispensed from the pen into a dappen dish when ready to apply (Fig. 5). A microbrush was utilized to apply the adhesive to the etched enamel, scrubbing the bonding resin into the surface for 20 seconds (Fig. 6, below). Next, a light air stream from the air/water syringe is applied to evaporate the solvent in the adhesive for five seconds, which is then followed by stronger air stream for an additional five seconds. The adhesive is then light cured for five seconds.

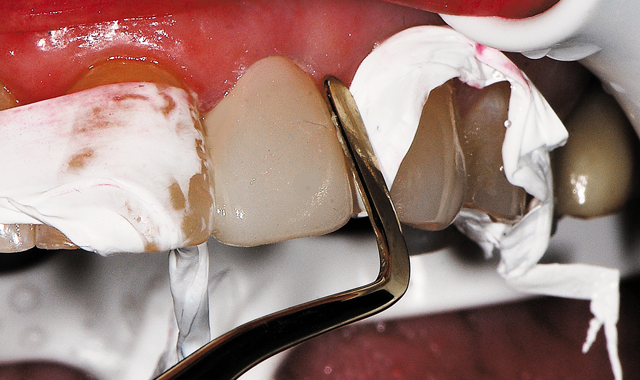
Fig. 6 Bond Force adhesive applied to the tooth's surface and light cured.

Fig. 7 Estelite Sigma Quick composite in a shade A2 was adapted and shaped to the tooth to build out the facial contour to blend better with the adjacent teeth.
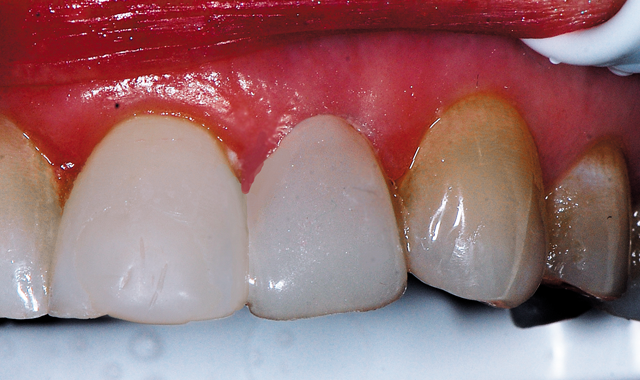
Fig. 7 Estelite Sigma Quick composite in a shade A2 was adapted and shaped to the tooth to build out the facial contour to blend better with the adjacent teeth.
As masking of the underlying tooth was not required in this case, Estelite-Sigma Quick (Tokuyama Dental America) in a shade A2 was selected. A portion of composite was removed from the syringe and adapted to the tooth with an instrument to the full desired contour required (Fig. 7). The tooth was light cured from the facial for 20 seconds, followed by an additional 20 seconds from the palatal surface.

Fig. 8 Teflon tape has been removed and basic contouring present to provide better esthetics.
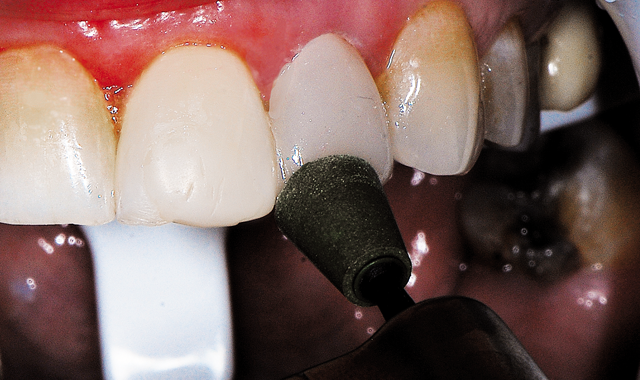
Fig. 8 Teflon tape has been removed and basic contouring present to provide better esthetics.
The strips of Teflon tape were removed (Fig. 8). Minor contouring was accomplished with a finishing diamond (Komet, Rock Hill, South Carolina) in a high-speed handpiece with water.
 used with light pressure in an electric slow-speed handpiece with water for initial polishing of the coronal 2/3 of the restoration.")
Fig. 9 A green medium grit diamond finishing cup (Couture, Centrix Dental) used with light pressure in an electric slow-speed handpiece with water for initial polishing of the coronal 2/3 of the restoration.

Fig. 9 A green medium grit diamond finishing cup (Couture, Centrix Dental) used with light pressure in an electric slow-speed handpiece with water for initial polishing of the coronal 2/3 of the restoration.
An electric slow-speed handpiece utilizing water was used for initial polishing, with a medium grit (green) diamond finishing cup (Couture, Centrix Dental) utilizing light pressure and constant motion over the incisal two thirds of the tooth. A medium grit (green) diamond finishing point (Couture, Centrix Dental) was used with light pressure over the gingival third of the restoration as the point adapts better in this area than a cup. This was followed by an ultrafine grit (blue) diamond finishing point (Couture, Centrix Dental), again with very light pressure, polishing the gingival third of the restoration (Fig. 10, below).
 used with light pressure in an electric slow-speed handpiece with water, polishing the gingival third of the restoration.")
Fig. 10 A blue ultrafine grit diamond finishing point (Couture, Centrix Dental) used with light pressure in an electric slow-speed handpiece with water, polishing the gingival third of the restoration.

Fig. 10 A blue ultrafine grit diamond finishing point (Couture, Centrix Dental) used with light pressure in an electric slow-speed handpiece with water, polishing the gingival third of the restoration.
 used with light pressure in an electric slow-speed handpiece without water, polishing the coronal two thirds of the restoration.")
Fig. 11 A blue ultrafine grit diamond finishing cup with diamond polishing paste (Couture, Centrix Dental) used with light pressure in an electric slow-speed handpiece without water, polishing the coronal two thirds of the restoration.
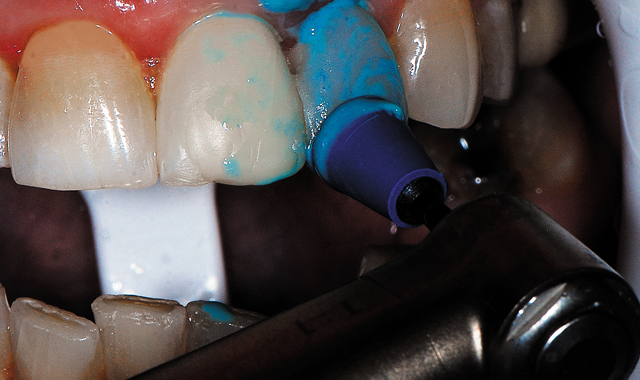
Fig. 11 A blue ultrafine grit diamond finishing cup with diamond polishing paste (Couture, Centrix Dental) used with light pressure in an electric slow-speed handpiece without water, polishing the coronal two thirds of the restoration.
An ultrafine grit (blue) diamond finishing cup was next utilized with diamond polishing paste (Couture, Centrix Dental) with light pressure in an electric slow-speed handpiece without water, polishing the coronal two thirds of the restoration (Fig. 11). The final finishing step utilized a diamond polishing brush (Couture, Centrix Dental) with the remaining diamond polishing paste that remained on the teeth with light pressure in an electric slow-speed handpiece without water, polishing the entire restoration (Fig. 12, below). The old composite present on the adjacent central incisor was also polished to restore its lost luster.
 used with light pressure in an electric slow-speed handpiece without water, polishing the entire restoration for its final finishing step.")
Fig. 12 A diamond polishing brush with the remaining diamond polishing paste (Couture, Centrix Dental) used with light pressure in an electric slow-speed handpiece without water, polishing the entire restoration for its final finishing step.
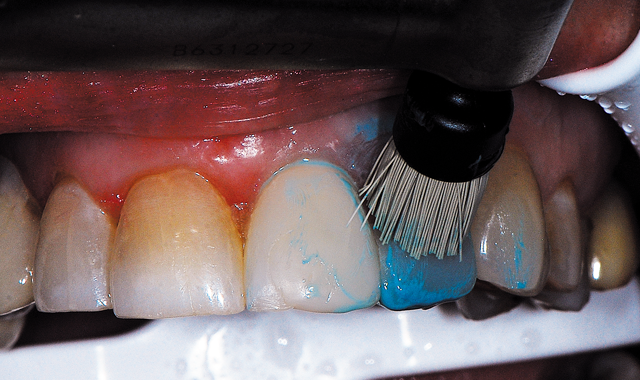
Fig. 12 A diamond polishing brush with the remaining diamond polishing paste (Couture, Centrix Dental) used with light pressure in an electric slow-speed handpiece without water, polishing the entire restoration for its final finishing step.

Fig. 13 Final direct composite veneer built out to the facial contour of the adjacent teeth to improve the esthetics.

Fig. 13 Final direct composite veneer built out to the facial contour of the adjacent teeth to improve the esthetics.
The final restoration rebuilds the contour to a better esthetic with the adjacent teeth and filled in the incisal embrasure between the lateral incisor and canine to eliminate the esthetic concerns the patient had expressed. Esthetics was achieved with a single shade composite using the resins spherical particles to blend with less effort then would be required using multiple shades of composite (Fig. 13).

Fig. 14 Patient presented with fractured amalgam on the mandibular left second molar.
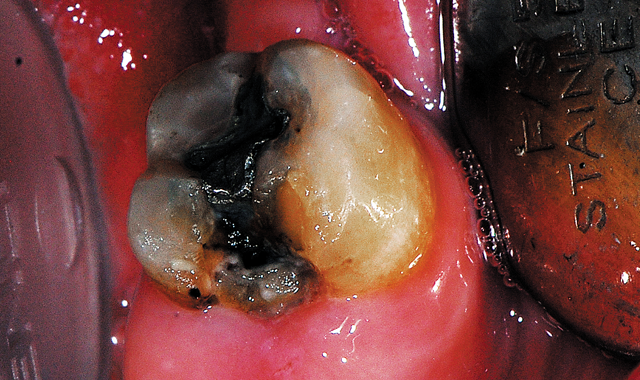
Fig. 14 Patient presented with fractured amalgam on the mandibular left second molar.
Case 2: Posterior direct restoration
The patient presented with complaint of a broken old amalgam on the lower left second molar with some periodic sensitivity (Fig. 14). The exam noted an occlusal mesial amalgam with the mesial portion missing with some recurrent caries evident. The adjacent first molar was missing and not replaced with a removable prosthesis. The patient was informed that due to the amount of missing native tooth structure, ideally a full coverage crown was indicated, but finances hampered that option at this time. A direct resin restoration would be placed, which would later act as a core for the future planned crown.

Fig. 15 Defective amalgam and caries removed and tooth presents with dark dentin and some underlying staining which were non-sticky to the explorer.
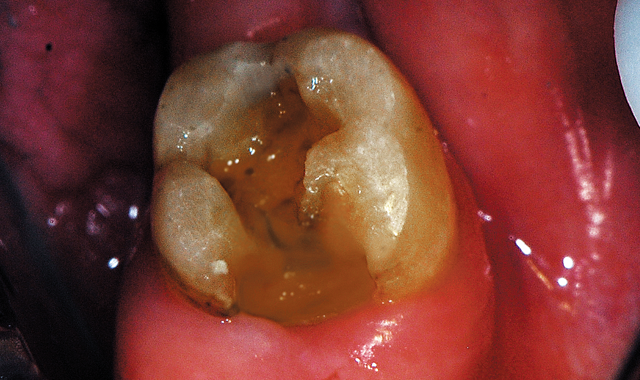
Fig. 15 Defective amalgam and caries removed and tooth presents with dark dentin and some underlying staining which were non-sticky to the explorer.
A local anesthetic, 1 carpule 4% Articaine with 1:200,000 epi (Articadent, Dentsply Sirona, York, Pennsylvania) was administered as an inferior alveolar injection. Caries and remaining amalgam were removed with a carbide in a highspeed with water (Fig. 15). It was noted that the underlying dentin was very dark in shade, but hard to the explorer. Masking the dark dentin would be required to provide better esthetics to the resulting direct restoration.

Fig. 16 A matrix band was placed to aid in containing the composite when placed and developing the desired anatomy on the mesial.
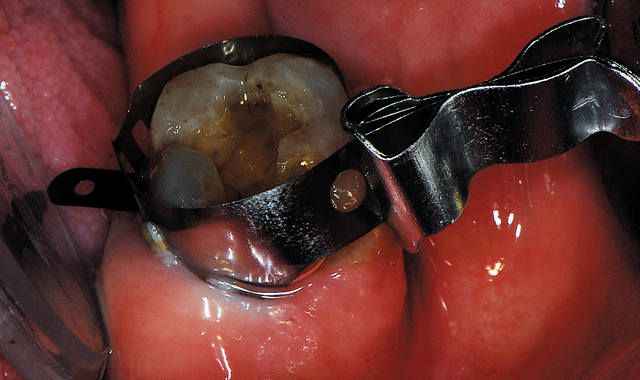
Fig. 16 A matrix band was placed to aid in containing the composite when placed and developing the desired anatomy on the mesial.
A retainer-less Tofflemire-Style circumferential matrix band (Pinch™ Metal Matrices, Garrison Dental Solutions, Spring Lake, Michigan) was applied (Fig. 16). Due to the sensitivity the patient had been reporting, a self-etch approach was decided for this tooth. The tooth was air dried. Bond Force was dispensed from the pen into a dappen dish and a microbrush was utilized to apply the adhesive to the dentin and enamel.

Fig. 17 Bond Force adhesive was applied and light cured.

Fig. 17 Bond Force adhesive was applied and light cured.
The adhesive was scrubbed into preparation surfaces for 20 seconds (Fig. 17). A light air stream from the air/water syringe was applied to evaporate the solvent in the adhesive for five seconds. This was followed by a stronger air stream for an additional five seconds and then light cured for five seconds.

Fig. 18 The first increment of composite is placed and condensed to cover all dentin and contact the preparation walls, then light cured.
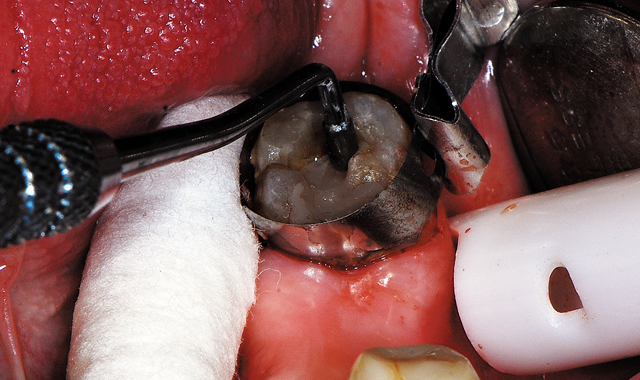
Fig. 18 The first increment of composite is placed and condensed to cover all dentin and contact the preparation walls, then light cured.
As masking of the dark dentin was desired, an opaquer shade of composite was selected, Estelite Sigma Quick composite in shade OA3. The composite was incrementally placed, curing between layers until the entire preparation was filled (Fig. 18). The matrix band was removed and additional light curing was performed from the mesial to ensure complete conversion of the resin. The composite was shaped and contoured with carbide and diamond finishing burs (Komet USA). Occlusion was checked and adjusted as needed.

Fig. 19 Completed direct resin restoration masking the underlying dark dentin.
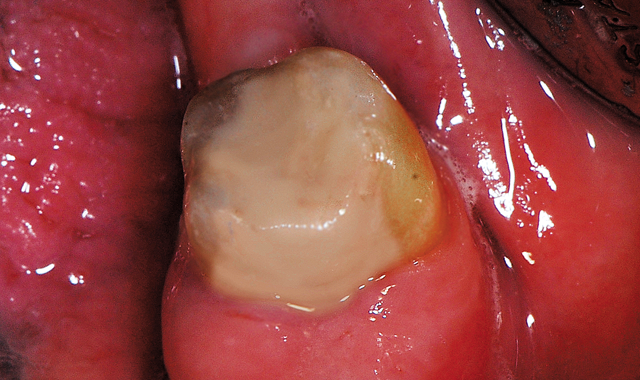
Fig. 19 Completed direct resin restoration masking the underlying dark dentin.
Polishing was performed in a similar manner as was previously described in this article using the Couture Polishing Kit and the restoration was completed (Fig. 19).
Must-read: Immediate esthetics for implant cases
Conclusion
Direct resin restorations remain a common everyday treatment in the average general dental practice. Advancement in both the adhesives and composites has improved the long-term success of these treatments. Additionally, these advancements allow easier, more simplified treatment while improving the esthetic results with fewer steps than with previous materials available.
References:
1. Adebayo OA, Burrow MF, Tyas MJ, Palamara J.: Effect of tooth surface preparation on the bonding of self-etching primer adhesives. Oper Dent. 2012 Mar-Apr;37(2):137-49. doi: 10.2341/11-172-L. Epub 2011 Sep 26.
2. Nikaido, et al., Tokyo Medical and Dental University Jpn J Adhes Dent, 2007
3. Waidyasekera K, Nikaido T, Weerasinghe D, et al.: Bonding durability of dual-curing composite core material with different self-etching adhesive systems in a model complete vertical root fracture reconstruction. J Adhes Dent. 2012 Apr;14(2):167-74. doi: 10.3290/j.jad.a21848.
4. Lawson NC, Cakir D, et al.: Characterization of third-body media particles and their effect on in vitro composite wear. Dent Mater. 2012 Aug;28(8):e118-26. doi: 10.1016/j.dental.2012.04.021. Epub 2012 May 10.
5. Beck P, Lindsey M, Michelson C, et al.: Polymerization Shrinkage of Nine Highly-Filled Composite Materials. IADR San Diego, CA March 2011 Poster presentation.
6. Ilie N, Kreppel I, Durner J.: Effect of radical amplified photopolymerization (RAP) in resin-based composites. Clin Oral Investig. 2014 May;18(4):1081-8. doi: 10.1007/s00784-013-1085-1. Epub 2013 Aug 21.


