Technique: Building a better metal-free substructure
Jim Collis, CDT, shows this step-by-step technique to use TRINIA material to create substructures for dental restorations.


In restoration cases that require a substructure, dentists and laboratories are looking for more efficient and cost-effective alternatives to metal bars cast in semi-precious or precious metals or bars milled in titanium. In the instances where substructures are cast in semi-precious or precious metals, casting can be a tedious process with many steps. There can be distortion, which results in the bar having to be sectioned, indexed and re-soldered, in which case the model will need to be readjusted and an additional try-in will be required.
Additionally, substructures cast in precious metals can be quite costly. Bars can also be milled in titanium, but many milling machines owned by laboratories are not capable of milling titanium, so the cases must be sent out for milling, resulting in additional turnaround time and a markup by the laboratory doing the milling step. Titanium is also a relatively expensive choice for a dental substructure. Shofu has a better alternative.
Related reading: Jim Collis on Shofu's OneShot unilayer
Shofu’s TRINIA™ is the solution for precise, metal-free substructures that can be milled with great precision on most leading wet or dry milling systems using nano-diamond burs. TRINIA is a lightweight, biocompatible material that obtains its tremendous durability and resiliency from multi-directional, interlacing layers of fiberglass and resin. The material has high flexural and compressive strength to facilitate intraoral function and comfort. As an additional benefit, milled TRINIA substructures can be produced at a unit cost far less than the cost of precious metal or titanium bars.
The following case study is a step-by-step guide for fabricating a full lower screw-retained appliance incorporating a TRINIA bar.
01 Once a verified model from a verification jig has been obtained and the case is ready to proceed, the case is mounted and a try-in is prepared. After the try-in has been checked in the mouth and any necessary adjustments are made, a rubber index is prepared that will be used to transfer the teeth from the try-in to the bar.
02 Next, UCLA abutments are waxed and cast over the implants (Fig. 1; all figures in video above). Normally, you would use a scan jig when you scan the model and then, from a purchased titanium insert kit, use appropriate abutments and titanium inserts. In this case, because a scan jig was not available to me, plastic UCLA abutments were cast, finished and screwed on the model.
Product roundup: Denture teeth
03 The try-in is sprayed with scan spray to reduce glare and reflection and is then scanned. Leaving the model in the same position on the scanner, the try-in is removed and the cast and finished UCLA abutments are screwed onto the model. The abutment screw holes are filled with wax. The metal portions of the abutments are sprayed with scan spray, and then the UCLA abutments are scanned (treating the abutments as if they are copings around which a bar is to be designed) (Figs 2 & 3).
Next page: Placing the teeth ...
04 Once the bar is designed in the software the laboratory is using, the next step is to verify the designed bar fits within the parameters of the try-in in the software. If necessary, adjustments are made in the design of the bar in the software (Fig. 4) The designed substructure is then ready to be milled.
05 After the bar is milled, the top of each coping is cut using a carbide bur to open up the screw access hole. Each UCLA abutment is measured, cut to size and inserted into the underlying abutment hole as if it were a titanium insert. Once verified, the bar and inserts are removed from the model. The UCLA abutments are cemented into the bar and screwed back on the model to allow the cement to set. This cementing technique eliminates any possibility of distortion. At this point, the bar could be sent back to the doctor to verify a passive fit in the oral cavity (Figs 5-9).
06 The teeth are removed from the try-in and diatorics are added. The teeth are then placed in the index and glued in place around the linguals using a hot glue gun with a small tip (Fig. 10). The rubber index containing the teeth is then placed on the model to confirm there are no interferences between the teeth and the bar. If there are any, this can be resolved by slightly grinding on the teeth where necessary.
07 A wax separator is painted on the final model because processing will not take place on this model. Then the teeth in the index are affixed to the bar from the lingual with wax and the wax is allowed to cool. The index is removed from the teeth and the cast. Each tooth that is over an abutment is removed, and using a Candulor static laser, each access hole in the bar is identified by the laser beam. Then each tooth is returned to the try-in, one at a time, and the access hole identified by the laser is marked on the tooth. The tooth is removed, the marked access hole is drilled and then the tooth is again returned to the try-in (Fig. 11).
Next page: Finishing the restoration ...
08 The case is then waxed to final contour from the buccal to reduce the amount of finishing required once processed. Take note: Based on the doctor’s preference, you may or may not have a final try-in at this point to verify contour, fit and occlusion before processing.
09 Processing is the next step. The try-in is taken off the model. Analogs are screwed in and tightened. The try-in with the analogs is then invested into a flask using your preferred method of processing (Fig. 12). If using a pour technique, it is necessary to first pour a separate cast with the analogs and then proceed with processing. The wax is flushed out. Shofu’s Ceraresin Bond 1 is painted onto the bar and allowed to dry for 10 seconds. Then, Ceraresin Bond 2 is applied over the same surface and is cured for three minutes in a light cure box.
Must read: How Shofu's Veracia SA teeth can be placed in a snap
10 Next, Shofu’s Ceramage pink opaque is applied to the surface of the bar to mask out the ivory color of the TRINIA, and the Ceramage is hardened for 10 seconds in a light box. The surface of the bar is painted with an air barrier coating and cured for three minutes in a light box. The air barrier is then removed, preferably by steaming it off. Ceraresin Bond 1 and Ceraresin Bond 2 are then reapplied as described above so the acrylic will bond to the opaque and will not fracture off the bar after processing (Fig. 13). The screw access holes on one side of the flask and the access holes on the teeth on the opposing side of the flask are filled to the top with flowable silicone gingival mask. Once the silicone has hardened, processing occurs (Figs 14 & 15).

A milled TRINIA disc

A milled TRINIA disc
11 After processing, the case is carefully broken out of the flask (or removed from gel after pouring). All surfaces are steam cleaned to verify everything processed correctly. A No. 8 round bur with a handpiece at low speed is inserted into each occlusal access hole and used to pull the silicone plug out of the access hole. Then, the No. 8 bur, on low speed, is again inserted into each access hole. A tiny bit of resistance will be felt, which is the thin sliver of acrylic that was processed between the access hole in the tooth and the access hole in the bar. Allow the bur to pop through this thin layer of acrylic into the silicone plug in the bar and remove that plug in each access hole being careful not to damage the top of the screw head below the silicone. Then, the analogs are unscrewed and the case is finished to remove any sharp edges. Since the case was waxed to final contour, very minimal finishing is required.
Tech in action: How this camera can improve your image work
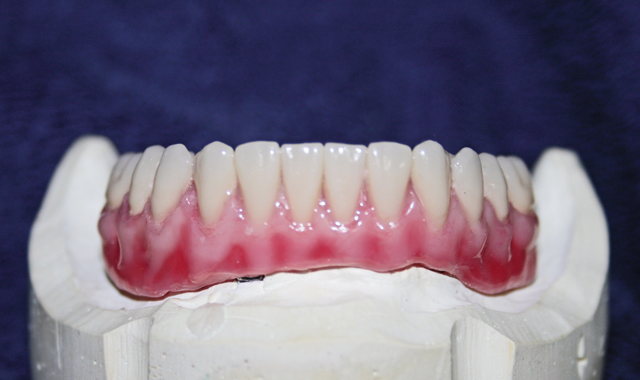
12 For this patient, we elected to further enhance the processed appliance base to recreate root eminences and color variations in the gum tissue using Ceramage Gum Color kit, a line of color composites (uniquely composed of 73-percent zirconia to yield luster and strength) that can be applied to acrylic or resin following simple manufacturer’s instructions. The result is a denture base with a beautiful, natural color translucency. (Figs 16-18)
Conclusion
TRINIA is an excellent metal-free alternative for substructures. TRINIA bars can be precisely milled on most milling machines and at far less cost than some other metal alternatives. TRINIA is biocompatible and lightweight. The material is very durable, and unlike metal substructures, offers highly flexural and compressive characteristics to aid in function and comfort for the patient. TRINIA has many applications, including: copings, substructures or frameworks for permanent and transitional anterior or posterior crowns, bridgework and substructures that can be either cemented or uncemented restorations. TRINIA is available in 98 mm circular discs, 89 mm D-shaped disks and 40 mm or 55 mm blocks.
For more information about TRINIA or other Shofu products, visit shofu.com or call 800-827-4638.


