Step-by-step: Providing immediate esthetics for implant cases
Mr. Chris Halke, CAD/CAM Supervisor, and Dr. Michael Pikus, Director of Clinical Education show how it's possible to promote healing and esthetics immediately upon implant surgery.
Today, immediate implant placement after extraction and immediate temporization is becoming an increasingly popular option for many clinicians.


Implants have revolutionized dentistry and are allowing patients whose only hope 40 years ago would have been to get complete dentures to now be able to have an esthetic and functional fixed prosthetic. Initially, dental implants were placed by oral surgeons, and their restorations were almost entirely undertaken by a prosthodontist. As implant science improved with different surface treatments and an increased scientific body of knowledge about the process of osseointegration, more clinicians started to delve into implant placement and prosthetics.
Related technique: An integrated surgical guide step-by-step
Immediate placement of dental implants after extraction and the patient’s need to have an immediate fixed restoration of dental implants have pushed many clinicians into providing this service to their patients. One way dentists are able to offer patients quick, accurate, esthetic, long-lasting and functional restorations is for the clinician to utilize a dental laboratory with a digital workflow.


Next page: How technologies combine to create immediate options ...


Fig. 1 Implant alignment in the CBCT scan.
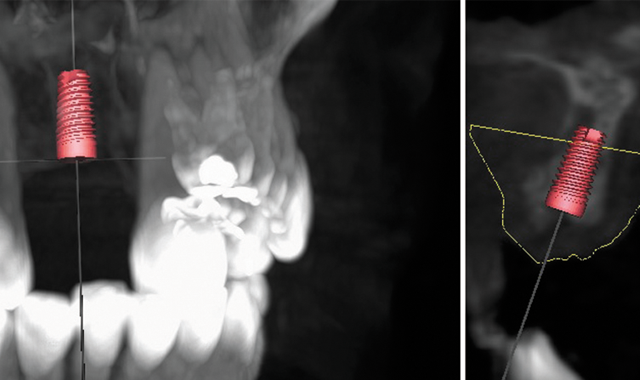
Fig. 1 Implant alignment in the CBCT scan.
As technology has improved in clinical dentistry, it has also made significant strides on the manufacturing and laboratory side. Clinically, we have technological innovations in radiography with digital X-rays and cone beam computerized tomography (CBCT). On the laboratory side, we have seen a vast improvement in scanning and computer-assisted design and computer-assisted manufacturing (CAD/CAM). Advances in 3D printing and milling-with mills that are able to operate in five axes-have allowed the lab to improve its manufacturing practices. At Albensi Laboratories, we have achieved an almost complete digital workflow.
Step-by-step: How going digital opens up new business opportunities
The process for the design of a fully guided surgical appliance begins with the clinician taking both a CBCT scan and impression or intraoral scan of the patient. This information is then sent via the internet to Albensi Dental Lab where the treatment planning phase of the restorative procedure begins using the Blue Sky Bio software. If a traditional impression is sent with the case, it is poured up in stone and then scanned using a 3Shape D-series cabinet scanner. For those practitioners using intraoral scanners, the scan data can be merged directly with the CBCT upon receipt, eliminating two production days from the case (in the form of shipping and stone model creation).


Fig. 2 Implant position to allow for screw-retained temporary and eventual final restoration.
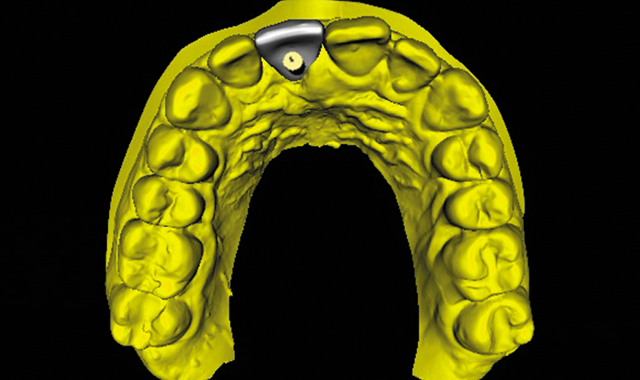
Fig. 2 Implant position to allow for screw-retained temporary and eventual final restoration.
Once the intraoral scan of the patient’s mouth or scanned models have been imported and aligned in the surgical guide fabrication software, a rough implant placement is done using the information on the Rx and industry-standard guidelines. Vital structures are able to be visualized on the scan, and are then accurately marked by an Albensi technician. The treatment plan is then reviewed by resident periodontist Dr. Michael Pikus and is approved or adjusted accordingly.
Digital Esthetics unpacks the world of digital dentistry
Dr. Pikus always evaluates implant angulation and the esthetic goals of the case. Bone density and vital structures are evaluated and implants placed in the most ideal position given the patient’s oral anatomy and pathology (if any is noted). Implant size and restorative options are considered so that spacing of implants is proper to achieve proper balance and cross arch stabilization to maximize implant and immediate load stability. Upon completion of the internal review, a remote session is scheduled between the dentist and an Albensi Laboratory specialist where the plan is reviewed and final adjustments requested by the treating dentist can be made.

Fig. 3 The assembled guide on the model.
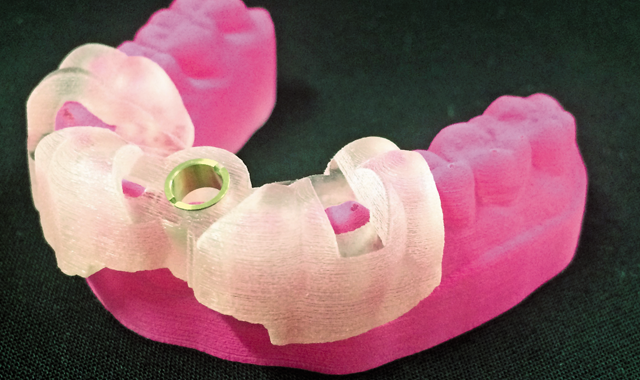
Fig. 3 The assembled guide on the model.
Once the implant position and size and angulation are finalized, the laboratory can start the fabrication process. The guide itself is designed using the manufacturer-established protocol for the doctor’s surgical-guided drilling kit. Once exported as an STL file, it is 3D printed using either an EnvisionTEC Vida or Stratasys Objet 350v. Simultaneously, a separate file is exported with digital versions of the same scan flags used in scanning physical models for implant design. This file is imported into 3Shape as a digital impression and designed as a screw-retained or cement-retained restoration depending on the doctor’s request. The design is based around a non-engaging Ti base abutment to prevent any concerns with correct timing during implant placement.

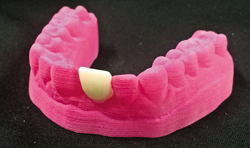
Fig. 4 The finished immediate temp on the model.
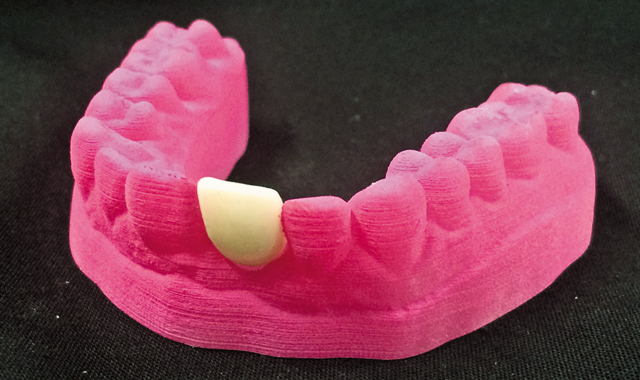
Fig. 4 The finished immediate temp on the model.
Once finished, the crown design is milled on a Roland DWX51D using PMMA, and a model with the implant interface is printed on an EnvisionTEC 3Dent. The accuracy of the surgical guide is such that after implant placement, the treating dentist will be able to place a full-arch prosthetic that is not only highly esthetic, but it will be functional and will allow proper contouring of the soft tissue to prepare for the final completed prosthesis once all the implants have demonstrated successful osseointegration.

Fig. 5 Seating jig for correct tooth alignment.
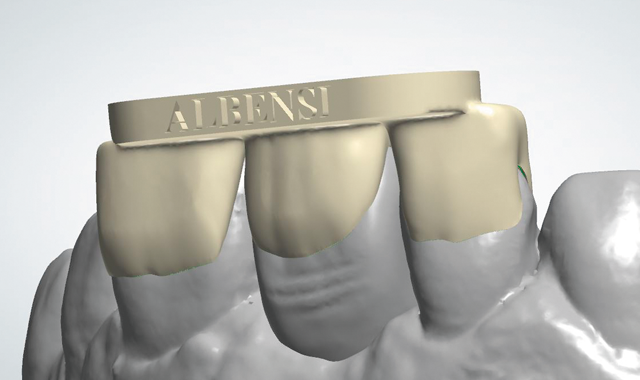
Fig. 5 Seating jig for correct tooth alignment.
After fabrication, all parts are tested for fit and assembled. The appropriate guide tubes are cemented into the surgical guide, and it is tested against the model for retention. The PMMA crown is assembled and tested on the printed model for correct contact, fit and seating. As the returned temporary restoration is non-engaging, a seating jig is provided to ensure proper alignment during insertion. A final report is included, detailing specifics such as bone thicknesses and density around the implant site, what drilling protocol was used, and any special considerations.

Fig. 6 A detailed report (only partially shown here) is provided for the surgeon to review.
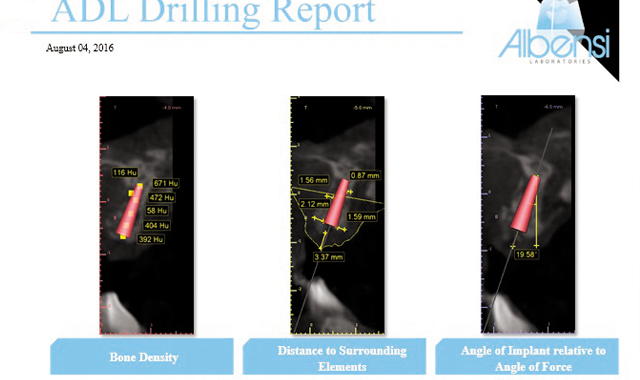
Fig. 6 A detailed report (only partially shown here) is provided for the surgeon to review.
Barring any unexpected concerns, the final osteotomy is step by step. The guide is seated in the patient’s mouth and the site is drilled based on the indicated protocol. Once the proper torque has been achieved with the implant, the temporary restoration is placed using the jig. Minor alterations can be made to the restoration if necessary using light cure composite and a handpiece.
Technique: Using digital tools to create beautiful implant restorations
Dentists focusing on improving their aptitude in implant dentistry from surgical placement to restoration will find this is another tool to help them achieve their goals as they relate to providing patients solid, esthetic and predictable implant restorations. Clinicians who successfully adopt a partnership with a digitally-advanced and skilled laboratory should not fear or avoid large implant-supported restorations or treatments. Bringing together expertise and various skills can help your patients walk out of your office with a smile.


