Step-by-step: How to digitally plan implants and design surgical guides
Bob Cohen, CDT, writes a step-by-step technique showing how 3Shape's Implant Module for Dental System can be used to plan implants and create surgical guides.
Like many new technologies introduced into the dental market, guided implant surgery has been slow to catch on. The reasons are many: cost, learning curve of complex software and time to do the virtual plan, to name a few. More recently, placing implants using a surgical guide has become much more popular. We now have faster, more powerful computers, better software and an increased number of CBCT scanners in dental offices. As a result, guided implant placement is more viable and economically feasible than ever before.


Recently, 3Shape launched a new software module called Implant Studio. This end-to-end solution is built for guided surgery, merging surface scans and CBCT (or CT) scans. Subsequent digital CAD design of the final restoration follows by planning implant placement. Utilizing the combination of the design of the final restoration, the CBCT and surface scans enable a best-in-class plan. This top-down digital workflow is both simple and precise and eliminates the need for manufacturing an appliance prior to and solely for use for the CBCT scan.
Related reading: Smoothing out CAD/CAM with software
Once the implant placement plan is accepted, there is a quick-and-easy digital guide design step that creates an STL file for milling or 3D printing surgical guides. This software can be purchased as a standalone planning solution or added to an existing 3Shape dongle. One of the really terrific things about Implant Studio is that it puts the planning in the hands of dental labs. This helps lab owners build new relationships and customers. An additional inclusion in the software is a sign-off process that puts the liability of the plan on the surgeon through a design approval process.
Click the next button to go step by step ...


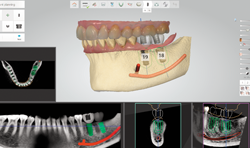
Fig. 1 Virtual Rx
Fig. 1 Virtual Rx
Case study
01 To begin implant planning, one uploads a CBCT scan, as well as a surface scan, into the Implant Studio software. Next, the implant locations and other info are added to a Virtual Rx (Fig. 1).

Fig. 2 Mandibular nerve
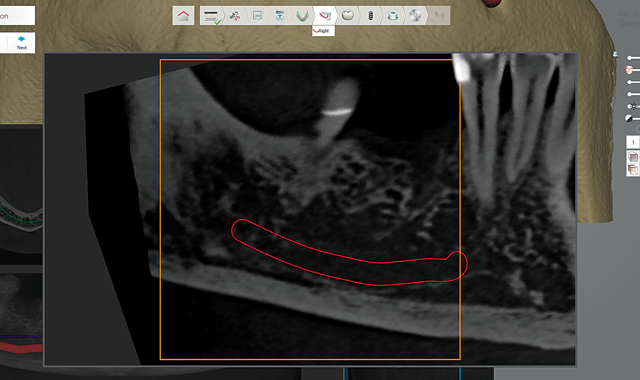
Fig. 2 Mandibular nerve
When treating the posterior mandible, one of the initial steps includes identifying and marking the mandibular nerve canal and mental foramen (Fig. 2).


Fig. 3 Design of final restoration
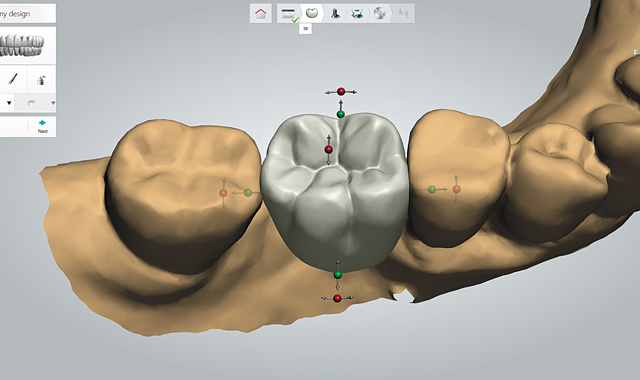
Fig. 3 Design of final restoration
02 Once the Rx is complete, the final restoration is designed using an abbreviated set of tools and functions found in the existing 3Shape Dental System CAD software. Once the design of the restoration is complete (Fig. 3), an outline of the final restoration appears in the CBCT views throughout the planning (Fig. 4).

Fig. 4 Designed crown in the CBCT scan
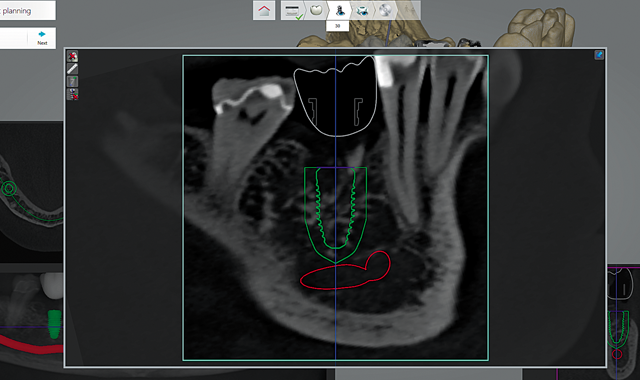
Fig. 4 Designed crown in the CBCT scan

Fig. 5 Implant selection box
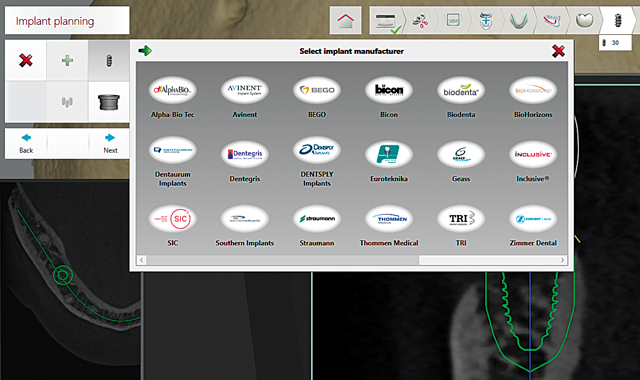
Fig. 5 Implant selection box
03 Next, through a dropdown box, one selects the brand, type, diameter and length of implant to be used in each implant site (Fig. 5).

Fig. 6 2 mm safety zone
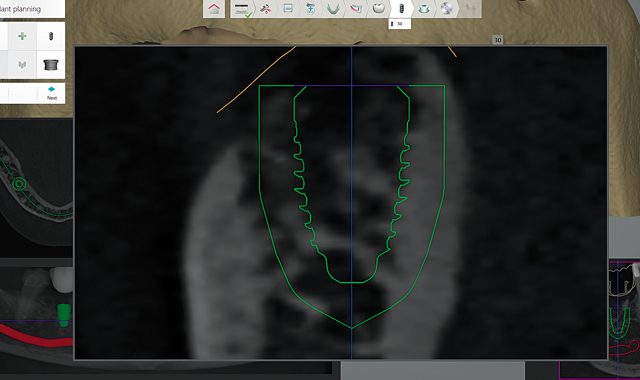
Fig. 6 2 mm safety zone
Intuitively, the software places the implants extremely close to the final desired location through smart placement using the restoration design previously completed. The software currently has a 2 mm safety zone around the implant (Fig. 6).

Fig. 7 Parallel implants
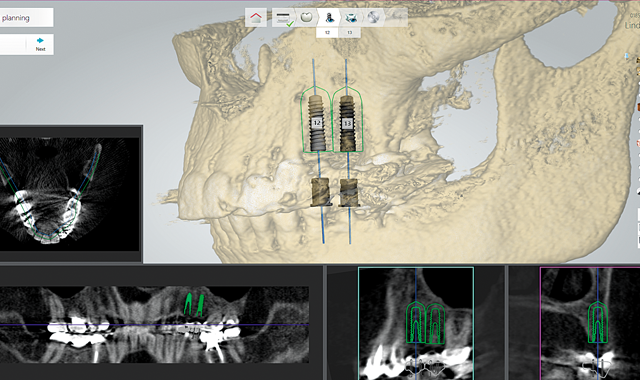
Fig. 7 Parallel implants
04 The planning stage offers tools that are very simple to use. The implant location can be adjusted or rotated, the implant can easily be lengthened or shortened and/or the implant type can be changed easily mid-design. Additional tools include the ability to group implants together to keep them exactly parallel to one another (Fig. 7).

Fig. 8 Change in color of implant when too close to nerve
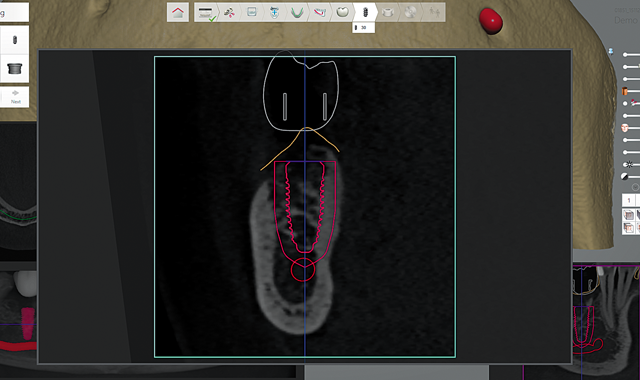
Fig. 8 Change in color of implant when too close to nerve
This is very helpful for overdenture cases where direct-to-implant overdenture retention abutments are planned. Having these implants parallel to one another reduces frequency of clinical attachment maintenance. The software changes the color of the implant while planning from green to red if the placement is too close to an anatomic feature that should not be impinged upon (Fig. 8) to help keep the plan and subsequent surgery safe and trouble-free.

Fig. 9 Approval screenshot
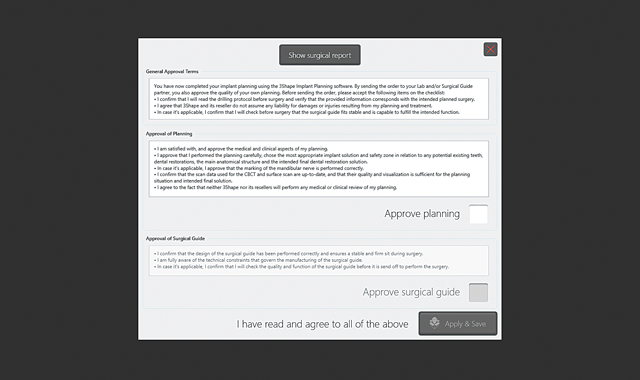
Fig. 9 Approval screenshot
05 Once the plan is finalized, we utilize a screen-sharing application called Teamviewer, which enables the dentist to see our plan screen live from any PC (or Mac). In fact, the dentists can also control the screen using their mouse. Once the dentist is satisfied with the plan, there is an approval screen (Fig. 9) that eliminates the laboratory liability. Once the dentist agrees and checks the “Approved Plan” box, the plan is permanently locked and the implant locations can no longer be altered.

Fig. 10 Line for guide design
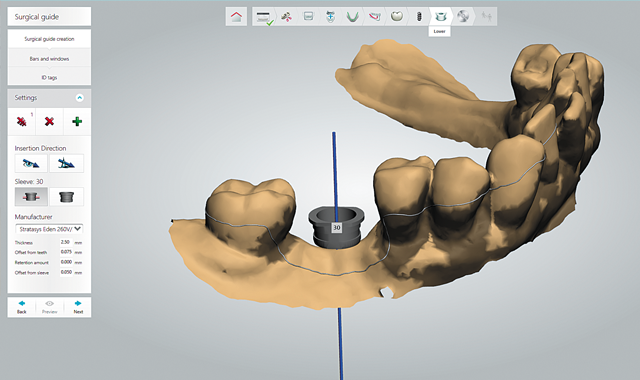
Fig. 10 Line for guide design
06 The final CAD procedure is designing the surgical guide. To do so, using the mouse, you simply draw a line on the surface scan outlining the periphery of the guide (Fig. 10). Once you connect the end of the outline to the beginning, you can adjust any part of the design except the hole locations for the drill guides. Keep in mind the hole placements were locked at the end of the plan stage. With a click of the mouse, the guide appears on the virtual model.

Fig. 11 Final guide design
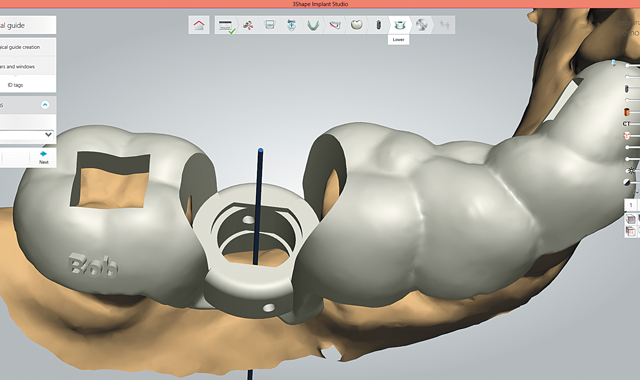
Fig. 11 Final guide design
07 There are a few more features one should include to finalize the guide (Fig. 11). You can add a patient name or ID. As a last step, place a couple of square or rectangular holes through the occlusal surface of the guide. This serves as a view box for the dentist to check for complete seating of the guide prior to starting the placement procedure.
08 Another important benefit of working with Implant Studio is that it is fully integrated with the 3Shape Dental System CAD software. This enables you to take the planned implant positions from Implant Studio into Dental System and design and fabricate restorations prior to surgery. Basically, you are working with 100 percent consistent data across the 3Shape software platform. This is an ideal solution for “teeth-in-a-day” workflow. 3Shape has made it possible to fabricate and deliver provisionals and or final prosthetics at the time of stage one surgery.

Fig. 12 Photo of final guide
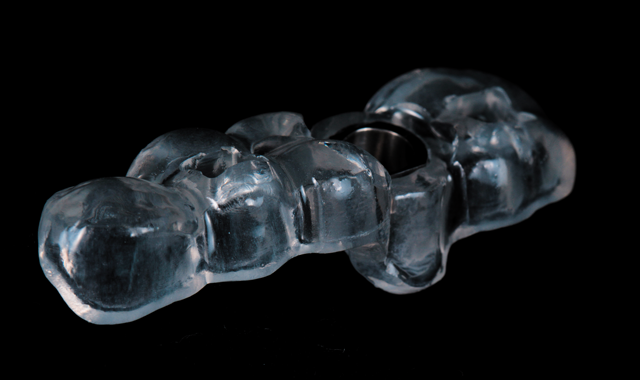
Fig. 12 Photo of final guide
09 Implant Studio outputs an STL file for the surgical guide. For manufacturing, one can use a five-axis mill and clear PMMA disc or a 3D printer. We use both manufacturing technologies with no significant difference in the end product. For milling, we use the Roland DWX-50 and the new DWX-51D. For printing, we use the Objet Orthodesk with the clear bio-compatible MED610 print material. Once the guides are milled or printed, the final step is bonding in the titanium drill guides (Fig. 12). This is achieved using Multilink Automix adhesive (Ivoclar Vivadent) and following manufacturers recommendations for technique. The Implant Studio software provides the part numbers for guide sleeves produced by Steco of Germany and sold in North America by CAP.
Conclusion
In conclusion, guided surgery eliminates questions and potential problems with regard to implant placement. It results in superior placement more routinely and often shortens the surgical procedure. This, in conjunction with making guided surgery an offer from your laboratory, will result in opening doors to new customers and help you grow your business. Lastly, becoming well-versed in Implant Studio is likely much easier than you may anticipate. Not to mention, if all implants were placed using a guided surgical protocol, the patient would receive restorations with fewer compromises.


