REVIEW: Catapult Group delves into details of ICON from DMG America
DMG America presented ICON to the Catapult Group to evaluate both the interproximal and smooth surface systems.
DMG America presented ICON to the Catapult Group to evaluate both the interproximal and smooth surface systems.
Over the last 100 years, general dentists lived and died with their burs and handpieces. Yet with the advent of adhesion and implant dentistry decades ago, many of us within the profession have molded our philosophies into maximizing tooth preservation by incorporating new techniques and materials into our everyday clinical practices. The challenge today with emerging technologies is: How can we be even more conservative with our restorative approaches and treatments?
With that in mind, DMG America presented ICON to the Catapult Group to evaluate both the interproximal and smooth surface systems. The question and challenge to the group and to the profession was: How do you currently treat such demineralized lesions in both categories and are these systems from DMG superior to your current methods?
When to use ICON
Smooth and interproximal surface lesions in the past have been treated with techniques from micro-abrasion, to traditional bur removal, to a variety of chemotherapeutic regimens that allow re-mineralization and halt demineralization. The ICON systems use a special “high-penetration” resin, which is drawn into a lesion by way of capillary action, ultimately penetrating and filling the sub-surface pore system of an incipient caries lesion. Once inside the lesion, the resin sets up a diffusion barrier, limiting further demineralization and changing the lesion’s whitish appearance.
Diagnosing lesions to select for appropriate candidates for caries infiltration is of utmost importance. A candidate for treatment with ICON would require the surface of the lesion to be intact. In these situations, there is a possibility to arrest the progression of demineralization with resin infiltration.
Only true demineralized smooth surface lesions, typically seen in post-ortho cases, are candidates for caries infiltration. Those that present from enamel defect, fluorosis, or trauma are not suitable for treatment as they lack the sub-surface pore system necessary for infiltration. Lesions that present radiographically as E1 to D1 are suitable to be treated with ICON1.
What the evaluators thought
As a whole, 89% of the Catapult Group rated the product’s conservative nature as its No. 1 feature. Of the two systems, evaluators found the smooth surface was easy to apply, and 95% said they would likely incorporate this technology into their clinical paradigm. However, only 56% of the group would incorporate the interproximal system into their practice.
The question was why, and the reasons included: complex procedure, time consuming, no opaqueness within the resin to identify penetration and monitor long term. Recently, these concerns were echoed by the ADA Counsel on Dental Benefits, and after months of investigation, concluded that the technology of Resin Infiltration warranted a new CDT code. Data recently published shows resin infiltration reduces the progression of “watch and see” lesions to a fractional percentage of those treated by other means. DMG’s response was that opaqueness is not available because the infiltration of the resin would be greatly affected by including this feature at this time.
ICON has been extensively researched and studied. Currently, there are no other options that can seal early Class II lesions that are as conservative in theory as ICON without being patient-dependent on home care, and ICON interproximal is what our evaluation team said they would use to treat their daughter or son with early demineralized lesions. The system comes with excellent packaging, easy to follow instructions and YouTube videos online to review right before treatment. In addition, pre-wedging and proper use of floss are essential when implementing the interproximal system. With new CDT insurance coding from the ADA, these 15-20 minute procedures can be submitted to insurance companies and support the “time” issue placement in your operatory.
Read the details of the smooth surface procedure by Dr. Carla Cohn on the next page ...
Smooth surface procedure by Dr. Carla Cohn
The clinical procedure for smooth surface lesions involves several carefully timed steps. Local anesthesia is not required.
01 The first step, after isolation and cleaning with a pumice or non-fluoridated prophylaxis paste, is the application of a 15% HCl etchant over the lesion and extending approximately 2 mm past the edge of the lesion. The HCl acid will erode the surface of the lesion for the purpose of exposing the lesion’s porosities.1-2 An advanced applicator allows for delivery of the ICON Etch. The ICON Etch is agitated after application and timed for optimum penetration for 2 minutes.
02 Timed washing and drying for 30 seconds, and then the use of an ethanol-drying agent, ICON-Dry (99% ethanol), supplied in a syringe in the ICON kit, follow this step.3 This drying step involves 30 seconds of application of the ICON-Dry followed by air drying. At this point an intermediate check can be carried out to preview the final result and to determine if the etching step has been successful. If satisfied, proceed with step 3. If the white appearance of the lesion persists after ethanol penetration, the etching step can be repeated up to two additional times. For particularly persistent discolorations, ICON-Etch can be mixed with pumice powder; ICON-Etch can then be activated when applied, i.e. applied with gentle pressure throughout the reaction time using a circular motion. Once satisfied with the result, the resin infiltrant is applied.
03 ICON-Infiltrant, a resin with a high penetration coefficient, is then applied with the supplied applicator in a series of two applications, first for 3 minutes and then for an additional 1 minute, and cured after each application for 40 seconds, as prescribed.4,5 The overhead operatory light should be reduced during this step. After light curing, excess material is removed. The mechanism of uptake of the resin infiltrant is because of the dry field created by application of the ICON-Dry. The resin infiltrant is drawn into the lesion by capillary action. Once light cured, the resin infiltrant occludes the microporosities thereby preventing further demineralization.6,7 ICON-infiltrant is applied a second time to stop progression of demineralization and increase the microhardness of the enamel.8,9 Treatment with infiltration changes the appearance of the lesion. The whitish appearance is masked from the reduction of light scattering.10
The procedure is minimally invasive with remarkable immediate results that are proven both in the literature and clinically.11 As well the stability of the esthetic results have been proven, even after new acid challenges.12, 13 The product is easy to use, and the results are impressive.
Clinical case by Dr. Doug Lambert
The ICON system offers the ultimate in conservative dentistry for demineralized interproximal lesions with its micro-invasive infiltration concept. The age-old practice of “waiting and watching” these areas by monitoring radiographs, home use of fluoride agents, and adjunctive oral hygiene (with hopeful patient compliance) are now supplanted by a simple, efficient, and predictable method to arrest the progress of these lesions.1-8, 14,15
Continue reading on the next page ...
Research supports the use of the system on interproximal lesions from E1-D1, and recently the American Dental Association announced that resin infiltration of incipient smooth surface lesions is now covered by a 2013 CDT Code classification (D2990) to allow for accurate coding and billing for this new technology.16 A 20-year-old male presented for routine dental care, including prophylaxis, oral exam and radiographs.
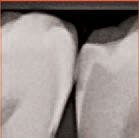
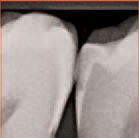
An interproximal lesion was noted on the bitewing on the distal proximal surface of tooth No. 29 (Figs. 3 and 4). The patient was informed of the diagnosis and his options for treatment, which ranged from monitoring the lesion over time to prepping and restoring in a traditional method. We also discussed with him a new technology that fills, reinforces and stabilizes demineralized enamel without removing healthy tooth structure and arrests the progress of the proximal lesion. The patient eagerly opted for the ICON infiltration concept.


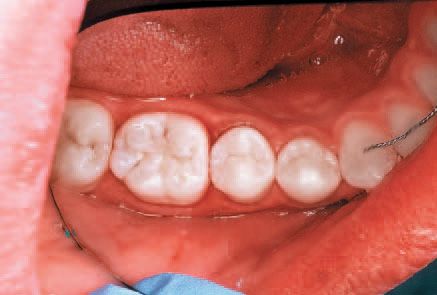
An interproximal lesion was noted on the
bitewing on the distal proximal surface of tooth No.
29 (Fig. 3)

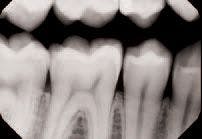
Digital x-ray of the lesion on tooth No. 29
(Fig. 4).
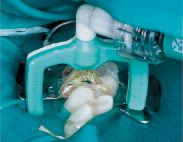
No local anesthesia is necessary, but rubber dam isolation is recommended to assist in the success of the ICON resin infiltration procedure. Cleanse the isolated tooth with NaOCl or Consepsis and rinse thoroughly with a water spray and air dry. The teeth are separated using one of the enclosed plastic wedges, which will allow for the placement of the Proximal-Tip foil matrix delivery system. The wedge can be maintained interproximally during the entire procedure if necessary (Fig. 5).
Screw one of the Proximal-Tips onto the end of the ICON-Etch (15% HCl), insert it between the teeth with the green side facing the affected proximal lesion, and turn the shaft 1½ to 2 turns to deliver the etchant. Leave the ICON-Etch on the surface for 2 minutes (Fig. 6).
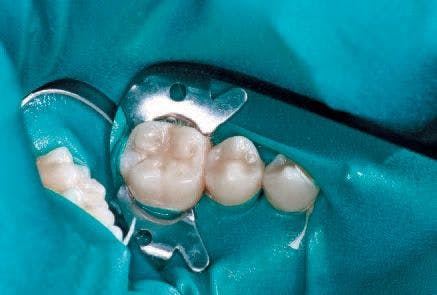
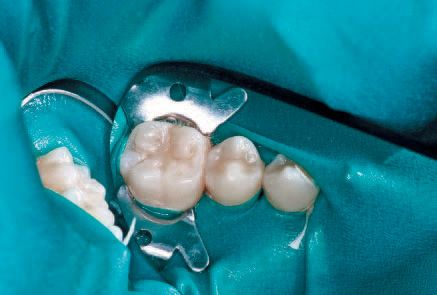
No local anesthesia is necessary, but rubber
dam isolation is recommended to assist in the success
of the ICON resin infiltration procedure (Fig. 5).

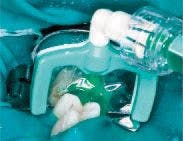
Screw one of the Proximal-Tips onto the
end of the ICON -Etch (15% HCl), insert it between the
teeth with the green side facing the affected proximal
lesion, and turn the shaft 1 ½ to 2 turns to deliver
the etchant (Fig. 6).
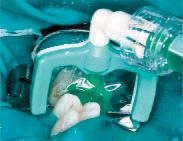
Remove the Proximal-Tip and rinse the area with a water/air spray for 30 seconds, then finish with air drying only for an additional 10 seconds. Apply ICON-Dry (99% ethanol) to the treated area with the metal micro tip and let it sit for 30 seconds, then air dry (Fig. 7). Fasten a new Proximal-Tip foil matrix to the end of the ICON-Infiltrant syringe and slide it interproximally, again with the green side toward the lesion. Turn the handle 1½ to 2 turns to allow an ample amount of the resin to flow into the site (Fig. 8). Wait three minutes, then remove the foil matrix and any excess resin with dental floss. Cure the area from both the buccal and lingual aspects with a visible light source for 40 seconds (Fig. 9).


Apply the ICON -Dry (99%
ethanol) to the treated area with the metal micro
tip and let it sit for 30 seconds, then air dry (Fig. 7).


Fasten a new Proximal-Tip foil matrix to the end of the
ICON -Infiltrant syringe and slide it interproximally,
again with the green side toward the lesion.
Turn the handle 1 ½ to 2 turns to allow an ample
amount of the resin to flow into the site (Fig. 8).


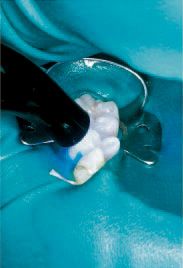
After removing the matrix,
cure the area from both the buccal and
lingual aspects with a visible light source
for 40 seconds (Fig. 9)
Screw a new Proximal-Tip onto the ICON-Infiltrant syringe and repeat the procedure, again being sure to leave the resin in contact with the lesion for an additional 1 minute as research has shown this dual application is critical to the success of an adequate protective resin barrier.17
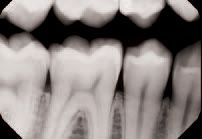
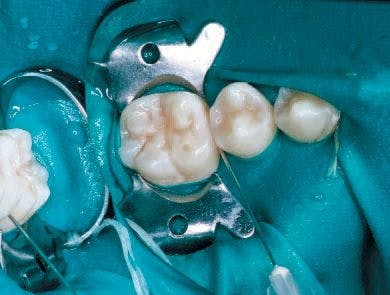
Remove the wedge and rubber dam. Any excess hardened resin is removed with a sharp #12 Bard Parker blade, and subsequent finishing is accomplished atraumatically with fine finishing disks and polishing strips. The final result is a minimally invasive solution to an age-old problem (Fig. 10). Monitoring the success of the ICON resin infiltration with periodic radiographs is essential. Follow up bitewing digital x-rays at 7 months and 12 months show the lesion is arrested and not progressing in dimension (Figs. 11 and 12).


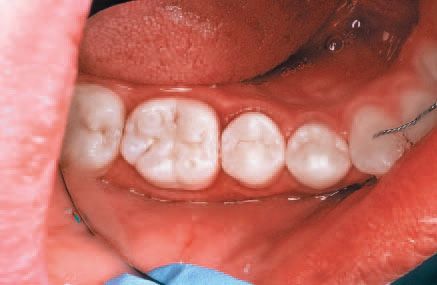
Remove the wedge
and rubber dam. Any excess hardened
resin is removed with a sharp #12 Bard
Parker blade, and subsequent finishing
is accomplished atraumatically with fine
finishing disks and polishing strips (Fig. 10).


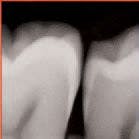
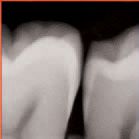
Figs. 11-12 Follow
up bitewing digital
x-rays at 7 months
and 12 months
shows the lesion
to be arrested and
not progressing
in dimension.
Conclusions
As the dental pendulum swings over the years, more conservative restorative options seem to rise to the top. The terms “do no harm,” “minimally invasive,” and “less is more” have never held more truth for the dental profession than they do today. The ICON system’s ability to infiltrate a proximal demineralized lesion positions it on the “cusp” of the next generation of dental restoratives.
Read article resources on the next page ...
References
1. Meyer-Lueckel H, Paris S, Kielbassa AM .
Surface layer erosion of natural caries lesions
with phosphoric and hydrochloric acid gels
in preparation for resin infiltration. Caries Res
2007, 41(3):223-30
2. Paris S, Meyer-Lueckel H, Kielbassa AM .
Resin infiltration of natural caries lesions. J
Dent Res 2007, 86(7):662-6
3. Meyer-Lückel H, Paris S. Infiltration of
natural lesions with experimental resins differing
in penetration coefficients and ethanol
addition. Caries Res 2010;44:408-414
4. Meyer-Lückel H, Paris S. Improved resin
infiltration of natural caries lesions. J Dent
Res 2008;87:1112-1116
5. Paris S, Meyer-Lueckel H, Cölfen H,
Kielbassa AM . Penetration coefficients of
commercially available and experimental
composites intended to infiltrate enamel carious
lesions. Dent Mater 2007, 23(6):742-8
6. Paris S, Meyer-Lueckel H. Inhibition of
caries progression by Resin infiltration in situ.
Caries Res 2010;44:47-54.
7. Paris S, Meyer-Lueckel H. Caries inhibition
by infiltrants in situ. Caries Res 43: 228, (Abst.
No.136), (2009)
8. Paris S, Meyer-Lueckel H. Influence of
application frequency of an infiltrant on
enamel lesions. J Dent Res 2008, (Spec Iss
B):1585
9. Bergdoll, P. Beck, D. Cakir, And J. Burgess,
ICON Caries Infiltrant For The Treatment Of
White Spot Lesions, University of Alabama at
Birmingham, Birmingham, AL
10. Paris S, Keltsch J, Dörfer CE, Meyer-
Lückel H. Visual assimilation of artificial
enamel caries lesions by infiltration in vitro.
Caries Res 44: 171–248, Abs. 41, (2010)
11. Effect of resin infiltration on white spot
lesions after debonding orthodontic brackets.
American Journal of Dentistry 2012 Feb;
25(1):3-8.
12. Effect of caries infiltration (ICON )
technique and fluoride therapy on the color
masking of white spot lesions. Journal of
Dentistry- 2011 March
13. Wear and morphology of infiltrated white
spot lesions. Journal of Dentistry- 2011 May;
39(5):376-85.
14. Paris S, Keltsch J, Dörfer CE, Meyer-
Lückel H. Visual assimilation of artificial
enamel caries lesions by infiltration in vitro.
Caries Res 44: 171–248, Abs. 41, (2010)
15. Paris S, Meyer-Lueckel H. Masking of
labial enamel white spot lesions by resin
infiltration - A Clinical report. Quintessence Int
2009;40:713-8
16. Dentistry Today. 7 December 2012 web
site release:. http://www.dentistrytoday.com/
industry-news/8423-cdt-code-for-resin-infiltration-
gives-practices-additional-treatmentand-
billing-options
17. Hendrick Meyer Lueckel, Andreas Chatzidakis,
Michael Naumann, Christoff Dorfer,
Sebastian Paris. Influence of application time
on penetration of an infiltrate into natural
enamel caries pages 465 - 469 Journal of
Dentistry volume 39.
REVIEW: Catapult Group delves into details of ICON from DMG America
DMG America presented ICON to the Catapult Group to evaluate both the interproximal and smooth surface systems. Written by: by Dr. Lou Graham, President Catapult Group; Dr. Carla Cohn, Catapult Elite Member; and Dr. Doug Lambert, and Catapult Elite Member Date published: 02/14/2013


