Implant evolution and CEREC technology
February 2010 | Dental Products Report Clinical 360° : implant technology The take-aways Since thier earliest days, implants have improved immensely in durability, quality and esthetics. The ability to create custom abutments via CAD/CAM systems such as Sirona's CEREC makes it possible for dentists to quickly create affordable implants with high esthetics. Implant evolution and CEREC technology
February 2010 | Dental Products Report
Clinical 360° : implant technology
The take-aways
- Since thier earliest days, implants have improved immensely in durability, quality and esthetics.
- The ability to create custom abutments via CAD/CAM systems such as Sirona's CEREC makes it possible for dentists to quickly create affordable implants with high esthetics.
Implant evolution and CEREC technology
CAD/CAM systems put high-quality custom implants within reach.
by Peter A. Gardell, DDS

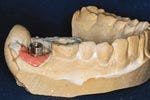

Fig. 1

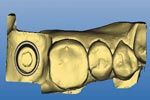
Fig. 2
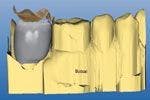
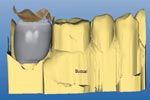
Fig. 3
FIGS. 1-3 The implant abutment is placed on the model,adjusted for adequate occlusal clearance, and a handpiece is used to mill an anti-rotation feature (Fig. 1). With the soft tissue removed, the model is scanned into the CEREC system for design of the restoration (Fig. 2). The form + and Smooth tool are used while designing the restoration (Fig. 3).
The set-up
“I’ve said it before and I’ll say it again: It’s a 3D world out there. Dentistry is embracing 3D in a big way and you’ll be seeing more and more of it in the coming months (trust me on this). The CEREC system is the granddaddy of the 3D systems, having been around since the late 1980s, and it continues to evolve and change the lives of patients and the dentists who embrace it. As 3D continues to change the way we do dentistry, it also is causing big changes in the world of implants. Fabricating an implant retained crown used to be a pipe dream. Now it is a reality. Here’s a great example of restoring a patient back to function within 48 hours of seeing the restorative dentist. This is not the future, this is being done NOW!”-Dr. John Flucke, Technology Editor
“One of the keys to long-term maintenance of tissue health and bone height around implants is complete removal of cement following crown placement. With the crown-and-abutment screw-retained, the author is able to generate a favorable emergence profile using a deep subgingival crown margin with no risk of retained excess cement.”-Dr. Brien Harvey, Implant Team
The way we approach the challenge of designing and placing implants mirrors the evolution of the technology and materials used for the implant restorations themselves. But as it was with the first implants, the ultimate goal is to create a restorative complex that mimics what nature provides. It needs to be cleansable, function with the occlusal scheme of the patient, be durable enough to withstand the occlusal forces the patient will exert upon it and look good.
Starting points
The history of implant restoration began with cylindrical abutments used to fill the transmucosal space and a prosthesis screwed on top. There was zero emergence up to the gingival crest, then the prosthesis extended in different directions to fill the space present. Many times uncleansable ridgelaps were incorporated into the design of the prosthesis to improve the buccal profile of the restoration.
With more experience and experimentation with abutment design, the complex started to evolve, and the advent of the UCLA castable abutment allowed for the creation of custom abutments that improved outcomes for difficult situations such as patients with poorly positioned implants or thin tissue.

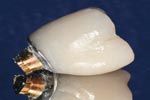
Fig. 4
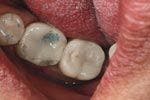
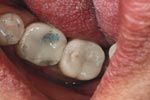
Fig. 5
The restoration ready to be delivered to the patient (Fig. 4). The finished case was completed in less than 48 hours (Fig. 5).
Mimicking natural structure
When dentists started incorporating emergence profiles into their abutments and fabricating cemented restorations, this removed the unaesthetic metal chimney present on the screw-retained prostheses. Over time these dentists started to observe that the gingival architecture maintained itself, including the very important papilla. The development of custom abutments allows us to mimic the cross section of the teeth we are restoring.
Techniques and materials further esthetics
When patients would no longer accept the dark, poorly contoured gingival surrounding their restorations, dentists began to bury the margin so tooth-colored ceramic extended below the gingival.
This development allowed esthetics to improve considerably, but with the cement line subgingival, removal became difficult. If any cement was left, the soft tissue reaction and subsequent damage destroyed even the most beautifully executed restoration.
The arrival of zirconia offered improved esthetic outcomes by making it possible to place an implant on a patient with thin gingival without causing graying of the tissue. The zirconia custom abutment allows for the placement of a cement-retained crown with the margins close to the gingival margin of the implant, and the white of the zirconia behind the soft tissue does not lead to esthetic issues.
CAD/CAM advantages
Led by the Sirona Dental Systems’ CEREC (sirona.com), CAD/CAM technology offers a predictable method for producing economical, esthetic restorations. The introduction of Ivoclar Vivadent’s e.max material (ivoclarvivadent.com) now allows a CEREC dentist to produce a restoration that can withstand the forces placed upon it. While the option to have a lab fabricated custom abutment made is still there and preferred by many, the CEREC system allows a dentist to make custom abutments and screw-retained implant supported crowns in either titanium or zirconia or e.max.
Case study
The case presented is a screw-retained restoration on an implant in the position of tooth No. 31. The patient is a 61-year-old male in good health. The case was a two-stage surgery where the patient was referred by an oral surgeon with the clearance to restore.
At the first visit, the patient had no complaints and the restorative process began with an implant level impression and the bite was recorded. There wasn’t an esthetic or functional reason to temporize, so the healing abutment was replaced and the patient dismissed.
A soft tissue model was poured and the implant position analyzed. The position and angulation were good in the arch. It was decided that this implant would be restored with a screw-retained e.max restoration cemented to a stock abutment. The reasons for this choice were that the access hole was on the occlusal table, the implant had a slightly lingual placement , and a desire to minimize the chance of retained cement. The use of a screw-retained crown would allow me to bring the emergence out toward the buccal to line it up with the existing dentition. This could have been done with a custom abutment, but is more difficult than with a stock abutment.
The stock abutment was selected; the collar height was 1 mm, the shortest for this implant system. There wasn’t a need to get a taller collar to bring it toward the gingival crest. In fact, with this type of restoration, a lower collar is more desirable because it gives more room to develop the emergence of the final restoration. This implant system has a nice .75 mm shoulder on its stock abutment allowing for easy imaging and fabrication of the e.max crown. The abutment was placed and adjusted to allow for adequate occlusal clearance. An anti-rotation feature is milled into the abutment with a handpiece (Fig. 1). I prefer a log incline plane on the occlusal.
The case was performed with the database method, so a bite was taken on the models and the antagonist images taken. The soft tissue was removed from the model and the prep images were taken (Fig. 2).
Using the CEREC system, the design process for the restoration is the same as with a natural tooth. The margin of the abutment is outlined, the insertion angle is corrected if needed, and the database is selected. After the proposal is rendered, the height, angulation, occlusion and contacts are evaluated and modified as required. Many times with an implant restoration the contact will be short of the adjacent tooth.
By using the scale tool, the proposal can be highlighted and enlarged or shrunk in the direction desired by the operator. The emergence will need to be improved in most cases. The Form + tool and Smooth tool are used to bring some contour to the flat area while the smooth tool is used to minimize any wavy areas (Fig. 3).
After the operator is satisfied with the proposal the access chimney can be positioned and created. The two most useful tools for this are shape and drop. By taking the proposal and making it transparent, the abutment can be seen and the chimney is created by creating a divot that goes straight to the screw location in the abutment.
The proposal is then sent to the milling chamber. Endo mode is recommended for the best fit. After the milling has been completed, the blue restoration is checked for fit on the abutment, contacts with the adjacent teeth and the occlusion with the opposing teeth. After the operator is satisfied with all of these, the blue restoration is placed in the oven and crystallized.
After being fired in the oven, the restoration again is checked for fit and function. After approval by the dentist the restoration is bonded to the stock abutment by using any of the recommended methods. The cement is shaped and polished to allow for smooth emergence of the restoration complex.
The restoration is now ready to deliver to the patient (Fig. 4). The healing abutment is removed, and the restoration complex placed. In some cases a releasing incision mesial and distal to the implant is placed or a diode laser can be used to remove some tissue if there is a lot of pressure placed on the implant. To close the screw access hole a fast setting PVS or bite material is placed in the chimney to cover the screw head, and then a composite material is placed to seal the access hole.
The CEREC system allows for easy and efficient restoration of integrated implants (Fig. 5). Through the use of stock abutments and a small investment of time, a quick turnaround for a case is possible. This particular case had a turnaround of less than 48 hours.
Conclusion
With greater collective experience, the way we restore implants has evolved. We no longer have to accept poorly contoured, non-lifelike restorations, and we no longer have to run the risk of cement sepsis that can turn what looks like a successful restoration into one with many complications that need to be addressed. CEREC and the e.max block allow the practitioner to create a restoration that follows the criteria that has developed over the years in an efficient, economical manner.
Peter A. Gardell, DDS, a guest contributor practices general dentistry with an emphasis on esthetic restorations in Stamford, Conn. He is a Clinical Mentor in the CAD/CAM department of The Scottsdale Center for Dentistry, and is a co-founder of DentalCadProducts.com. Dr. Gardell is on the adjunct faculty of CERECDoctors.com, and participates as a beta tester for Sirona’s CEREC software.
Join the Discussion
- Comment on this and other articles on our Facebook page


