How to master single-unit crown procedures
The secret to a successful single-unit crown procedure is preparation and tissue management - but that’s easier said than done.


According to the ADA, the two most common restorative procedures in a general practice are a two-surface posterior resin and a single crown.1 Single crowns have long been the mainstay, the bread and butter, of general dental practices as the treatment of choice when full coverage is indicated.
Several factors help determine the most appropriate type of restoration. The most important involve the size of the lesion/destruction of tooth structure and whether the remaining tooth structure must gain strength and protection from the restoration.2,3
In many cases, the factors necessitating a full-coverage restoration are consistent with a tooth needing restoration after endodontic treatment. Given the large number of teeth that undergo root canal therapy, it’s important for restorative dentists to become proficient in this basic - and commonly needed - procedure. In fact, the single-unit crown procedure is made up of several integral procedures that when done efficiently and correctly result in an excellent treatment outcome.
The ultimate goal for every restorative procedure in my clinical practice is to align the patient’s wants, needs and expectations with my own ability. As it relates to a crown, the patient’s expectation is simplistic: a “cap” that makes the tooth whole again, causes no discomfort, and will allow him or her to eat normally.
The best compliment a patient can give after a crown is completed would be, “I’ve completely forgotten it is there; it just feels like my other teeth.” This compliment might seem anticlimactic for the clinician, but it’s exactly the result we hope to achieve. A well-made restoration should mimic the natural clinical situation and when done correctly should be indistinguishable to the patient.
The minutia of a single crown procedure, such as maintaining and facilitating gingival health, creating wide, broad contacts, or avoiding occlusal interferences, mean nothing to patients. What every dentist understands, however, is that achieving an “indistinguishable crown” is the result of properly completing all the steps of the single crown procedure. In my experience, the most important parts of the procedure involve proper preparation of the tooth as well as the creation of an ideal environment for impression-making through effective tissue management.
PFM crowns
Porcelain-fused-to-metal (PFM) crowns have two potential drawbacks:
- Veneering of feldspathic porcelain can causes abrasion, sometimes severe, of the opposing tooth.
- Due to the fact that PFMs are bilayered restorations, there’s a chance the weak feldspathic layer can chip or fracture and the gray metal substructure could be exposed.
Despite the possible drawbacks of the PFM crown, it has been a stalwart in dentistry for almost 70 years. Although recently supplanted by zirconia and glass ceramics by most dental offices as the crown restoration of choice, in my 29 years of clinical practice I’ve had excellent results with PFMs, and I rarely have a case that fractures due to the bilayered construction.4
The key to creating an indistinguishable PFM crown restoration in my experience is proper preparation. With proper reduction of the supra- as well as the sub-gingival regions of a tooth, the dental technician can develop excellent margins and life-like esthetics that highlight why the PFM restoration has stood the test of time.
Case study

Fig. 1
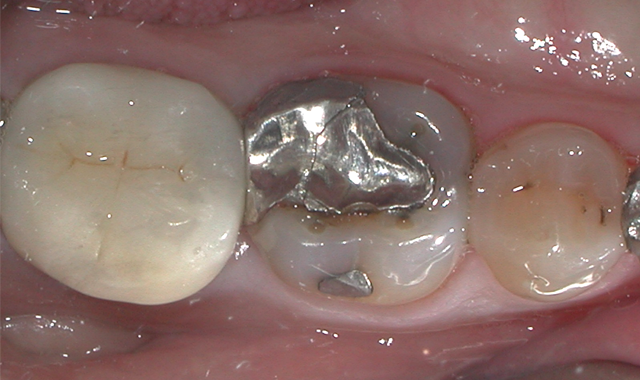
A 60-year-old male patient presented complaining of pain from the lower right first molar. Upon clinical examination, tooth #30 was sensitive to percussion and had a fractured disto-occlusal-lingual amalgam.
After discussion with the patient and effective local anesthesia, the existing amalgam was removed to reveal caries extending into the pulpal tissue (Fig. 1).
The patient was referred for root canal therapy and after three weeks returned for a restoration (Fig. 2). The tooth was cleaned of temporary restorative material and was prepared for a post and core. A Dentatus Classic Surtex® (Dentatus) metal post was cemented with self-adhesive resin cement (TotalCem, Itena) and an adhesive layer of CLEARFIL SE Bond (Kuraray Dental) was placed as per manufacturer’s instructions, followed by light curing for 10 seconds.

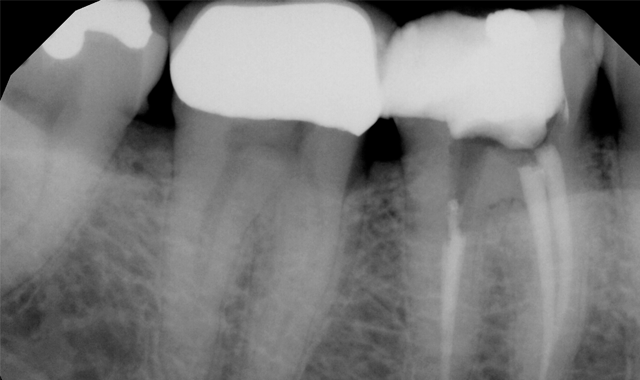

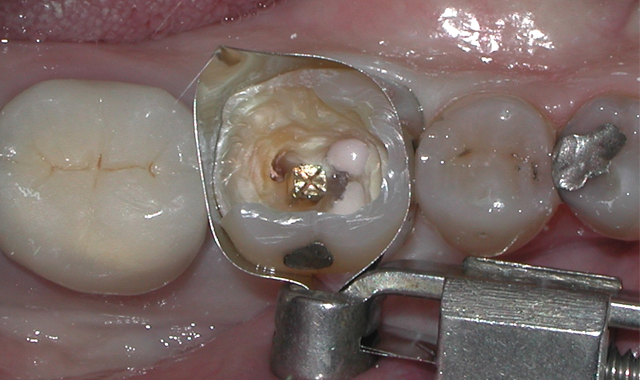
Fig. 2 Fig. 3
The chamber was then filled using CompCore™ AF (Premier Dental). CompCore AF is a dual-cured, fluoride-releasing, radiopaque composite core buildup indicated for vital and nonvital teeth (Figs. 3-4).
I’ve adopted the use of single-use cutting burs in my practice following statements from the Occupational Safety and Health Administration (OSHA), which advises that, “Because dental burs are difficult to clean and are degraded by the sterilization process, dental offices should consider making burs a single-use, disposable item.”5 In my office I use Premier Dental’s Solo Diamonds® because they’re single-use, individually packaged, pre-sterile diamond burs that come in all the shapes I’m accustomed to and prefer.
 into the tooth to complete the post and core")
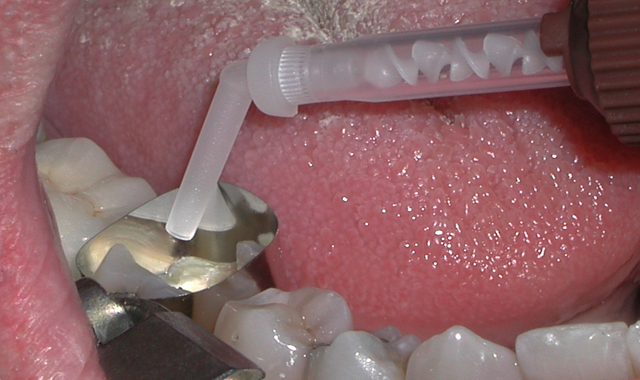
Fig. 4 Fig. 5
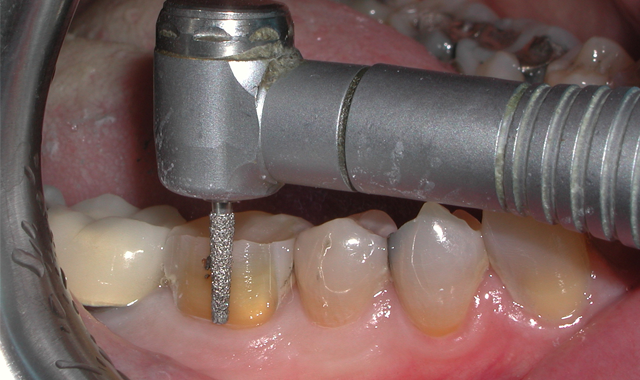
The first step in preparation of tooth #30 for a PFM crown is reduction of the clinical crown in the buccal and lingual dimensions. This was accomplished using a flat-ended taper diamond bur (Premier Dental, Solo Diamond #846KR016C) to create rounded internal line angles (Fig. 5).
Next, interproximal contacts are broken using a round end-taper diamond bur (Premier Dental, Solo Diamond #850012C), followed by occlusal reduction and shaping using a football diamond bur (Premier Dental, Solo Diamond #368T023C) (Figs. 6-7). Proper axial reduction for a PFM crown should be 1.0-1.5 mm and occlusal reduction of 1.5-2.0 mm in the central fossa.

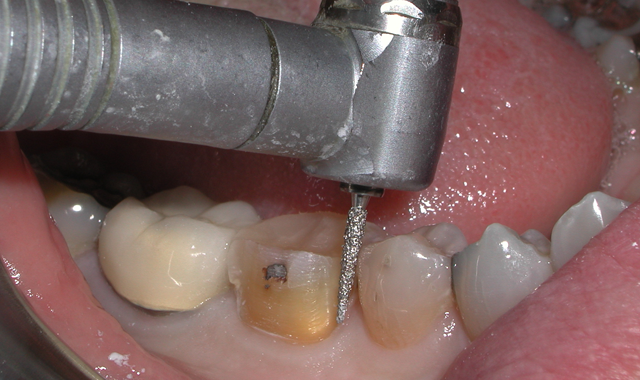

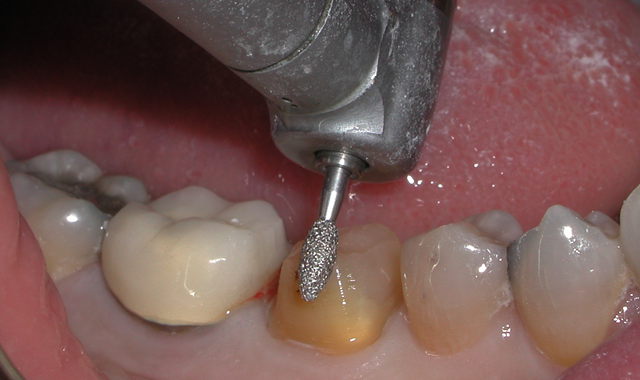
Fig. 6 Fig. 7
I completed the occlusal preparation with a ball diamond bur (Premier Dental, Solo #801023C), which provided the laboratory with adequate central fossa reduction to create sufficient thickness of material for strength and esthetics while allowing enough material for adjustment (Fig. 8).

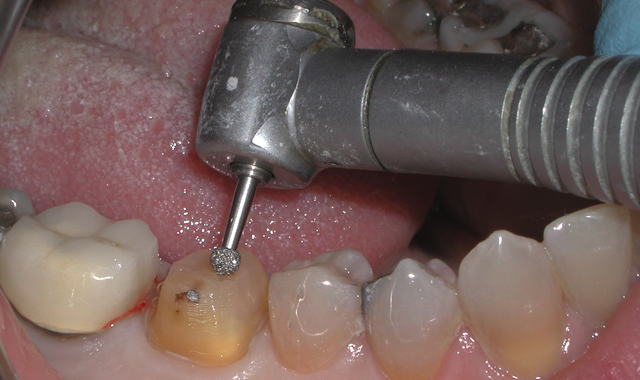

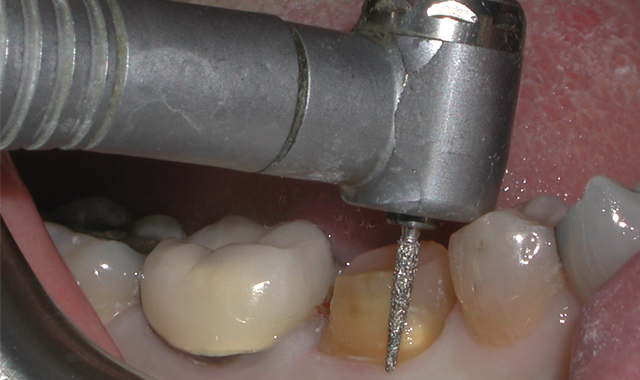
Fig. 8 Fig. 9
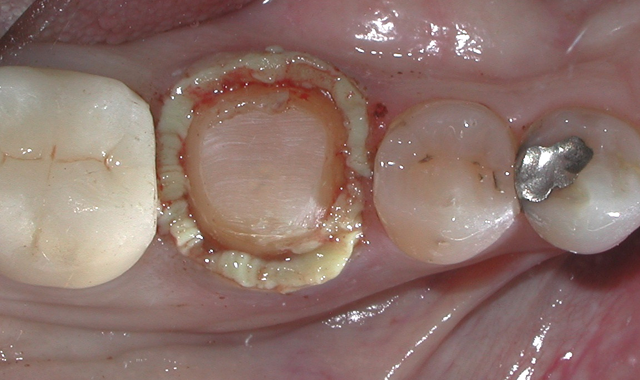
Beveling is important to the success of the crown, and PFM crowns lend themselves nicely to this preparation design. The bevel adds 1.0–1.5 mm of additional tooth structure to provide needed ferrule for resistance to lateral forces. In addition, creating a bevel reduces the circumferential width of the tooth in the critical cervical area, thereby decreasing the emergence profile of the crown.6 Shoulder bevel preps were originally designed to mitigate metal distortion during porcelain fusion, and although this hasn’t been proven not be clinically relevant (finish line form doesn’t significantly affect the fit of metal ceramic crowns), I’ve had success with this preparation design on teeth that I crown.7
To create a circumferential bevel for tooth #30, I used a flame diamond (Premier Dental, Solo #862012C) (Fig. 9). I then carefully inspected for tissue attachment to the bevel region, as any tissue left adhering will negatively affect my impression. Any tissue was then removed with either a periodontal curette or a rotary instrument.
Subgingival preparation is traumatic to the gingiva and bleeding can be expected. It’s critical to control the fluid and blood before the impression is made. Astringedent® (Ultradent), an aqueous 15.5% ferric sulfate solution, was vigorously rubbed circumferentially in the sulcular region until bleeding has slowed. The Astringedent was washed away with copious amount of water followed by application of gingival retraction paste.
Premier Dental’s Traxodent® Hemodent Paste Retraction System, a clay-based paste containing aluminum chloride, was applied directly into the sulcus, and a compressive Retraction Cap (Premier Dental) was fitted over the tooth. The cotton cap not only drives the Traxodent paste into the sulcus, but it also facilitates hemostasis when the patient bites down for a minimum of two minutes through direct pressure on the site (Figs. 10-11).
 retraction paste has been placed")
 for at least two minutes")
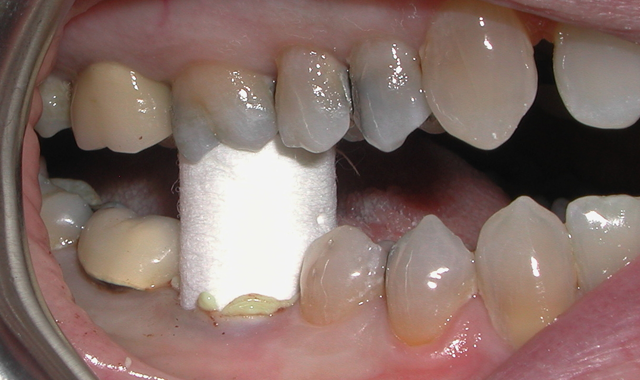
Fig. 10 Fig. 11
After two minutes, the Traxodent was rinsed away with water, and at this point the tissue around tooth #30 was dry with no bleeding and was ready for the final impression (Fig. 12). Using a T-LOC™ Triple Tray® (Premier Dental) and Impregum™ (3M ESPE) the final impression of tooth #30 was perfectly captured (Fig. 13). The tooth was provisionalized and the patient released.

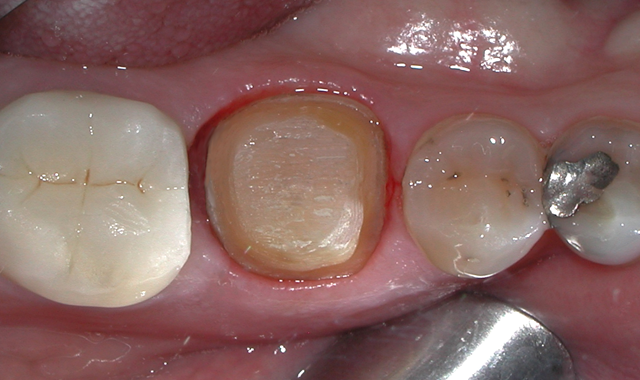

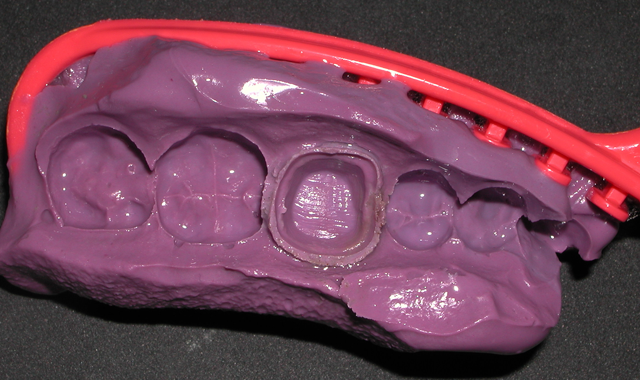
Fig. 12 Fig. 13
One week later, the PFM crown for tooth #30 was delivered to my office for insertion. The provisional was removed and the PFM placed to check, adjusting the fit and occlusion as needed. Finally, the patient’s new PFM crown for #30 was definitively cemented using glass ionomer luting cement (Ketac™ Cem, 3M ESPE) (Figs. 14-15).

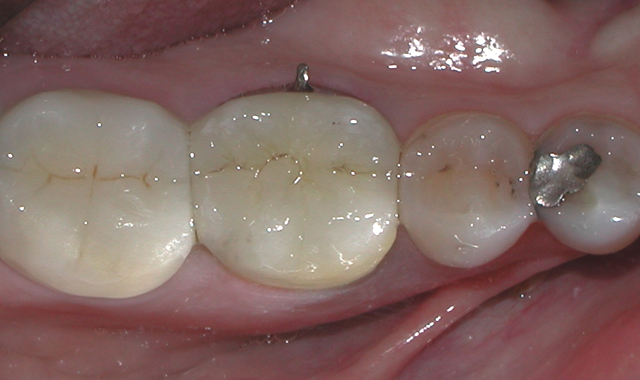

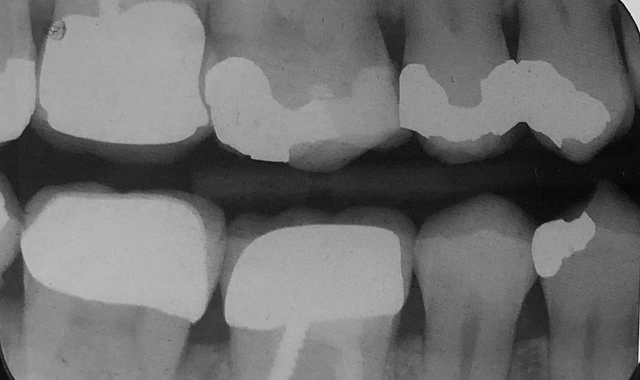
Fig. 14 Fig. 15
Conclusion
The outstanding final PFM crown in this case was the result of proper completion of all the previously described steps. The saying, “garbage in, garbage out” applies to this otherwise routine and basic procedure. In order to achieve excellence in the result, each of the steps discussed above must be completed to the utmost of our ability as clinicians. Failure to do so will result in a less-than-adequate impression, leading to a poorly fitting crown.
When clinicians focus on the foundation of a crown restoration (i.e., preparation and tissue management leading to perfect impression), the overall procedure becomes more consistent and rewarding, not only for patients with better fitting crowns but for dentists who will spend less time adjusting.
In my experience, rigid adherence to proper preparation design and tissue management, combined with tried-and-true procedures utilizing the highest quality products, has allowed me to insert crowns with optimal marginal integrity and esthetics. Dentists are privileged to play an integral part of not only a patient’s oral health but overall health, and striving to provide better, safer and more cost-effective dentistry should always be our mission.
References
1. The 2005-2006 Survey of Dental Services Rendered. American Dental Association. 2007.
2. Schillingburg HT. Treatment Planning for Single-Tooth Restorations. In: Fundamentals of Fixed Prosthodontics. 4th Ed. 2012. Quintessence Publishing Co, Inc; Hanover Park, IL. p71-79.
3. Smithson J, Newsome P, Reaney D, Owen S. Direct or Indirect Restorations? International Dentistry 2001;1(1):70-80.
4. DiTolla M. Is the PFM dead? Dental Economics. 2014. Accessed May 2, 2018.
5. Frequently Asked Questions (FAQs) on dental infection control. OSAP. Available at: http://www.osap.org/?FAQ_Instrum_Ster1#whataretheguidelines. Accessed May 2, 2018.
6. Mehler S. It All Starts with the Prep, Doctor!! DentalTown Magazine. 2017. Available at: http://www.dentaltown.com/Article.aspx?i=(null)&aid=6492. Accessed May 4, 2018.
7. Byrne G. Influence of finish-line form on crown cementation. Int J Prosthodont 1992;5(2):137-144.


