How to intraorally repair porcelain-fused-to-metal or zirconia/alumina restorations
Intraoral repair with BISCO's Intraoral Repair Kit can be a treatment option that can save the dentist, technician and patient valuable time and money.


Sometimes a patient presents with damage to a restoration, such as a fracture or chip. In some cases, the damage may not result in reducing the integrity or function of the restoration; it simply compromises the esthetics.
Unexpected failures can even occur with restorations in just a few weeks after placement. Although this can be frustrating, there are many reasons this may occur:
- A high bite or patient’s occlusal dysfunctions, including refusal to wear a nightguard
- Accidents
- Repairs made during manufacturing in the laboratory that causes some alterations in its strength and structure
- Bubbles or cracks in the internal structure that were not evident to the technician
Regardless of the root cause for premature failures, intraoral repair can be a treatment option that can save the dentist, technician and patient valuable time and money.
There are a number of situations when intraoral repair can be a useful procedure in your daily practice. At other times, the treatment plan requires replacing the fractured restoration. An intraoral repair can also be considered a temporary solution when the replacement cannot be made immediately. The decision between repairing the damaged material or fully replacing the restoration will depend on the clinical situation.
Clinical situations for choosing intraoral repair
The most common reason for intraoral repair is that the patient may prefer not to invest the time or money to fully replace the restoration. The patient simply may not have the time for multiple visits, including the preparation and seating appointments as well as the temporization time. In addition, depending upon the
circumstances, the patient may not want to incur the expenses of a full replacement.
There are several scenarios where the clinician and patient may determine that repairing the restoration would better serve the clinical purpose than replacing the restoration. Some examples include:
- If the fractured material is part of a well adapted restoration or a sealed three or four unit bridge.
- If the restoration is seated on a highly sensitive tooth that is under control after the original restorative cementation, and there is no clinical or radiographic evidence that the pulp has been compromised.
- If this is already a replacement for other failures such as incorrect shade or gingival recession after impression.
Clinical situations for choosing replacement
There are also clinical situations where the fractured restoration should be replaced. If upon inspection, it is determined that there are problems with marginal adaptation, root canal condition, contact points to adjacent teeth or periodontal disease, the restoration should be replaced. The age of the restoration should also be considered.
Finally, the accessibility to the area to be repaired should be considered since the key to a successful repair is to follow a proper protocol.
Continue on to read a clinical case...
Other options for using intraoral repair
Even in the event that the treatment plan calls for replacement, intraoral repair can still play a role. In the case of an emergency, there may not be time in the doctor’s or patient’s schedule to remove the old crown, make a provisional and seat the crown until a later date. In this case, repair can be done during the emergency visit as a temporary solution to preserve the restoration and improve esthetics until the replacement procedure can be scheduled.
Finally, if a patient is unsure of which treatment option to choose, the repair can be completed and the patient can make a final decision on whether to replace the restoration in the future, or keep the repair as a permanent restoration. Whether used as a permanent solution or a temporary procedure, intraoral repair is a convenient, cost-effective, highly esthetic, durable solution for addressing failures in restorations.
BISCO’s Intraoral Repair
The key to successfully repairing a restoration is the proper choice of restorative materials. Planning the procedure in advance and understanding the benefits of the materials used enable the procedure to be completed quickly, esthetically and with long-term durability.
BISCO’s Intraoral Repair Kit provides all the materials necessary to repair the framework of broken or damaged restorations intraorally. The Intraoral Repair Kit is a cost effective option as a practical restorative solution and comes complete with BISCO’s Z-Prime™ Plus, Porcelain Primer, Porcelain Bonding Resin, Dual-Cured Opaquer , Porcelain Etchant (9.5% HF) and Barrier Gel.
BISCO’s Intraoral Repair Kit is effective in repairing porcelain and lithium disilicate restorations, porcelain-fused-to-metal or zirconia/alumina restoration and indirect composite restorations.
A clinical technique for repair of porcelain-fused-to-metal or zirconia/alumina restorations*
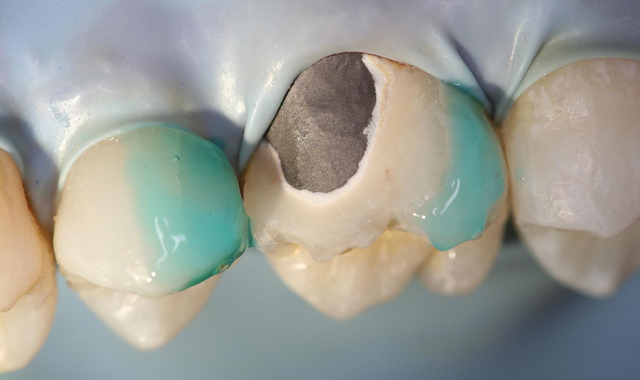
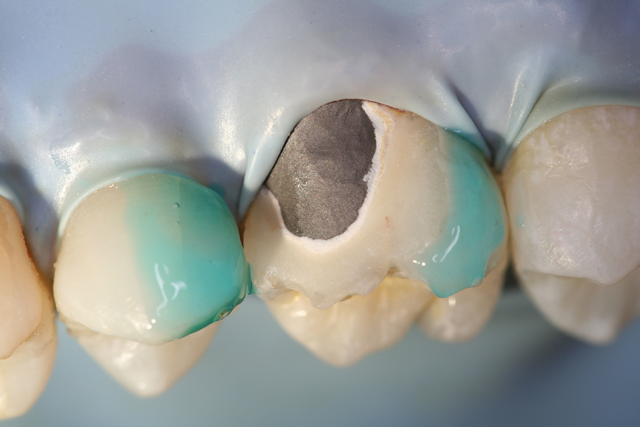
Step 1 – Always use a rubber dam. The use of a rubber dam during porcelain repair provides several benefits, including isolation from saliva during bonding and soft-tissue protection when using hydrofluoric acid intraorally
Step 2 – Remove the glaze and bevel (45 degree) the porcelain around the area to be repaired. Place Bisco’s Barrier Gel on gingival tissue that may be exposed or porcelain to protect areas where etching is not desired.


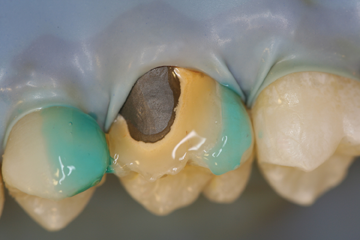
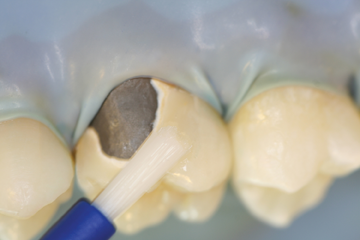
Step 3 – Remove cap from Bisco’s Porcelain Etchant, securely attach dispensing tip and verify etchant flow prior to applying intraorally. Apply Porcelain Etchant (9.5% HF) to the dry porcelain surface for 90 seconds. Continue to observe the etch site throughout the entire procedure. Suction the Porcelain Etchant, then rinse with a copious amount of water and air dry. The etched surface should appear dull and frosty (if porcelain has a white/chalky appearance, agitate a moist microbrush on the porcelain to remove salt and debris created by etching, rinse and dry).


Step 4 – Apply one coat of Porcelain Primer to the etched porcelain surface and allow to dwell for 30 seconds. Dry with air syringe.
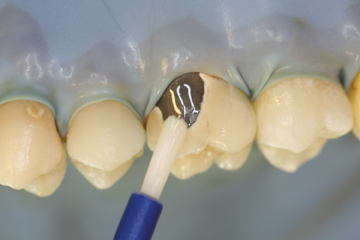
Step 5 – Apply 1-2 coats of Z-Prime™ Plus to the exposed metal/zirconia/alumina & dry with an air syringe for 3-5 seconds.


Step 6 – If metal masking is required, shake Bisco’s Oapauer Base and Catalyst bottles well before dispensing. Dispense one drop each of Catalyst and Base onto a mixing pad, and mix with a brush tip. Apply a thin coat of Oapauer only to the metal surface.
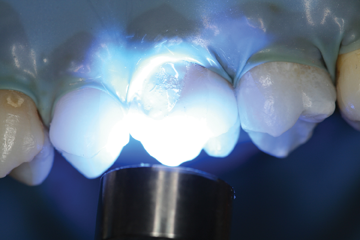
Step 7 - Allow to self cure, or light cure for five seconds. An oxygen inhibited layer will be present on the surface once the curing process has completed. This is normal for this material.
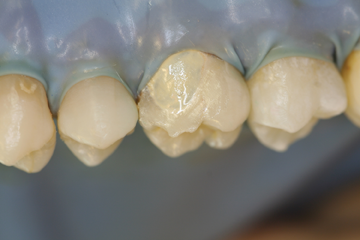
Step 8 – Apply a thin layer of Bisco’s Porcelain Bonding Resin to the repair site. Spread composite evenly over the surface and light cure.
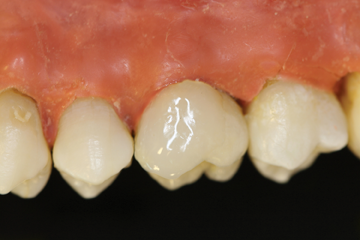
Step 9 – Complete the repair and finish/polish.

* Refer to instructions for complete details.


