How to create a single-visit zirconia fixed bridge with CEREC and CEREC SpeedFire Sintering Furnace
How technology helped one clinician provide the best care possible.

Since the introduction of CEREC 3D in 2005, single-visit, all-porcelain restorations have become increasingly more popular. Dentists have adopted this technology rapidly, tremendously benefiting themselves and, more importantly, their patients.
Dentists have increased their adoption of dental implants, yet patients still frequently opt for the traditional fixed bridge. With CEREC Connect, cases are submitted digitally to a laboratory. Connect improves the fit and comfort of fixed bridges for patients by allowing for instant feedback from the laboratory technician prior to fabrication; however, the process still requires multiple patient visits to complete.
In 2011, materials were introduced for chairside fixed bridges. While these bridges are beautiful and can be completed in a single visit, certain limitations remained. The material of the bridges is designed for posterior bridges replacing first bicuspids and anterior bridges; however, the material is not approved for fixed bridges replacing molars or second bicuspids. The maximum pontic mesial to distal dimension cannot exceed 9 mm in the posterior and no more than 11 mm in the anterior. The connector sizes must be 16 mm2 with the height greater than the width. Additionally, e.max is not indicated for Maryland bridges, cantilever bridges or inlay bridges.
Trending article: How CEREC Zirconia makes restorations easier
In 2016, Dentsply Sirona introduced a solution for the those limitations-CEREC Zirconia and the new SpeedFire sintering furnace. Dentists have long used zirconia because of its exceptional strength. Zirconia is well suited for all posterior bridges with one or two pontics, and recent material advances have made it substantially more acceptable esthetically.
The new CEREC SpeedFire furnace can completely sinter a CEREC Zirconia bridge in about 25 minutes using the CEREC MC XL Practice Lab milling machine’s dry mill method in fast mill mode. This case demonstrates two techniques for extraction and immediate placement of a single-visit, fixed bridge. The first technique shows where a tooth is extracted the same day as the fixed bridge placement with no resulting loss of tissue or bone height. The second technique shows the fabrication of a zirconia fixed bridge from preparation to cementation in a single visit.
Continue to page two to read more...
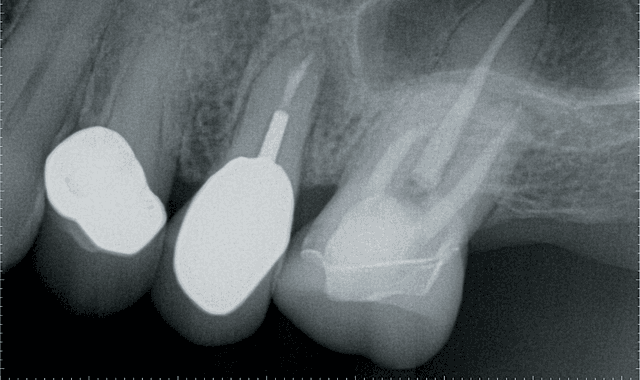
Fig. 1
Step 1: The patient presented with a cracked root on #13 (Fig. 1). The treatment plan options were extraction of #13 with bone grafting and implant placement or extraction of #13 with a fixed bridge for #12-14. A Galileos® CBCT scan showed that primary stability of an implant placed at the time of extraction could not be achieved. The tooth would need to be extracted with socket grafting, heal for three to four months and then be followed by implant placement.
The patient found the first treatment option to be unacceptable. Teeth #12 and #14 already had crowns, so replacing these crowns with a fixed bridge would not sacrifice healthy teeth. Understanding all of the benefits and risks, the patient opted for the second option of a fixed bridge.
Biogeneric copy images were taken with the CEREC Omnicam. The crowns were removed from teeth #12 and #14 by sectioning the crowns. The preparations were cleaned, and additional tooth structure removal was not necessary, since zirconia requires less tooth reduction than porcelain restorations.

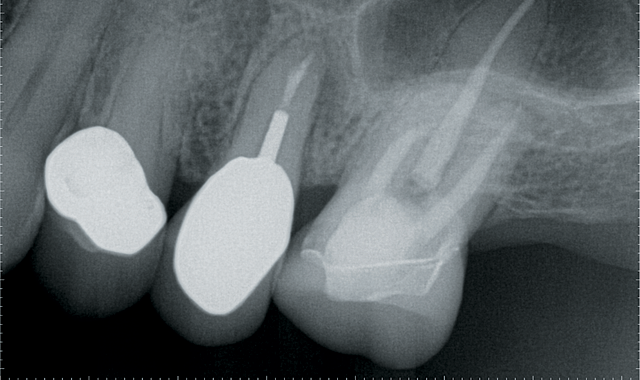
Fig. 2
Step 2: The crown was removed from tooth #13 and the tooth root was reduced approximately 5 mm apical from the crest of the ridge, leaving a thin wall of tooth root (Fig. 2). This technique simulates the socket without any bleeding. Images can easily be taken with the CEREC Omnicam.
Step 3: The bridge was designed using CEREC Software. This software makes designing fixed bridges effortless. Connector sizes were designed to zirconia specifications; the connector size is shown in “Analyzing Tools.”
Milling this zirconia bridge took 26 minutes using the fast dry milling method provided on the CEREC MC XL Practice Lab (Fig. 3). Sintering time is reduced using this method since additional drying time after wet milling is eliminated. Sintering in the new SpeedFire furnace took another 26 minutes. Clinicians have a choice between polishing the restoration using Meisinger rubber wheels or staining and

Fig. 3
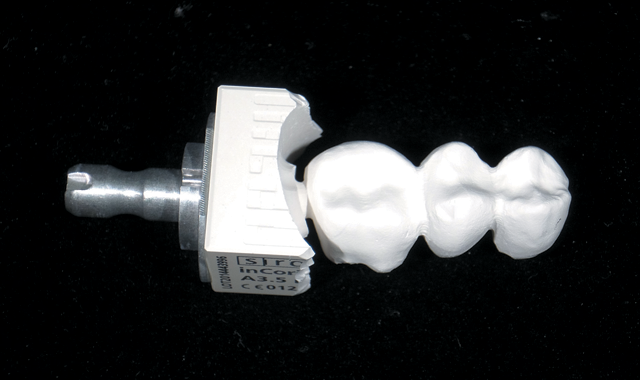
glazing the restoration. In this case, staining and glazing was performed-a cycle that took nine minutes.
One of the most amazing benefits of zirconia restorations with CEREC is the perfection of the occlusion. After four months of using the CEREC for zirconia restorations, spot-on occlusion with no adjustment needed during or after insertion and eliminated post-operative sensitivity on every case has been noted. CEREC Zirconia can be conveniently cemented. Glass ionomer cement has several significant advantages over resin bonding, including a faster removal process. Removing excess resin cement in bonding has become easier throughout the past several years, but it is still a time-consuming process, sometimes taking longer to remove the cement than the initial preparation.
Another advantage of cementing versus bonding is that cementation is less technique-sensitive and requires fewer steps. Glass ionomers require water to set. While they cannot be placed under water reliably, they do not require desiccation of the dentin. Glass ionomer cement also has excellent antimicrobial properties, which reduces the incidence of recurrent caries.
Step 4: Once the bridge is completed and ready for cementation, the residual root is removed. It is important that a flap is not raised. The buccal plate is thin and derives its blood supply from either the periodontal ligaments or the periosteum. Removing the tooth and curetting the socket causes a loss of blood supply to the buccal plate from the tooth side. If a flap is raised, the blood supply from the periosteum is also eliminated. In the time it takes to re-establish a blood supply, the buccal plate would die, resulting in a buccal and occlusal defect.


Fig. 4
Using periotomes from Dowell, the root is easily removed in an atraumatic fashion. The periotomes from Dowell are very thin, strong and flexible. The periotome is inserted between the root and surrounding bone and, as it moves apically, the periodontal ligaments are severed. The root is then removed using the root extractor provided in the Dowell kit. The socket is curetted to remove all remaining periodontal ligaments and establish bone bleeding. Demineralized freeze-dried bone is hydrated and placed in the socket. A collagen plug is cut to 2-4 mm in thickness and placed over the graft to contain it until a blood clot has formed. Sutures are not needed since the bridge pontic fits the extraction site perfectly and will keep the collagen in place. The plug also controls bleeding well enough to keep the preparations dry during cementation. The bridge is inserted and slight pressure is placed against the collagen plug. After the cement is set, the excess is removed.
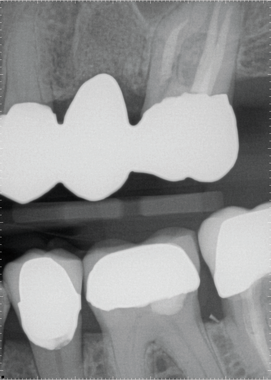
The postoperative radiograph shows the margins of the restoration and the fill from the bone graft (Fig. 4). The bullet-shaped pontic design allows the pontic to appear as if it emerges from the tissue as a natural tooth. It also facilitates easy cleaning with floss.
Continue to page three to read more...
The total treatment time was just over two hours:
- 10 minutes: Anesthesia and initial Biocopy imaging with CEREC AC with Omnicam.
- 30 minutes: Preparation of abutments and root.
- 15 minutes: Imaging and design of restoration with CEREC Software.
- 26 minutes: Milling with fast, dry mill method on CEREC MC XL Practice Lab.
- 26 minutes: Sintering in the new CEREC SpeedFire.
- 10 minutes: Stain and glaze.
- Five minutes: Removal of residual root and bone grafting. Please note that this step took a total of 15 minutes, but root removal and grafting started while the final restoration was in the SpeedFire for glazing.
- Five minutes: Cementation and cement removal.
During the milling and sintering phases of this process, the dentist is able to see other patients, further increasing the convenience and profitability of the procedure.
Traditionally, this treatment would require tooth extraction followed by a healing period of six to eight weeks. After healing, the teeth would be prepared and an impression would be taken followed by a two to three week waiting period for the laboratory to complete the restoration. During this time, the patient would have a temporary restoration and could not eat on the affected side of their mouth. Often, these temporary restorations would need to be re-cemented while waiting for the permanent bridge and, in some cases, the temporary must be completely remade.

Fig. 5
These extra steps are inconvenient and unproductive for both the patient and the doctor. The patient must take time off of work for multiple appointments and is without full mouth function for up to 11 weeks. From the dentist’s perspective, the more visits with this patient, the lower the profitability for this one restoration procedure. The dentist also has the expense of fixed hourly overhead, staff labor, laboratory and materials costs.
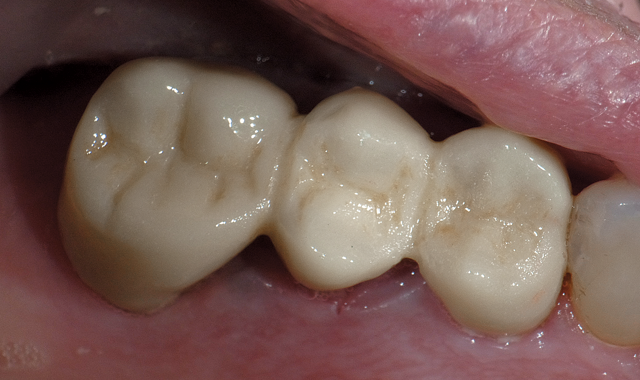
The ability to perform fixed bridge restorations with zirconia in a single visit is a tremendous advancement for both patients and dentists (Fig. 5). In conclusion:
- The patient is not required to return for multiple visits.
- The patient does not have to wear a temporary restoration, and is returned to full functionality in two and a half hours.
- Zirconia is a strong material approved and well-suited for posterior bridges, Maryland bridges, cantilever bridges and inlay bridges.
- Zirconia requires less tooth reduction.
- The process requires minimal to no adjustment in occlusion.
- Cementation process is faster and easier.
- The entire process is controlled in-office with CEREC Omnicam, CEREC MC XL Practice Lab milling unit and SpeedFire sintering furnace.


