Treating proximal caries lesions with DMG Icon
A dental case study showing techniques for treating a proximal caries lesion.
While there have been improvements in caries incidence and prevalence in the United States, caries is still pandemic. By the age of 40, 90 percent of U.S. adults have experienced coronal caries, and root decay affects approximately one-third of adults over the age of 59. It has been estimated that the prevalence of caries among adolescents is 68 percent, and caries affects the primary dentition in 41 percent of young children.
All age groups and segments of the population are known to be susceptible to developing dental caries. Not all caries


lesions progress to cavitation, but knowledge regarding the progression pattern of caries lesions is limited. The International Caries Detection and Assessment System (ICDAS) concept was developed under the direction of Professor Nigel Pitts of Kings College in London, to evaluate dental carious lesions. The ICDAS concept entails the use of a standardized system, based on visual evaluation and best available evidence, to acquire information about early and later stage caries severity. This information is to be used to assist with appropriate diagnosis, prognosis and clinical management of dental caries at both the individual and public health levels.
The following outlines the treatment steps involved in successfully halting the progression of caries lesions through the establishment of a resin diffusion barrier within the demineralized enamel. Once in place, the Icon resin hardens within the enamel making the site less susceptible to cavitation, and produces an area that is more resistant to continued acid attack. These benefits are achieved without the removal of any tooth structure, either healthy or demineralized. All tooth structure is preserved through the resin infiltration technique.
Related article: Moving caries detection and patient engagement into the 21st century
Up next: See the technique in action


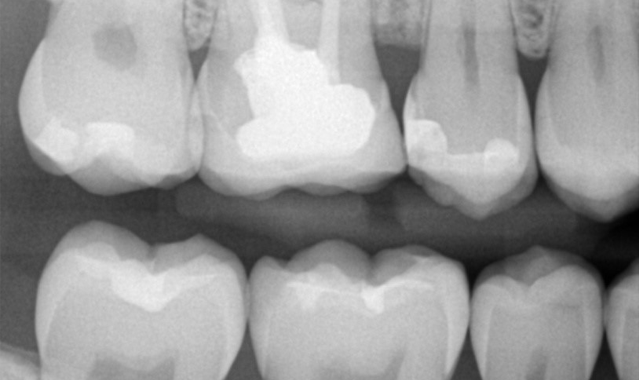
The patient, a 34-year-old white male is in good overall health. He attends routine six-month recall visits for dental prophylaxis but admits he isn’t a regular user of dental floss. He presented with an incipient lesion on the distal of tooth #5. Being an excellent candidate for resin infiltration, the patient opted for this treatment after a brief explanatory discussion.
Icon is an innovative product for the micro-invasive treatment of dental lesions in proximal regions and on smooth surfaces and available in two variations: Proximal and Smooth Surface applications. Icon Proximal is a specially developed hard tissue preserving treatment for incipient proximal dental lesions.
Related: Patients 'cried tears of joy' after DMG America's Icon treatment
Step 1-Cleaning the surface of the tooth to be treated. Before the start of treatment, clean the affected tooth and adjacent teeth. Remove any cleaning residue with water spray. Create a sufficiently dry working field. You should take appropriate measures such as rubber dam, liquid dam or similar to protect the gingival tissue (Fig. 2).
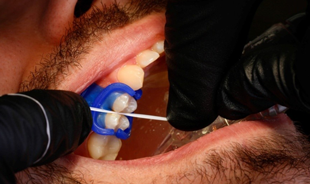
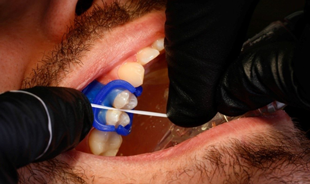
Step 2-Isolation of the treatment site. Along with Isolite, use of DMG’s MiniDam offers a fast and convenient means for isolating a single proximal area while helping to maintain a dry field. Here the device is placed with the aid of dental floss, allowing quick placement into the proximal area (Fig. 3).


Fig. 2
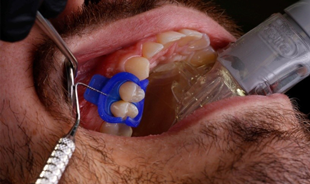

Fig. 3
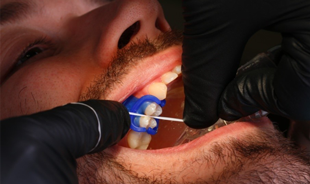


Fig. 4
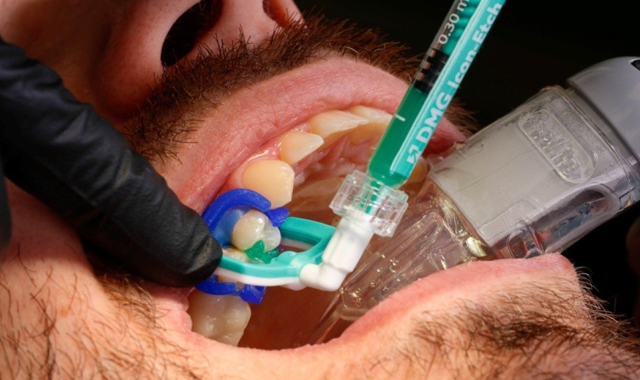
Fig. 4
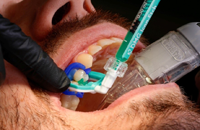
Step 3-Accessing the sub-surface pore structure of the lesion. To ensure a successful treatment, a proximal separation of approximately 50 microns is required. Introduce one of the enclosed dental wedges into the treatment site. Apply an ample amount of Icon-Etch onto the lesion site (One and a half to two turns of the shaft). Let Icon-Etch set for two minutes. The etching gel will be activated by slightly moving the applicator. Remove excess material (Fig. 4).
Related article: Study finds secondhand smoke exposure linked to increased dental decay in children
Clinically important: The Icon Etch is a 15 percent HCl solution requiring the protection of gingival tissues. The Icon Etch dissolves a thin layer of remineralized enamel which covers the demineralized tissue. This demineralized area contains porous enamel filled with an air-fluid solution which must be uncovered and dissecated allowing the Icon resin to flow into the lesion.

Fig. 5
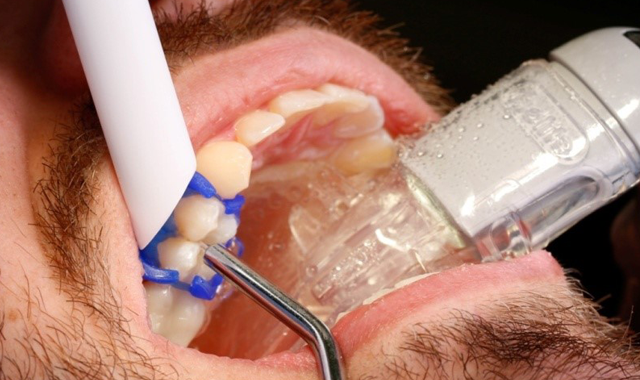
Fig. 5
Remove the application tip from the proximal area. Suction off Icon-Etch and rinse with water for a minimum of 30 seconds (Fig. 5).
Step 4-Chemical drying of the lesion. Drying the interior of the lesion is critical if infiltration is to take place. The Icon resin can’t displace any fluid which may be occupying the pore volume of the lesion, therefore desiccation is necessary. Desiccating the lesion’s pore system is accomplished in two steps: air drying and the use of a chemical drying agent-Icon Dry. Icon Dry is an alcohol based drying agent. No moisture can remain within the pore system of the lesion. Any moisture remaining within the lesion will prohibit the infiltration of the Icon resin. Remember, the capillary action of the Icon resin is only possible if the lesion is completed dissecated (Fig. 6).
Air evaporation is employed to thoroughly evaporate the Icon Dry after 30 seconds. Apply sufficient quantities of moisture free air for 30 seconds. The drying process is employed to not only desiccate the tooth surface, but also the porosity within the lesion itself (Fig. 7).

Fig. 6
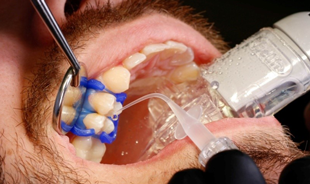

Fig. 7
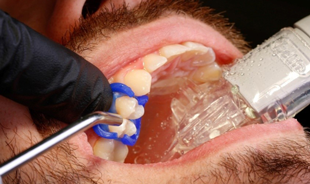

Fig. 8
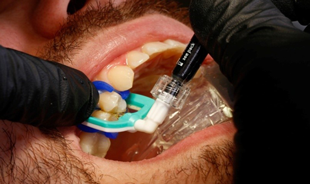

Fig. 9
Step 5-First infiltration step. Screw a new Proximal-Tip onto the Icon-Infiltrant syringe, and introduce the application tip into the treatment site. Be sure to align the green side of the Proximal-Tip with the area to be treated. Slowly turn the syringe handle until the Icon resin emerges from the buccal/ lingual areas. There is no need to use an excessive amount of the Icon resin (Fig. 8).
A dental hygienist's perspective: Fighting caries with customized care
Throughout the three-minute infiltration period it is necessary to add small increments of the Icon resin in order to ensure that enough resin is available to fill the entire pore volume of the incipient lesion. Failure to do so will possibly lead to an unsuccessful outcome. Do not apply Icon-Infiltrant under direct operating light as this may cause the material to set prematurely.
After three minutes remove the applicator and clear any excess material from the site using dental floss or tape (Fig. 9).

Fig. 10
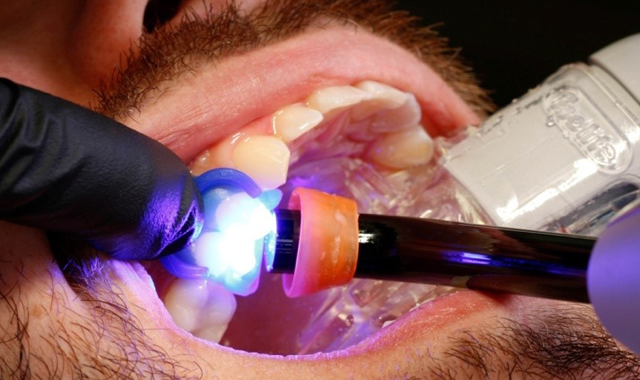
Fig. 10
Step 6-Light-curing the Icon Resin. Be sure to light-cure Icon-Infiltrant from all sides for at least 40 seconds (total). It is prudent to cure for the entire 40 seconds to ensure the complete curing of the Icon though several millimeters of tooth structure. A leading cause of failure, when using Icon, is the failure to allow the different materials the necessary time to perform their duties. Therefore, instructions should be followed to the letter and on the clock (Fig. 10).

Fig. 11
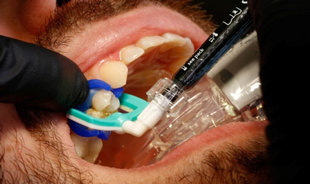

Fig. 12
Second infiltration step is undertaken utilizing the same steps as in the first infiltration step. Screw a new Proximal-Tip onto the Icon-Infiltrant syringe, repeat the application as before and allow the Icon resin to penetrate for one full minute (Fig. 11).
Removal of excess resin. After one minute remove the applicator and clear any excess material from the site using dental floss or tape (Fig. 12).

Fig. 13
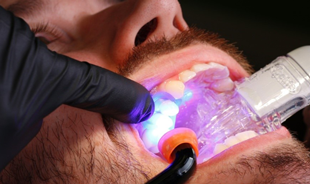

Fig. 14
Remove the application tip from the site. Remove excess material with dental floss. Conclude by light-curing the restoration from all sides for at least 40 seconds (total) (Fig. 13).
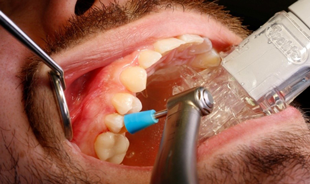
Use polishing cups or strips (or similar) for the surface finish. The goal of this procedure is to eliminate rough, uneven surfaces which may provide an ideal trap for food, debris or plaque in the proximal treatment site (Fig. 14).


