Step-by-step: Opaquing structure metals the RIGHT way
Tom Zaleske explains a revolutionary new way to make sure your substructures, frames, implant bars and more look natural in the mouth.
Anyone who has overlaid or wrapped acrylic to implant bars, attachment housings or chrome frames (Fig. 1) has certainly found the need to block out the gray influences of the alloy (Fig. 2).

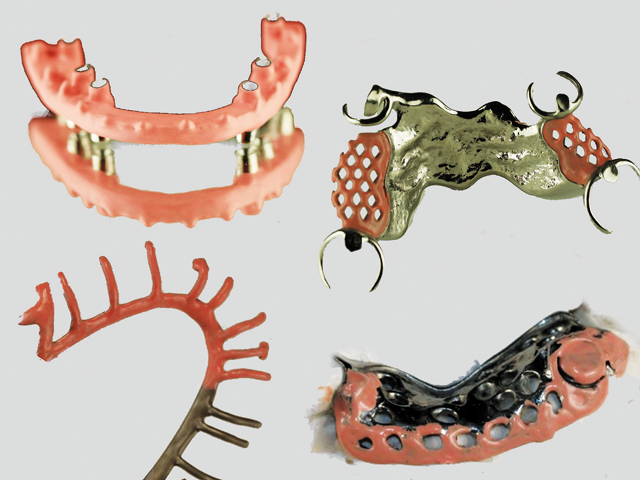

Fig. 1 Opaque products are ideal for the gray masking of several types of fabrications. These include implant supported bars, partial denture frameworks, embedded alloy reinforcement, and attachments positioned closely to surface of tooth and flange.
The technique involves opaque products which hopefully match the acrylic or composite pink shade being used, as well as avoiding a compromise in the bond between opaque material and the alloy and/or acrylic. Some products come in a single shade and the promise of added constituents that promote bonding. Other systems are costly investments that bake opaque onto the metal surface and are single in purpose.

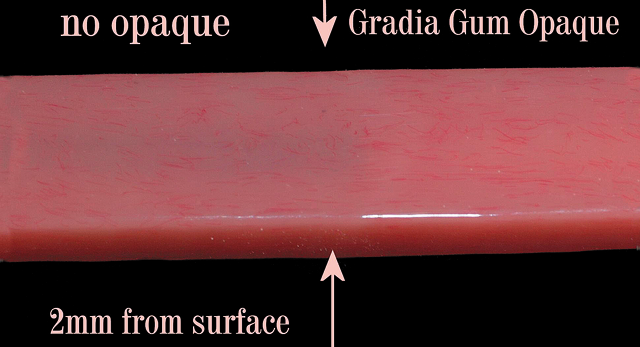

Fig. 2 Gray influence at 2 mm from surface illustrates the need for masking, since many times cases possess even less acrylic than 2 mm.
I discovered and started using GC Gradia Gum Opaque from GC America, Inc., because it fulfills all of the requirements I feel are important when selecting an opaque system that fits my business model. It provides multiple shades with the option to modify any of the standard shades and it also uses a well paired metal bonding primer that is useable as a stand-alone product. The system is also comprised with a separate composite primer which is controllable in application assuring complete bonding coverage at the interfaces, and is curable with an array of inexpensive visible light curing units.
Step-by-step technique: Seeing new possibilities in a complex implant case
Gradia Gum Opaque Technique for Alloy Masking
01. Needed: curing source of choice/curing time
- Halogen light (Triad, Proform, etc.)/ 20 seconds all surfaces* or
- GC Steplight /1 cycle per side rotate; or
- GC Labolight/ 1 minute rotate*
Materials needed:
- Gum Opaque color choices are GO11(light), GO12(medium), GO13(dark)
- Gum Opaque Modifier GOM 51(Optional)
- MetalPrimer II
- Composite Primer
- Air Abrasion unit
- Aluminous Oxide (50 micron)


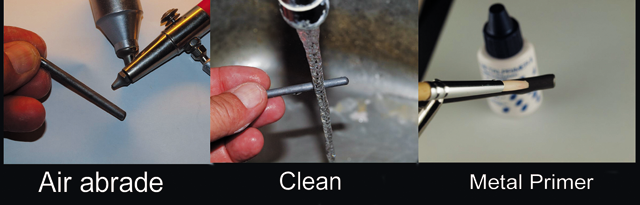

Fig. 3 Air abrasion using 50 micron aluminous oxide. Clean with water and towel dry or dry with compressed air. It is not recommended to steam clean as moisture can be imparted into surface texture causing poor bonding of composite to prepared metal primed alloy.
Procedure for all alloys to receive opaque application prior to acrylic overlay. (Figs. 3 and 4)
02. First, air abrade the surface with 50-micron aluminous oxide. Then, clean with dry oil free and moisture free air, or water from tap. Do not steam clean. (Do not touch after)


Fig. 4 A thin wash coat is applied and cured for a cycle. A covering coat is then applied to fill in any gray showing through wash and cured. An additional covering coat can be applied and cured if necessary. A final composite primer coat is applied and cured for one minute to prepare for acrylic bond. Light exposure to all sides is critical in obtaining a uniform cure.
03. Apply one to two thin coats of GC MetalPrimer II, and air dry between coats 45-60 seconds.


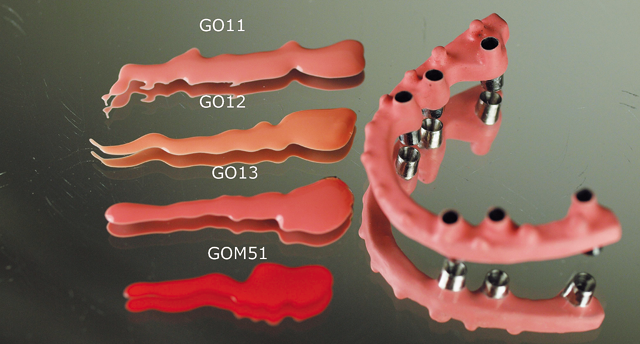

Fig. 5 Gradia Opaque offers three standard shades and the option to create a wide range of variation for each by adding increments of the Gum Opaque Modifier 51.
04. Apply Gum Opaque in preferred shade (GO11, 12 or 13) after dry (Fig. 5). Apply a thin wash coat, cure and then apply a covering coat and run the cure cycle again. Light cure in between applications using curing source and applicable times appropriate for source. 360 degree light exposure to all opaque surfaces is critical.
05. Lastly, apply a thin coat of Composite Primer to the cured Gum Opaque and cure for one minute.
06. Use hemostats or similar to place bar on model without touching the cured surface and prepare for acrylic application.
Technique: Shade matching in the most complicated case
Optional
07. Color adjustment of any Gum Opaque can be accomplished by mixing increments of Gum Opaque Modifier/GOM51 into the opaque pastes to darken (redden) the base shade. It is desirable to closely match the shade of the base acrylic being applied to the opaque to avoid over-influence by the underlying opaque shade.

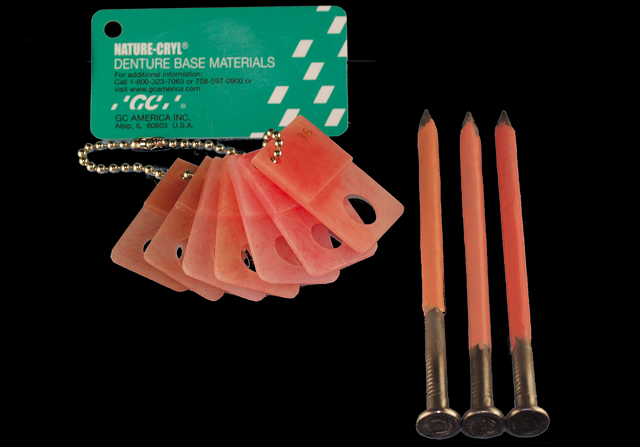

Fig. 6a Here shade sticks are fabricated on 20 penny nails allowing for zeroing in on the shade of opaque on alloy to match the acrylic to be used. Photo illustrates how it is used to match Naturecryl Super Hi Impact acrylic. Using nails offers a chance to observe the effects of the opaquing material in actual use on a gray canvas.
08. Additionally, constructing shade guides (rods) that reflect the three opaque shades on alloy will aid in refining the selection of your opaque to match acrylic of choice. (Figs. 6a and 6b)

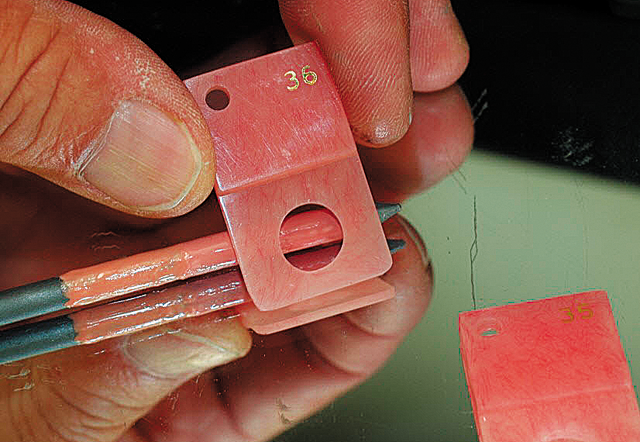

Fig. 6b I prefer to supply acrylic shade guides with holes in the center to better match tissue intraorally or comparing shade on a custom fabricated opaque shade stick by surrounding the tissue or shade stick with the matching color.
Metalprimer II note
This material contains a special monomer (MEPS thiophosphoric methacrylate) that promotes bonding by penetrating the metal alloy and co-polymerizing with resin or composite to produce a mechanical and chemical resin to the metal bond. This product is effective on semi-precious and non-precious alloys.

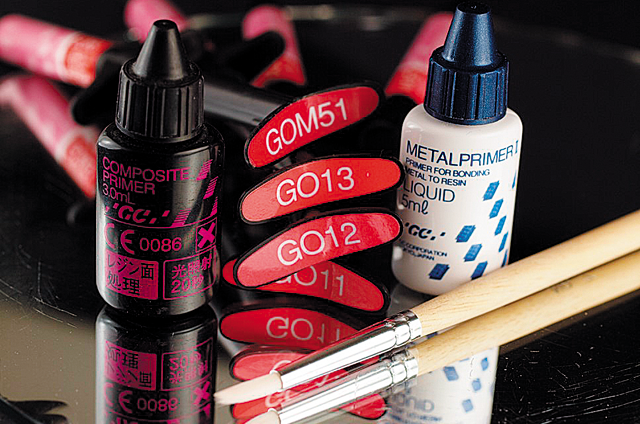

Fig. 7 Recommended products to prepare and perform metal opaque technique on any alloy having most variety of shades in acrylic bonded to it. Make sure that a brush is dedicated to each individual product, Metal primer, composite primer and opaque.
Recommended GC Products for Opaque Procedure (Fig. 7)
- Gum Opaque’s GO11, GO12, or GO13 (light pink, medium pink, or dark pink)
- Gum Opaque Modifier GOM 51(Optional) if darkening of opaque is desired
- MetalPrimer II for alloy to opaque bonding
- Composite Primer for opaque to acrylic bonding
Ancillary products
- Air abrasion unit and 50 micron aluminous oxide
- VLC curing unit such as GC Step light, Proform VLC unit or DENTSPLY Triad


