Step-by-step: Low-cost veneers for a cost-conscious patient
She was very dissatisfied with her smile, which led her to visit the dentist in the first place, but also concerned about cost.

Our patient in this case study is a 50-year-old female who was experiencing some financial difficulties at the time her case was being completed. She expressed concern about the final outcome of her case and the appearance of her smile to both her dentist and the author.
She was very dissatisfied with her smile, which led her to visit the dentist in the first place, but also concerned about cost. She also expressed apprehension regarding preparation-she did not want much reduction to her teeth in the correction process.
The clinician called the author to discuss lower-cost options for a patient, such as ours, who did not want her teeth prepped extensively and was concerned about payment. However, she was looking for improved anterior esthetics when she smiled, for which the dentist knew the author would explore options.
Bench Mastery: Custom shade matching in an anterior implant case
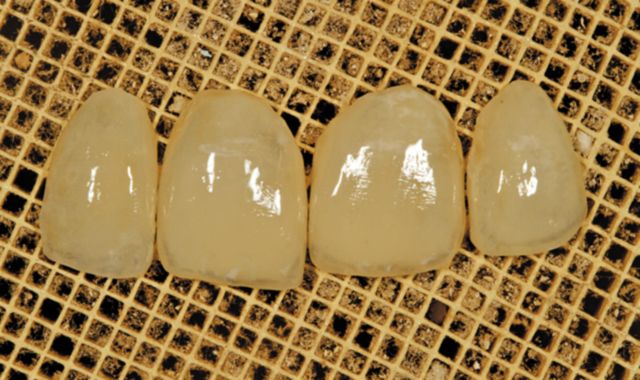
With all of these stipulations in mind, the author recommended composite veneers, a viable solution to the patient’s concerns and yet also technologically advanced-utilizing the lab’s skill and labor with fewer materials and, therefore, a lower cost.
Next page: Go step-by-step ...
Case Study
01 In Fig. 1 (all figures in video below), we see an image of the dentist’s study models, used to evaluate the case for the patient’s area of concern, anterior teeth Nos. 7-10. The shape of her teeth was unbalanced and uneven with No. 7 notably higher than No. 10 in the gingival. In addition, the lobe area is undercut. This is the initial impression the author gained from his observation of the models. In Fig. 2, he made note of the area he would grind 0.1-0.3 mm, using a red marker for indication. He knew, per the doctor’s instructions, he would be allowed to prep as little as possible.
02 In Fig. 3, the study models were compared, with the lower model in the image, bearing the marks where grinding would occur, and the upper model, without red markings.
Step-by-step: How to foresee a final outcome
03 The author next applied a dentin base in A2 (Fig. 4) with enamel layered over the top on Nos. 8 and 9. The lateral teeth buildup, using dentin buildup, was then applied (Figs. 5-6) to tooth No. 7. We next see a rough buildup on the centrals in Fig. 7, ready for light curing. The author then created contour with shaping based on the red line application (Fig. 8).
04 For this case, the author used a product called OPTIGLAZE from GC, an external stain kit and coating agent. OPTIGLAZE utilizes special nanofiller technology in which the tiny particles are evenly dispersed, offering long wear and resistance to discoloration, as well as a long-lasting gloss. The OPTIGLAZE image is shown in Fig. 9 with its multiple color possibilities. For our case, the author selected a white OPTIGLAZE composite color for his incisal enamel effective choice (Fig. 10), as well as an ivory color (Fig. 11). He then added a small amount of dark warm-tone color (Fig. 12) to mix together with the white, ivory and red he had previously chosen. To come up with a well blended combination of colors, a technician must understand the nature of color and the harmony of esthetics or his final shaded results will not match with the patient’s natural dentition, in the author’s opinion.
Technique: How to create excellent esthetics with digital technology
05 After an OPTIGLAZE application to the incisal 1/3 to create translucency, the gingival area has a warm tone, including horizontal lines and a grey appearance to the mesial-distal corner. The interproximal contact areas also have a warm tone, creating a natural harmony within the restorations and a match with the patient’s natural dentition.
Conclusion
With minimum thickness allowed in the preparation of the teeth, a technician cannot apply specific enamel, translucency or mamelon amounts in order to achieve a match with the patient’s natural color. No more than two porcelain layers of color will work with a preparation thickness of only 0.1 to 0.3 mm, which leads to a final appearance that tends to be monochromatic in appearance, in the author’s opinion.
The difference, when using a product such as OPTIGLAZE, is that the technician can create optimum esthetics with very little prep to the patient’s dentition. It’s an indirect technique that benefits anyone who needs to perform multi-layering with a case but the circumstances do not allow that.