How to use a 3D digital workflow for ortho treatment
3D digital treatment planning and diagnostic case workup can lead to improved patient care.


The world of 3D processes in orthodontics has arrived, and the digital workflow necessary to manipulate and work with the information is being developed. Cone beam computed tomography serves as the framework for diagnostics and treatment planning purposes upon which the intraoral, along with potentially a 3D facial analysis, can be added to improve diagnostic capabilities. At the heart of 3D orthodontic diagnostics and treatment planning are the CBCT and intraoral scan. Along with these, we can add intraoral photos and a clinical exam. With this information, we can begin our diagnostic workup as well as begin thinking about our treatment plan.
In this case presentation, one will see how 3D orthodontic digital treatment planning and diagnostic case workup with virtual setup and ultimately design and manufacturing of appliances is possible and beneficial to patient care.
There will also be discussion regarding 3D printing and clear aligner therapy as used by some practitioners. This information provides the direction to create the patient database necessary to do proper diagnostic and treatment planning.
Inputs:
1. CBCT
2. Intraoral scan
3. Digital photography and/or 3D photography
Output:
1. Diagnosis
2. Treatment plan
3. Analysis with super imposition
4. 3D printing
5. Clear aligners therapy
Case study
Diagnosis and etiology
A 14-year-old male presented with a chief complaint of “My bite is off … my teeth turn in on the right side.” His medical history was insignificant, and he had no previous orthodontic treatment. He presents with a Class I skeletal relationship with the mandibular midline 2 mm to the right and a crossbite present on the right side in centric occlusion.
Read more: How to use digital technology to make cases easier
Upon opening, the lower midline is 0.5 mm to the right, revealing a slight functional shift. A TMJ exam revealed no joint sounds and joints were asymptomatic. The patient has balanced upper and lower facial heights and his lips are competent with average upper lip length. He shows 100 percent of incisors upon smiling with 1 mm of the gingival display.
Radiographic analysis
Cephalometric analysis revealed a normodivergent, Class I skeletal pattern with well-balanced upper and lower facial heights, increased convexity, and moderately proclined and protruded maxillary and mandibular incisors were noted (Fig. 1).


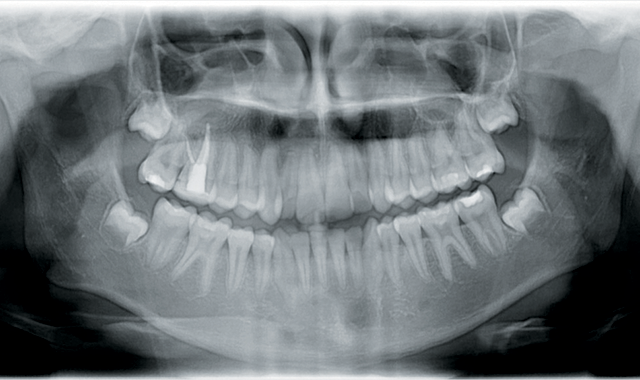
Fig. 1
Panoramic analysis showed no pathology and third molars were developing normally (Fig. 2). When this case was started, CBCTs weren’t routinely being taken on all patients. That has changed because of Ultra Low Dose™ technology, which has been developed by Planmeca. Currently, the author is using the ProMax® 3D Mid X-ray Unit, which allows for an Ultra Low Dose CBCT full field of view (FFOV) to be taken with lower radiation (<15 microsieverts) than traditional 2D digital radiography.

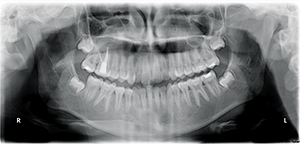

Fig. 2
Continue to page two to read more...
Once the patient exam had been completed, it was determined that a CBCT should be taken to evaluate the mid-palatal suture and buccal cortical plate. Additionally, the proximity of the maxillary right teeth to the buccal cortical plate was needed to determine what type (skeletally fixated or traditional hyrax) of expansion was required.
CBCT analysis revealed limited alveolar boundaries on the buccal and lingual of the mandibular anterior teeth (Fig. 3).

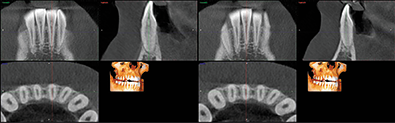


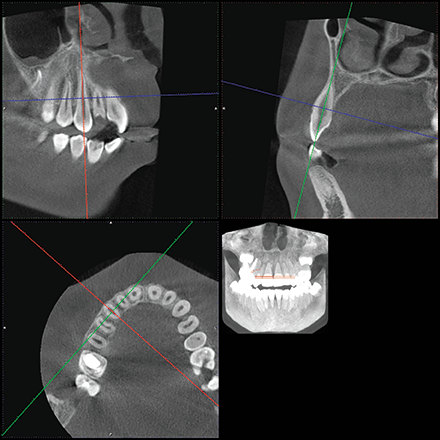

Fig. 3 Fig. 4
The location of the roots of the maxillary right dentition closely proximate the buccal and palatal cortical plates of the alveolar processes, which were thin particularly at the canine and first premolar with thicker cortex regions lateral to the second premolar and first molar (Figs. 4-7).
Read more: How to perform closed crown lengthening with an all-tissue CO2 laser

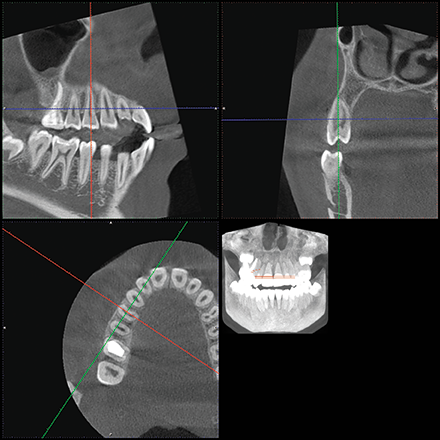


Fig. 5 Fig. 6
Model analysis reveals a Class I molar and canine relationship. The models reveal a shallow overbite and limited overjet. The maxillary midline is coincident with the facial midline and mandibular midline is shifted 2 mm to the right of facial midline in CO. Patient has 2 mm of crowding in both the maxillary and mandibular arches. The curve of Spee is flat. The maxillary arch form is constricted as compared to the mandibular arch form (Fig. 8).

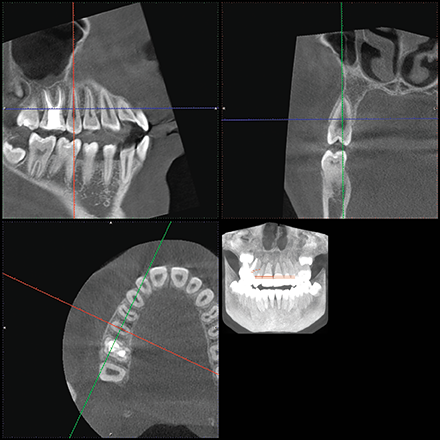


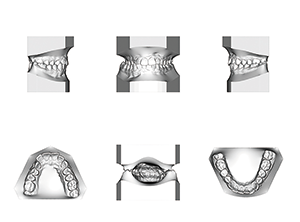
Fig. 7 Fig. 8
Treatment objectives
The following treatment objectives were established: Alleviate posterior crossbite, alleviate maxillary and alleviate mandibular crowding. Additionally, minimize A/P movement of lower anterior teeth due to limited alveolar boundaries and achieve a functional Class I occlusion with normal overjet and overbite.
Treatment alternatives
Two treatment options were considered for the patient. The first was a traditional hyrax rapid palatal expander to alleviate crossbite with the likely need for gingival grafting of the maxillary right posterior teeth in the future. The second treatment presented was a skeletally fixated rapid palatal expander to alleviate the crossbite with reduced risk for dehiscence of maxillary right posterior teeth.
Continue to page three to read more...
Treatment plan
The following treatment plan was presented and accepted by the patient:
• Place four palatal TADs necessary for a skeletally fixated expander
• Impress for appliance design and fabrication
• Deliver skeletally fixated expander
• Expand to alleviate crossbite
• Maintain appliance for at least four months to allow for proper healing to occur at the mid-palatal suture
• Deliver TPA to maintain expansion
• Fixed appliance therapy with conventional edgewise appliances (MBT prescription, 0.022 slot)
• Level and align
• IPR as needed
• Coordinate arches
• Intraoral scan for finishing and detailing with clear aligners
• Orthodontic digital set up using Planmeca Romexis® 3D Ortho Studio
• 3D printing of staged models
• Fabrication and delivery of clear aligners
• Revision if necessary
Treatment progress
Four TADs were placed in the palate for the skeletal anchorage necessary for the expansion of the maxilla (Fig. 9). After the TADs were placed, an impression was taken for an acrylic skeletal expander that was supported solely by the palatal TADs. The appliance was delivered and fixed in place using a resin-modified glass ionomer. After cementation of the appliance had occurred, the patient was instructed to turn the appliance one time per day for two weeks and then return for evaluation, at which point one turn per day was continued with weekly evaluation. A total of 42 turns were completed over the course of six weeks for a total amount of 10.5 mm of expansion. At that time it was determined that no additional expansion was necessary. During the expansion phase of treatment, no bands or brackets were placed.
Trending article: The dangers of microbial resistance in the dental practice

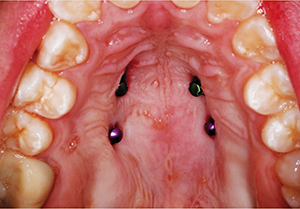

Fig. 9
After expansion had been completed, the patient had brackets bonded to U 5-5/L 6-6. Buttons were placed on the palatal side of the upper right second premolar and canine to further improve the posterior crossbite. The expansion was maintained using a TPA fixed to the maxillary first molars, which also served as the anchorage point. Once the resolution of the posterior crossbite had occurred, the remaining diastema was closed between maxillary central incisors.
At this point, arch coordination had been completed and it was time to finish and detail the case. The patient’s fixed appliances were removed and a thermoformed retainer was delivered to maintain the position of teeth when debonded. Superimpositions were created showing the expansion achieved using the initial and final CBCTs. An intraoral scan was then taken using Planmeca’s intraoral scanner. The STL files were uploaded to Planmeca’s Ortho Studio. The teeth were segmented and the digital orthodontic setup was completed. The staging of the case was determined based on the amount of movement necessary. A model builder was used to create the STL files, which were then printed on a formlabs Form 2 printer.
Aligners were then fabricated using 0.040 clear aligner material, and the patient was instructed to wear each tray for two weeks at a time. Prior to delivering the aligners, the patient had attachments bonded to aid in the necessary movement.
Final records were taken upon completing the phase of finishing and detailing in aligners.
Discussion
Upon completion of treatment, it’s noted that CBCT was vital for proper treatment planning and diagnosis and necessary for proper TAD placement and presurgical planning. Upon review of final record, you can see the patient’s chief complaint has been resolved as the posterior crossbite was no longer present.
Critically speaking, I would say that even though a substantial effort was made to limit the potential for dehiscence of the maxillary right first molar through the buccal plate, it was difficult to keep this from occurring as the mesial buccal root of the maxillary first molar closely proximates the cortical plate at the time of final records. This case highlights 3D digital workflow from start to finish showing how CAD/CAM technology was used not only to diagnose and treat the case but also to plan the final occlusion and finishing of the case using 3D printing and CAD/CAM technology. This case was completed using the Planmeca PlanScan®; however, I have since acquired the Planmeca Emerald™, which is the scanner used in my cases currently.


