Technique: Using Komet® instruments to simplify cavity preparation and chairside finishing and polishing procedures
At its simplest, cavity preparation involves the mechanical alteration of tooth structure to remove caries and to create a compatible foundation for subsequent restoration that returns the tooth to proper morphology, function and esthetics.


At its simplest, cavity preparation involves the mechanical alteration of tooth structure to remove caries and to create a compatible foundation for subsequent restoration that returns the tooth to proper morphology, function and esthetics.
The objectives of cavity preparation are to remove diseased tissue while providing protection to the pulp, to locate the margins of the restoration as conservatively as possible, to ensure cavity form, and to allow functional placement of the restorative material. Komet® precision-engineered, superior-quality diamond instruments have long adhered to these fundamental principles while continuing to meet the challenges of ever-more conservative tooth-preparation techniques and minimally invasive procedures that maximize retention of healthy, natural tooth structure.
Finishing and polishing procedures enhance restoration esthetics, allow minor trimming and contouring to lightly adjust and more precisely define tooth-surface morphology, and produce smooth, healthful tooth surfaces. Komet USA offers an array of finishing and polishing instruments and kits to simplify the procedure at chairside and to meet material-specific requirements.
Cavity preparation
Figure 1. To remove an undesirable or defective amalgam restoration, select the H32 amalgam removal instrument, which features a pronounced, tip-transversing blade and is engineered to resist clogging and heat generation. Position the H32 amalgam remover in an axial direction or at an angle, and cut several longitudinal and transverse separation grooves, depending on the size of the filling, to separate the filling material into several small segments. Note: Some fragments of the filling may break off while cutting. Remove any residual material with appropriate manual instruments or with the H32.
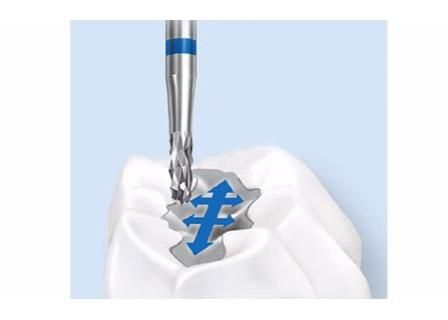
Figure 2. For optimal preparation and subsequent restorative success, precisely shape the cavity and cavity margins while preserving as much healthy, natural tooth structure as possible with the appropriate S-Diamond®.
Figure 3. Alternatively, to remove soft, carious dentin in a minimally invasive approach, use the highly durable K1SM ceramic instrument, which offers controlled excavation, outstanding tactility and smooth operation.
RELATED: How one dentist uses Komet USA products in his practice
Figure 4. For rapid, conservative excavation, use the H1SE or H1SME instrument, each of which features a round working portion and sharp-tip transversing blades. To facilitate minimally invasive excavation, the H1SME features a slim-neck design.
Figures 5 & 6. For cavity preparation prior to restoration with ceramic material, use Komet® diamond instruments with rounded, working-part edges to create rounded internal angles to prevent the formation of micro-cracks.
Figures 7-10. After basic preparation with rotary instruments and prior to taking accurate impressions for conventional or CAD/CAM restorations, prepare the ideal chamfered shape using the SFM7 (mesial) and SFD (distal) Sonic Tips. The instruments feature rounded angles in the transition area between the axial and shoulder regions.
Read about finishing and polishing (and watch the technique video) on the next page...
Finishing & polishing
Figures 11-13. Following placement of a composite restoration, apply Komet’s Q-Finisher® as the first step in a two-step finishing procedure, and follow up with an ultra-fine finisher. The Q-Finisher’s specially adapted, crosscut toothing creates an ideal surface quality.
Figures 14 & 15. To avoid damaging the surfaces of healthy adjacent teeth when finishing interproximal surfaces, shape and trim composite restorations to a smooth, natural-looking surface with a Komet® diamond strip (with or without a honeycomb structure). The strips are offered in two widths and in three grit sizes (medium, fine and extra fine).
Another technique from Komet: How to shape and clean root canals
Figure 16. After shaping the composite restoration with tungsten-carbide finishers or with a fine diamond instrument, pre-polish the restoration surface with a light-pink CompoBrite polisher, which also can be employed for minor shape corrections.
Figure 17. For the second polishing stage, use the light yellow CompoBrite polisher to create a perfect high-shine finish.
Figure 18. To efficiently achieve an ideal polish and shine on high-strength ceramics such as zirconia, pre-polish with the light-blue ZR Flash Polisher™.
Figure 19. Apply the light-gray ZR-Flash Polisher high-shine polishers to produce a brilliant shine on high-strength ceramic restorations.
Check out the new bone cutter from Komet launched at IDS 2015
For more information on Komet® cavity-preparation instruments and finishers and polishers, contact Komet USA LLC at (888) 566-3887 or visit www.kometusa.com. To learn more about this technique, watch the video below...


