Technique: Pouring better models with Wonderfill
Ellen Gambardella explains how she uses Wonderfill from Dental Creations to make perfect dental models.


Ellen Gambardella, CDA, M.Ed., is an award-winning educator and professional speaker. She recently wrote a technique article for both Dental Products Report and Dental Lab Products, explaining how she has found a great product for pouring models. It's a skill all-too-easily missed in practices in labs all over the country, and it can make all the difference in an individual case. Read on as Ellen describes her techniques for ensuring perfect models, every time.
Over the years, I have poured numerous models while continually striving to make this task as efficient and easy as possible. Therefore, I would like to share my experiences with different approaches for obtaining the perfect model.
Most of us have spent valuable time at the model trimmer or have used lab burs to remove excess stone from a model. I have experimented with various techniques, such as using alginate, wax, wet paper towels, Play-Doh and Wonderfill to fill the tongue area and voids in the impression in hopes of minimizing the finishing time.
Related: How to save time and money on model techniques
I have found that using alginate impression material to fill the tongue area is quite time-consuming. This requires mixing the alginate, inserting it in the tongue area and waiting for it to set. Once this is completed, additional time is needed to decontaminate work surfaces and equipment, such as bowls and spatulas.
Another method uses wax that has been heated and manipulated to fill the area. I have noticed this procedure may not make a complete seal with the tray. Stone or plaster penetrates those unsealed areas, resulting in an uneven surface. Again, more wasted time is spent finishing the model.
A different technique is to place wet paper towels in the tongue area. Oftentimes, this method produces an irregular stone surface, which requires additional time at the model trimmer to smooth the area.
I have tried using Play-Doh as a filler. Although it filled the tongue area, it resulted in stained models, and the Play-Doh adhered to the stone, making it difficult to clean off the surface of the model. This unattractive appearance does not present well to patients and sends a negative message about the office.
FREE checklist: 5 things to look for in a void filler
Undercuts also add to the demise of models. Patients with mandibular tori may produce large undercuts, which must be filled prior to pouring models. If this is not done, separation of the impression from the model becomes difficult and may result in a fractured model. If this happens, the model may have to be poured again. The results are too well known: Frustration escalates, productivity declines, materials are wasted and the entire process is delayed.
After experiencing these disappointing results, I asked myself: How can I save time and money without compromising the accuracy and professional appearance of my models? There is an answer: Use the product Wonderfill.
Prior to pouring the models, I always verify that the impression has been properly disinfected. Confirm the disinfectant solution has remained on the impression as well as the tray for the amount of time recommended by the manufacturer. Because Wonderfill is water-soluble, it is important to eliminate any excess disinfectant solution from the tray prior to filling the tongue area. This dryness will create a tight seal between the Wonderfill and the tray, which prevents plaster or stone from infiltrating the area.
01 I remove the desired amount of Wonderfill from the tub and then manipulate the material with my fingers to form a domed bridge in the tongue area [Editor's note: Step-by-step images are availalbe in video above].
02 Once this is completed, I start pouring the model by adding small amounts of stone to the most distal surface of one side of the impression and continue adding small increments to the same area. Next, I rotate the impression to guide the flow of the stone around the arch. Be sure to keep the stone moving through the anatomical depressions from one side, through the anterior and into the opposite side.
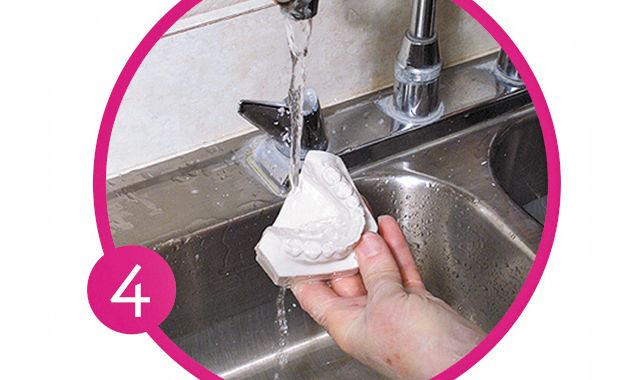
03 When the impression is totally filled and the stone has completely set, I pop out the non-sticky Wonderfill.
04 Because Wonderfill is water-soluble, non-sticky and won’t stain, it makes cleaning the model very easy. I just rinse the models under cool running water, and the surface looks pristine.
I discovered that in one quick, simple step, I could fill the tongue area and voids in seconds by using Wonderfill. This water-soluble product is ready for placement and manipulates easily to conform to all locations, i.e. tongue area, missing teeth, undercuts caused by bubbles or voids created by tori.
Step-by-step: Saving time on implant fabrications
I like that this innovative tongue and void filler requires no mixing or preparation, no setup time and no cleaning time. Moreover, it is simple to use and quick to apply.
Think about the effect on your practice if there was reduced time spent in the lab, a decreased repeat of procedures and less wasted products. To accomplish a positive impact on your practice, both clinically and financially, I recommend using Wonderfill as part of your pouring technique. In my opinion, when you add up Wonderfill’s time-saving results, convenience and ease of use, it equals satisfaction.
This article originally appeared in the April 2015 issue of Dental Lab Products.


