Technique How to create esthetic denture shade guides
Taking advantage of a highly ignored fabrication and marketing tool.
Taking advantage of a highly ignored fabrication and marketing tool.


The definition of the word “guide” fits well into the techno-clinical approach many dental labs understand as the way they need to work with the clinical side of the chair to communicate more comprehensive treatment and show the esthetic options they can provide.
Guide: Noun: guide; plural noun: guides
A person who advises or shows the way to others. A thing that helps someone to form an opinion or make a decision or calculation.
Go step-by-step: Zaleske on making processed baseplates more efficiently
This article will present an optional tool to guide labs’ clinical partners to an esthetic decision and fortify or help establish their position as a technical advisor or guide. Traditionally, in removable prosthetics, a shade guide has been used to select base acrylic shades to match the edentulous tissue surrounded or covered by removable prosthetics. These guides are usually a rectangle or square of acrylic processed straight from the bottle and generally fastened to a chain or placed in a holder to be used chairside (Fig. 1 [Editor's note: All figures and captions are in video below]). With the emergence of coloring agents for both subsurface and surface characterization and kits that allow for denture tooth characterization, there needs to be a better way to introduce and guide your clients on what can be offered and used to stylize treatment for the individual patient.
Process
01 For making small quantities of esthetic shade guides, I use Harvest Dental’s HD Gum Kit. The kit offers a polished metal mold to make individual guides and includes the colorants to subsurface colorize dentures (Fig. 2).
02 The base acrylic I use for this guide fabrication method is GC Naturecryl Pour because it matches shades across the board with the other GC Naturecryl products I use. The HD Gum colorants work with all the different acrylic types I use on my definitive work, which makes it my “go-to” product for any style of cure in the Naturecryl line.
03 Making shade guides one-off using the metal mold for a specific case is fine, but when a lab is looking to market esthetic services en masse, one-at-a-time fabrication of these is a bit tedious (Fig. 3).
Video technique: Saving time on model-making
04 For making many at a time, I suggest using the existing shade tabs included in the HD Gum kit (13 of them) along with putty to make multiple silicone molds (Fig. 4).
05 You can either pour resin guides directly into these putty molds or you can use the molds to make wax replicas that you can color and cure using conventional acrylic or, in my case, microwave cure (Fig. 5).
06 I use the GC Naturecryl MC microwave cure acrylic because I like the speed of cure, the richer color it offers, the finish and the ability to crank them out at around 48 minutes a flask.
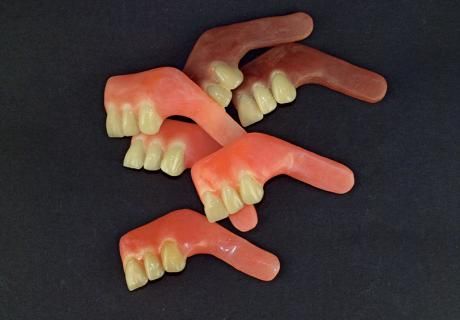
07 Because I understand that doing things like everyone else does nothing to set myself apart from other laboratories or strengthen my position as a technical resource and lab product provider, I like to offer a more high-end esthetic guide. This guide allows me to not only illustrate the denture base coloring effects I can provide either subsurface or on the surface, but is also great for demonstrating, marketing and communicating tooth coloring and characterizing effects that are possible on an individual, case-by-case basis (Fig. 6).
08 It entails making a master guide with at least three anterior teeth and a contoured flange exhibiting emergence profiles. Again using PVS putty, I make a reusable mold. Because I purchase the same teeth for every guide of this type I make, I plug the teeth in the PVS mold and pour hot wax into it. Once cool, I repeat the process as many times as I want until the desired amount of wax-ups are produced (Fig. 7).
Step-by-step technique: A full-arch, metal-free zirconia restoration
09 I use GC Naturecryl MC to fabricate these as well, for the same reasons I mentioned above (Fig. 8). I keep some in stock already processed in popular shades in the event I need to communicate personalized effects for a specific patient or market to a new account. Some I keep in the wax state so I can internally or externally colorize, process and modify the teeth at will (Fig. 9).
As a provider of products and services, I am always looking for inventive ways to stand apart and provide the best possible options for the client and, most importantly, the patient.
This article originally appeared in the June 2015 issue of Dental Lab Products. For more great articles, click here: http://bit.ly/18S8j4i


