Technique: Correcting peg laterals with veneers
Luke S. Kahng shows a step-by-step technique for correcting peg laterals with veneers.


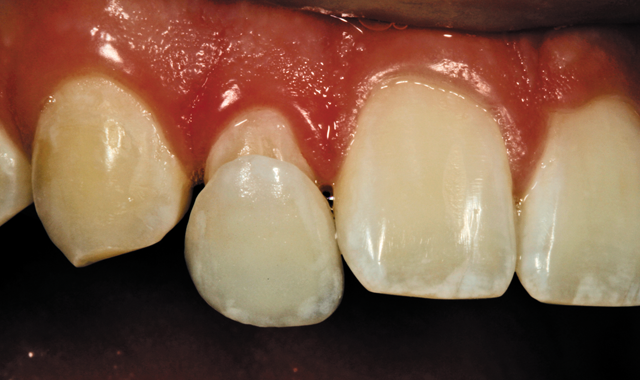
Our case study involves an 18-year-old athlete and his brother who were brought into our author’s laboratory with the same condition, which their mother hoped to correct through cosmetic dentistry. That condition, known as “peg laterals,” comparatively short lateral teeth, was causing the boys to be self-conscious about their smiles. It occurs when the teeth on either side of the centrals do not develop correctly and have a cone-like appearance. Because the lateral teeth play a central part in the role of a patient’s smile, when they are misshapen, the deficiency is noted and recommended for improvement by the dentist.
Bench Mastery: A more efficient way to match color
There are corrective measures that can be taken, which was the purpose of this particular visit. The consultation involved discussion regarding the dentist’s diagnosis and treatment preference. It was noted that the mother’s inclination was to have her son minimally prepped for veneers on the laterals.
The author is often asked if this is possible with certain patients and whether or not it can be done. In his opinion, it depends on the adjacent teeth and whether or not there is room facially. In this case, there was 0.3 mm room for the facial area if the author applied external stain or, alternatively, a porcelain buildup. A veneer case must have 50 percent translucency and slightly high opacity. The author decided a light translucency ingot would be utilized with a build-up technique for this case.
01 During the custom-shading appointment (Fig. 1; all figures in video below), the author checked the patient’s color and cervical surface texture translucency and chroma. He next waxed up the coping with GC Press PC (Fig. 2), utilizing proper contour compared to adjacent teeth to create golden proportion. This is the traditional laboratory technique for fabricating the final restoration (Fig. 3).
02 The author decided to use an AOO ingot (Fig. 4) and GC Low Fusing porcelain (Fig. 5) in his lab processing. After pressing, the copings were fit to the die, a thin layer of opaque was applied and they were ready for buildup (Figs. 6, 7, 8).
Step-by-step: Kahng on an ideal implant bridge
03 In the next images, the porcelain build-up steps for tooth No. 7 are illustrated (Figs. 9, 10, 11 and 12) with Translucency Enamel 59. The author then moved on to tooth No. 10, applying the buildup in the same way as tooth No. 7 (Figs. 13, 14, 15 and 16). After baking, on the die, appearance was photographed (Figs. 17, 18 and 19).
04 Creating surface texture was the next step, and the author marked the restoration in the way he wanted the texture to be produced (Fig. 20). When the restoration was ready for staining, the author chose GC Initial stain, shown here in a variety of colors (Fig. 21).
05 After staining, the final restorations were ready to be tried-in (Fig. 22), shown in this mirrored view. The patient came into the lab for the try-in stage (Figs. 23, 24, 25, 26, 27 and 28) to allow the author time to make any corrections or adjustments necessary to the color and/or fit.
Technique: Creating fluorescence through shade matching
06 The author then took a look at the marginal integrity (Figs. 29 and 30) and made some very minor, subtle adjustments (Fig. 31) before the restorations were permanently cemented by the clinician.
Conclusion
To match no-prep veneers with existing natural dentition, we need proper diagnosis from the clinician regarding convexity and any undercut present. The dentist might be asked to smooth the tooth down to prevent fracture and trim bulkiness for alignment purposes. Translucency of the adjacent teeth must be noted and adapted to mimic the natural dentition. The ingot chosen should be one of low opacity to match the harmony of the lobe, height of contour and incisal silhouette and surface texture. Minimally prepped veneers require all of these considerations to ensure the dentist and patient will be happiest with the final restoration and its appearance in the mouth.


