Step-by-step: IPS e.max Press
January 2010 | Dental Lab Products Step-by-step: ips e.max press Pressed estheticsCreating highly esthetic pressed veneers using Ivoclar Vivadent’s IPS e.max Press lithium disilicate.
January 2010 | Dental Lab Products
Step-by-step: ips e.max press
Pressed esthetics
Creating highly esthetic pressed veneers using Ivoclar Vivadent’s IPS e.max Press lithium disilicate.
by Steve Hoofard, CDT, Aesthetics Design Laboratory, Hermiston, OR; dentistry by Dr. Scott Wehrkamp, AAACD
Information supplied by Ivoclar Vivadent Inc.
IPS e.max Press


Features
- Biocompatible lithium disilicate glass ceramic
- Offers exceptional fit, form, function, and flexural strength (400 MPa)
- Kind to opposing dentition
- Offered in low, medium, and high opacities to meet clinical needs
- Lifelike esthetics independent of prepared tooth shade
- Allows conventional or adhesive cementation
Ivoclar Vivadent
www.ivoclarvivadent.com
info@ivoclarvivadent.com
IPS e.max Press lithium disilicate glass ceramic is increasingly being selected as the material of choice for esthetic restorations based on its versatility and strength and its ability to satisfy multiple requirements for technicians.
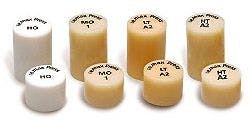
Additionally, the IPS e.max Press lithium disilicate is available in four different ingot opacities that can be used to satisfy different esthetic demands: High Opacity (HO), Medium Opacity (MO), Lower Translucency (LT), and Higher Translucency (HT).
This is significant because dental ceramists today must accurately match tooth shades while being as productive as possible. The recent introduction of lithium disilicate enables dental laboratories to fabricate esthetic restorations with greater efficiency.
The cutback and layering technique described here is a step-by-step process for using the IPS e.max Press lithium disilicate material not only to precisely and predictably deliver the patient’s desired shade and internal effects, but also to support proper soft-tissue response. The technique results in the creation of natural-looking optical effects by enameling over the imparted characteristics to return the restoration to full contour and blend seamlessly with the natural dentition.
Case Presentation
An 18-year-old female entering her freshman year of college presented with an angular fractured maxillary left central incisor (Fig. A). Seven years ago, tooth Nos. 8 and 9 were severely fractured and had since been restored three times with direct bonded composite.
The patient sought more esthetic, functional, and long-lasting restorations. Based upon examination findings, Dr. Wehrkamp and the patient agreed upon a treatment plan that included a take home, tray-based whitening system to establish the lightest baseline shade for her teeth; direct bonded occlusal restorations on tooth Nos. 2, 3, 12, 14, 15, 18, 19, 21, 30, and 31; and placement of IPS e.max Press veneers on tooth Nos. 8 and 9 to restore esthetics and function.


Refer to the slideshow for pictures
In the laboratory
01 A Kois transfer jig was used to mount and fabricate cross-mounted split cast master models.
02 A wax-up was created and contoured to the desired buccal/incisal position. A Siltek matrix was fabricated to capture this (Fig. B).
03 The wax patterns were then cut back to allow for effect and enamel layering and transferred to the sectioned master model (Fig. C).
04 The margins were then sealed and verified, and the wax patterns sprued and invested (Fig. D).
05 The ring was burned out, placed into a pressing furnace (Programat EP 5000), with an HTBL2 ingot and plunger loaded to complete the pressing.
06 After pressing, the pressed units were fitted to the master dies and de-sprued, and desired cutback verified
(Fig. E). With the cutback complete, the restorations were removed from the dies, lightly sandblasted, steam cleaned, and readied for internal stains and effects.
07 A thin layer of propylene glycol was applied to the entire surface of the restoration. Then, e.max stains were applied for internal character modifications and a slight amount of “blue” brushed onto the mesial and distal incisal corners (Fig. F).
08 The restorations were dusted with IPS e.max Ceram Bleach enamel and fired (Fig. G).
09 To extend the mamelon structure, the Siltek matrix was used while applying an equal mixture of 040 enamel and neutral. IPS e.max enamel powder EO2 was used to fill in the void areas of the matrix. Neutral/bleach and translucent OE1 were used to layer the incisal and incisal/facial surfaces in a symmetrical pattern to achieve the desired effect (Fig. H).
10 The restorations were removed from the dies and filled internally with Object Fix and then fired.
11 Another layer of neutral/EO2 bleach, neutral/bleach, and neutral/OE2, as well as IPS e.max powder OE3 were applied to achieve the desired incisal halo.
12 The restorations were fired and fit to the master dies. Contacts, occlusion, and function were established using Accufilm articulating tape and all contours shaped using diamond burs (Brasseler). Surface anatomy and morphology were established to blend the restorations with the surrounding dentition. Goldfinger silver surface paste was applied to verify that surface texture and contours blended well with the adjacent dentition. The restorations were then cleaned, the fit verified on the solid model, and then lightly sandblasted and steamed (Fig. I).
13 Here, e.max stains were applied wherever necessary, the restorations glazed using IPS e.max Fluorescence Glaze, then fired to seal and protect the stain layer (Fig. J).
14 Full embrasures, contacts, and fit of the final restorations were verified.
15 To achieve the desired satin luster and reflectivity, #2 pumice was used to polish the external surface. Ivoclar Ceramic Etching Gel was applied for 15 seconds, rinsed, and dried (Fig. K).
16 Post-operative view of the patient’s final IPS e.max Press veneer restoration in place on tooth Nos. 8 and 9 (Fig. L).


Related articles
- Step-by-step: Single central solution
- Investing in quality
- Step-by-step: Veneer esthetics


