Outside the box cosmetics for outside the guide results
Exploring why shade matching is so challenging - and the products that can streamline the process.


Our decision making have been greatly enhanced by technology.
Technology in dentistry has provided for an incredible amount of efficiency and productivity in any office that chooses to embrace it.
However, despite all of the advances we’ve been fortunate to see in our profession over the last 20 years, there are still some things that we struggle with. One of these is proper shade taking - or perhaps a better way to phrase it is “proper shade discernment.” It seems that no matter how much effort we put into it, the correct answer is always just a little to the left or right.
Trending article: What technology is right for your practice?
Over the years we, as a profession, have seen multiple attempts at solving this quandary through technology. However, the bottom line is this: We don’t have a technology readily available yet that takes the human eye and the human brain out of the equation. Because of that, we are often left with “getting it close” instead of “getting it right.”
Real-world case from my office recently: A long-time patient with a beautiful smile comes in for routine re-care. As the hygienist is taking radiographs, the patient mentions that she has been having increasing sensitivity with tooth #7, and she thinks it is turning dark. When I hear this, I immediately think “No, no, no!”
Why? Because we all know that one of the hardest things to do in dentistry is to match one single anterior tooth, especially in someone with an already gorgeous smile. The stress of doing, and sometimes re-doing, a case with high esthetic requirements is high.
Trending article: 5 surprising ways digital tools can boost your abilities
In this case, the tooth had gone south without any kind of trauma. When the electric pulp tester registered no response from this tooth, I checked the periapical radiograph to ensure I could still see a pulp space. The good news was that I could, which meant that I could do the endo while keeping the access as conservative as possible. Since there were no previous restorations and I could create a small access, it allowed me to retain a near pristine clinical crown. This allowed for internal bleaching and restoring the access with a small composite. If the tooth ever darkens again in the future, it is a simple process to remove the composite and do internal bleaching again.
However, not every potentially difficult cosmetic case can be solved this easily. The good news is that there are other ways that we can approach these cases that will help make the shade discernment process easier, less stressful and more accurate.
Continue to page two for more...
The basics
The human eye is an incredibly complicated piece of hardware, but for the purpose of this article let’s just stick to the color processing portion; that’s complicated enough! The eye has two types of photoreceptors: the rods and the cones. There are approximately 6 to 7 million cones that are used to see color, and approximately 120 million rod cells that help us see in low light conditions and see the brightness of an object. When you consider those numbers, it’s pretty obvious to see why we have trouble judging colors precisely.
As most of us know, shade discernment is a combination of three components:
1. Hue is simply the base color. For instance, the primary hues of our world are red, yellow and blue.
2. Chroma is the strength or intensity of a particular color. An example of chroma would be “sky blue” as opposed to “midnight blue.”
3. Value is simply how bright the color is. This is gauged starting at black, ending at white, and encompassing every shade of gray in between. Since humans have 120 million rods as compared to 6 to 7 million cones, it is much easier for humans to identify value than hue or chroma.
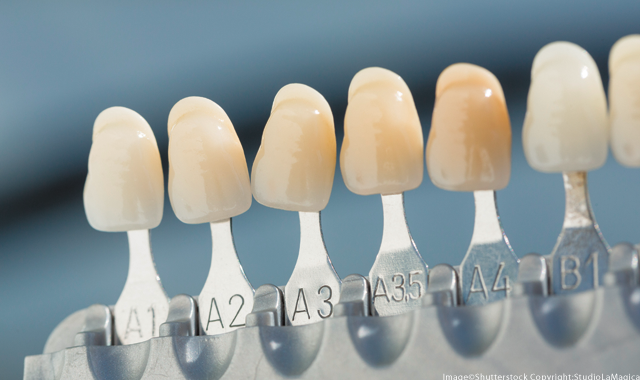
Now, let’s think about our standard shade guides. The most common is the VITA Classic, which has 16 shades. Unfortunately, it was created in 1927. The process then was to find the shade of a denture tooth that closely resembled the shade of the teeth that would soon be extracted. The concept of matching exactly never entered the mind of the dentist or patient. Unfortunately, no one was envisioning the esthetics possible with lithium disilicate in 1927.
Over the years we’ve seen several attempts to improve on shade guides as our materials have become more esthetic. The most popular seems to be the VITA Tooth Guide 3D Master (26 shades), which is based on value. There is also the Trubyte Bioform Color Ordered Shade Guide (24 shades) arranged from light to dark as well as the Lumin Vacuum guide. While all of these guides are much better than the 1927 version, it is still difficult in many cases to properly discern the shade.
Trending article: The risks and rewards of mail-order braces
The box we can’t get out of
In addition to the problems we have with all of the existing shade guides, we also have struggles due to the anatomy of our eyes. When it comes to processing color, the cones I mentioned above are not divided equally; 64 percent process red, 32 percent process green and two percent process blue.
Combining that fact with the rod and cone arrangement also shows why it is difficult for us to match shades. The rods are highly light sensitive and high-motion sensitive, but lower in resolution. For example, when something “catches your eye,” it usually is from motion in your peripheral vision. The rods sense this motion, but to truly see what the object is we have turn our heads to bring the object into the center of our vision. That’s because the highest resolution occurs from the cones that are located in the center of our visual field.
Our visual field actually extends about 200 degrees, but the accuracy of that 200 degrees is pretty low. Most of the retina is covered with rods and only a small area is covered with cones. That is why the accuracy of peripheral vision is fairly low.
About 98 percent of the cones, however, are located in the macula, a small depression in the center of the retina with a diameter of 2.5 to 3 mm. Since the cones are what provide high resolution images, the object must be where the image falls on the macula. That means the best resolution is achieved within 15 degrees of center. That is also why you can only attempt to match a shade one tooth at a time. Outside of that narrow 15 degree field, color vision drops considerably.
The most accurate area of vision is a 0.3 mm diameter area in the center of the macula called the fovea centralis. It’s important to remember that in the area of greatest visual acuity is the fovea centralis and the eye is constantly moving to keep the object of interest centered in this high-definition sweet spot. It’s also critically important to remember that these cone cells can tire fairly quickly, which is why staring at any object for too long causes your perception of that color to change.
Continue to page three for more...
Thinking outside the biological limitations box
Since we humans have obvious limitations in how we perceive color, we need to be looking for better ways to properly discern shades.
For openers, always take the shade at the beginning of the appointment. After prepping, the eyes are tired from focusing so intently. There is also the fact that almost every dentist is working under magnification with a fairly bright light. After just a few seconds of light from today’s LEDs, your color vision is rendered pretty inaccurate - and that includes the assistant’s as well. Also, despite the water spray from the handpiece, the tooth will be somewhat dehydrated after prepping and that will cause it to appear somewhat brighter than it was preoperatively.
One of the things offices often try is to view the subject in as many light sources as possible. This can certainly help, although colors in the office and even outside can vary greatly depending on the light sources or time of day.
Women generally have better color vision than men, so male doctors need to rely on female colleagues to take shades. Also, do not hesitate to get multiple staff involved and the patient as well. I have very reliable color vision, but in my office I have staff get the shade after which I’ll take a look - but I cannot remember the last time I overruled the staff on a shade.
Trending article: how to jump start your cosmetic dentistry practice
Rite-Lite 2
One of the things I have found that can help with the shade-match problem is the Rite-Lite 2. The device has the look of a magnifying glass, with two different wavelength of LEDs.
One is “daylight,” which simulates outdoor light on a bright but cloudy day. The color temperature is 5500° Kelvin, which is an industry standard. The second is “room light,” which simulates the warm light that comes from indoor lighting. These LEDs have a color temperature of 3200° Kelvin. The third is a mixture of 5500° and 3200° to create an approximate temperature of 3900° Kelvin that often exists in many indoor environments.
Pushing the button on the device activates the 5500° LEDs. A second push turns off the 5500° LEDs and turns on the 3200° LEDs, and a third turns on both the 5500° and the 3200°, which creates the 3900° light.
As you cycle through the various LED arrays, you look through the center of the “lens.” This provides the viewer with a uniform lighting experience similar to a ring flash for photography. Holding different shade tabs up and comparing them to the tooth under the different temperatures of light helps.
We use the 5500° light for initial match and then use the other settings to confirm. The device also comes with strips of light pink paper that are held behind the target teeth. These do not interfere with color perception and help do away with any kind of color distraction. They also provide a very neutral background that does not fatigue the eyes.
Continue to page four for more...
ShadeWave
Providing good photographs to the lab has, for years, been one of the most reliable ways of getting reliable cosmetic results. However, as we’ve entered the world of digital photography, problems resulting from different sensors and color variation between computer monitors have presented themselves.
So, how do we use photography when there are inherent problems more or less built into the digital system? The answer is ShadeWave. ShadeWave is a cloud-based photography software program that uses four different mapping systems that measure shade and ensure that the photo you take is interpreted and sent to the lab with no loss of digital communication along the way.
Trending article: How to achieve esthetic restorations for the pediatric dental patient
The system is easy and pretty much foolproof. There is a custom shade reference tab that is held in the photo you take of your case. This shade reference tab is a “known quantity” to the ShadeWave software. That means when you upload the case and the ShadeWave system analyzes the photo, it knows all the nuances and colors in the shade reference tab. It can then take those known values and apply them to your photo and digitally figure out the proper shade. It then creates the maps and sends all of this info to your lab.
When your lab finishes the case, they take photos of the finished case and upload them to ShadeWave, which then can show how the finished case appears with its maps to the pre-op photos. This ensures that when you receive the case, the shade is just what you need.
More from the author: How to locate the pain points in your practice
Wrapping up the box
Take a few minutes and think about how this subject is impacting your practice. As we all know, the definition of insanity is doing the same thing over and over and expecting different results. If that applies to your fight to tame the shade-matching beast, maybe it’s time you came at that attack from a different angle. There are lots of ways to help solve this problem. Here’s hoping you just found a couple of new tools for your utility belt.


