Luke Kahng on using milled titanium to make a great restoration
We can produce restorations at a more predictable level with less cost than we were able to in the past, and, as an added bonus, the product is better! It is another option available to us and, many say, the wave of the future.
Luke Kahng on using milled titanium to make a great restoration.


New methods of utilizing CAD/CAM digital dental technology are growing every day. In the future, this approach will be the most common when we fabricate restorations for our clients. It has certainly changed the way our laboratory industry operates.
We can produce restorations at a more predictable level with less cost than we were able to in the past, and, as an added bonus, the product is better! It is another option available to us and, many say, the wave of the future.
Product roundup: Benchtop scanners
Case Study
01 Our patient presented with four screw-retained implants placed in the mandibular area (Fig. 1; all figures in video below) for the purpose of placing a PFM bridge. The abutments used previously were UCLA, which had involved ordering, modifying, waxing up and using gold and casting-a process that is time-consuming and expensive, especially when the metal weight is high.
02 So the doctor would not have to pay a high gold price, the lab suggested the one-piece bridge be fabricated using titanium milled in-house at a less costly rate. The doctor agreed.
03 The bite record was placed on the model next for a proper measurement (Fig. 2). The screw-retained occlusion was checked (Fig. 3), as were the access holes, to make sure everything was properly placed and that the access holes’ insertion direction was correct.
04 Figure 4 is an image of a Freedom scanner from DOF, which was utilized in the scanning process of this case. The model was placed entirely inside with a semi-adjustable articulator. Using this scanner, the technician is able to scan any semi-adjustable articulator for proper occlusion and bite.
05 The next stage in the process was the nesting stage, after design, (Fig. 5) to maximize disc space. During this stage, the structure’s set-up position is determined according to the thickness of the titanium disc. Our milled titanium substructure was next photographed inside the machine (Fig. 6).
06 The titanium bridge was then opaqued (Fig. 7) after cutting the sprue and finishing the metal framework. The framework was not de-gassed because that step is unnecessary; however, titanium bonder was applied and then the restoration baked. Two or three times, the opaque was applied, and the substructure was baked after each application before moving onto the next stage.
Must-read: How to transition from traditional to all-digital
07 After opaquing, the dentin application was layered on using GC Initial Titanium Porcelain (Fig. 8). It was then tried on the model for an occlusion (Fig. 9) and fit check (Fig. 10). Mirrored views of the porcelain to titanium with pink porcelain tissue are next (Figs 11, 12 and 13).
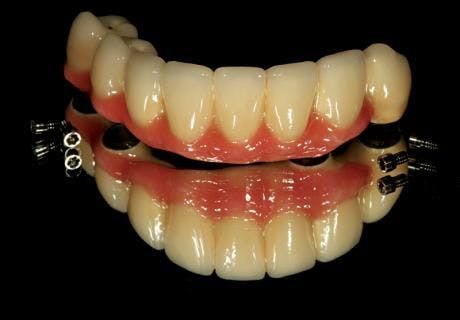
08 Figure 14 shows a final view of the mirrored restoration that is ready to be delivered to the client.
Conclusion
Many people are concerned about porcelain-fused-to-titanium restorations, especially with regard to cracking or debonding. With the old technique dental technicians used that involved casting, that concern was often a legitimate one. That method was not trustworthy. However, in using CAD/CAM and milling titanium hybrid bars, no casting is involved. Without the extra steps or oxygen/gas involvement, we do not experience those issues. The specific bonder we use for titanium assures us of a successful outcome with our work.
This article originally appeared in the May 2015 issue of Dental Lab Products. For more great insights, make sure you're subscribed to DLP by clicking here: http://bit.ly/18S8j4i


This article is part of DLP's Modern Dental Artistry, meaning it has special interest for anyone who is a part of the esthetic, cutting-edge workflow. Click here to find out more.


