How to use 3D printing to simplify occlusal splints
Occlusal splints don’t have to be complicated or expensive - digital workflows can make them more accessible than ever.


Completely digital workflows allow laboratories and practices to provide better treatments and clinical outcomes - but they can only gain widespread adoption once they make business sense.
Occlusal guards, splints and occlusal splints have been prescribed by clinicians and sold over the counter for decades with little change to how they’ve been manufactured. Recently, however, 3D intraoral scanners and 3D printing technologies are becoming widely adopted in the dental industry, opening an opportunity to produce completely digital appliances that have many advantages over their analog counterparts.
Traditionally the dental laboratory has made occlusal splints by forming acrylic by hand over articulated models, vacuum forming techniques or a combination of both. Using the Formlabs Form 2 stereolithography (SLA) 3D printer and Dental LT Resin, dental laboratories and practices can now directly 3D print biocompatible occlusal splints for long-term use. The completely digital workflow that concludes with 3D printing allows for greater control, requires less labor and results in better fitting appliances.

Fig. 1
Occlusal splints are usually prescribed for therapeutic and preventive reasons, but due to poor fittings, cost and the tedious workflow, splints are often under prescribed or not even offered. Experts estimate that one-third of all patients would benefit from occlusal splints, with the most common uses being preventing chips, cracks and tooth wear. Due to its preventive nature, many dentists opt not to prescribe or even recommend the use of occlusal guards - and when offered, patients aren’t typically willing to invest hundreds of dollars into their future oral health. The solution? 3D printing these appliances can meet the cost needs and open a larger market for these products.
In this article, we’ll provide a breakdown of the full digital workflow as well as process considerations for 3D printing occlusal guards and splints on the Form 2 3D printer using the Dental LT Resin.
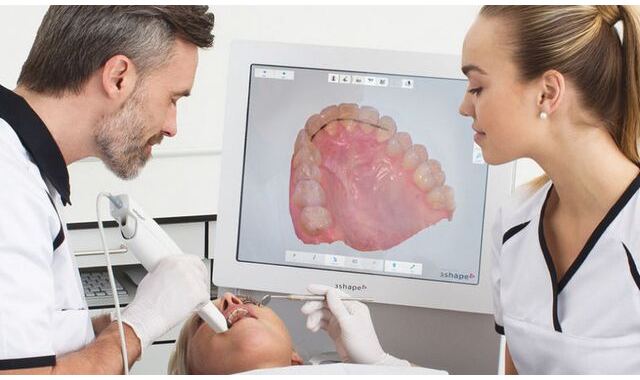
As with any dental appliance or indication, it all starts with the impression. In Figure 1, you can see the use of a 3D intraoral scanner, the 3Shape TRIOS®, to digitally capture an impression of the patient’s mouth. Although it’s best for the workflow to be completely digital, the dentist or assistant can also take a traditional impression and have the impression or model be scanned on a laboratory desktop scanner to digitize the impression.
Some might believe that occlusal splints don’t need to be as accurate as other indications, but it’s very important to make sure the digital or physical impression is as accurate as possible. If the dentist is using a physical impression, we recommend a PVS type impression material - as opposed to an alginate - to assure sufficient occlusal detail and cross-arch accuracy. If a digital IOS is being used, we recommend reviewing the scan data; look for any missing holes interproximally or otherwise after scanning the bite and make sure the occlusion looks correct while reviewing the contact points.
The digital impression files are then brought into a dental design software, or CAD, where the occlusal splint can be designed according to the clinical specifications. In our example, 3Shape Appliance Designer CAD software was used, but any open CAD software capable of exporting a STL file will work with the Formlabs PreForm print preparation software. If the cost of the CAD software is too high, there’s a lack of CAD dental technician bandwidth or you want to try printing splints without buying software first, consider outsourcing splint design to CAD service providers. For example, fullcontour.com allows customers to upload digital impression files with prescription information. Based on the information received, they design the occlusal splint and send back the STL file to the customer for 3D printing in-house.

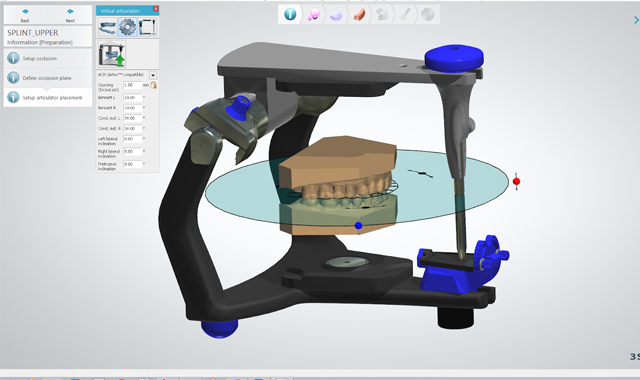

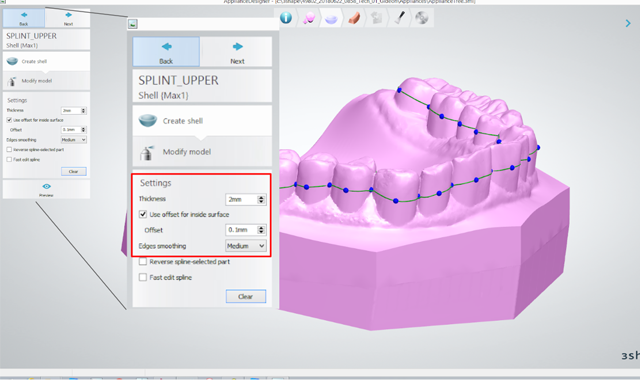
Fig. 2 Fig. 3
Using dental CAD software is very similar to the traditional steps of making a splint in a laboratory. The first step is to set the insertion direction, virtual articulation and occlusal plane (Fig. 2). These first steps are important because once the appliance is made, these settings will be the foundation you use to open the bite and make occlusal rests and stops.
The second step is to outline the perimeter of the occlusal splint. During this step you’re able to set the thickness of the splint as well as the internal offset. As you can see in Figure 3, we found the best offset to be 0.1 mm; this produced appliances that fit with the least chairside adjustment. Although the material can be printed pretty thin, it’s recommended to have at least 1.5 mm thickness for the optimal material properties and to have enough posterior thickness for wear on the splint.
Once the splint is generated you have the ability to add additional material around the appliance, if needed. The next step is to open the bite in virtual articulation as needed and put the case through excursive and protrusive movements. The software will adjust the appliance’s occluding surface with those virtual movements as much as the user selects. The last step is to take the “2D cut tool” and slice through the appliance to measure the thickness and review contact points with extreme accuracy (Fig. 4). To conclude, the case is saved and a 3D printable file is created in STL format.

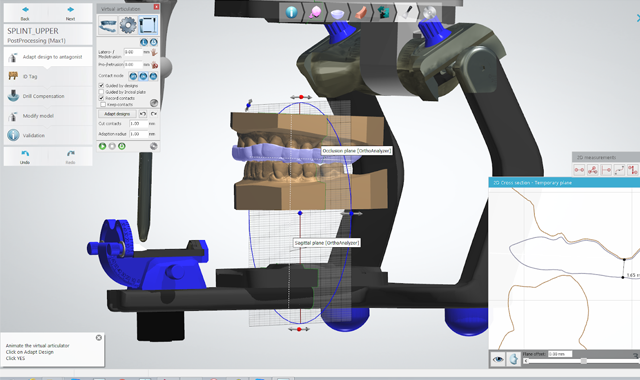
Fig. 4 Fig. 5
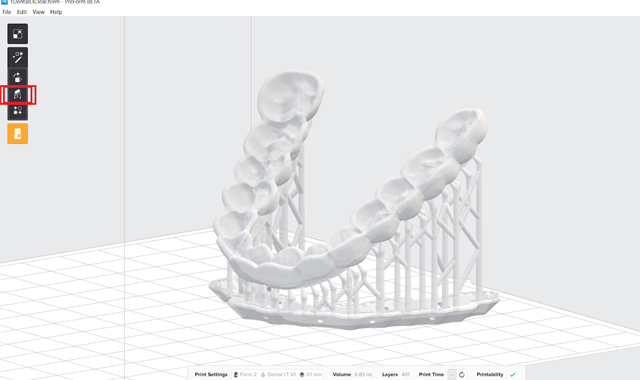
Now that you have a 3D printable file from 3Shape design or your CAD software, the 3D printing process to create the occlusal splint on the Form 2 can begin. The Form 2 3D printer uses a nesting or CAM software called PreForm, which is very easy to operate and learn. Open the file from 3Shape in PreForm, orient the splint at about 45 degrees with the occlusal side facing downward, and click on the “supports” button (Fig. 5). To send the job to the printer, click the orange button with the Form 2 icon.
To prepare the Form 2 printer for printing, insert a resin tank, resin cartridge and build platform into the printer (Fig. 6). Thoroughly agitate the resin cartridge before inserting by shaking and rotating it several times. For full compliance and biocompatibility, Dental LT Clear Resin requires a dedicated resin tank, build platform and finishing kit. Once the print job is sent from PreForm, the printer will have a preview of the print on screen and ask for confirmation to begin printing.

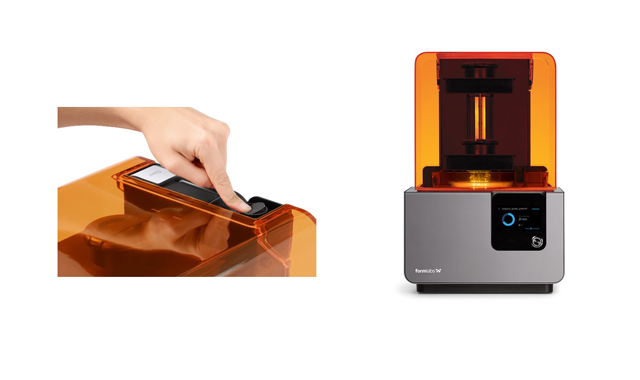

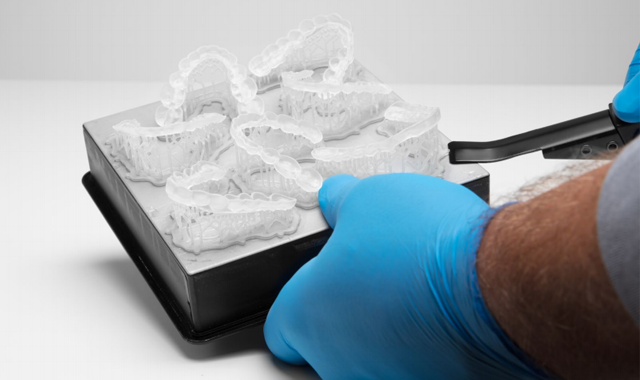
Fig. 6 Fig. 7
Always use gloves when handling uncured resins and parts. Remove the printed occlusal splints from the build plate with the Formlabs provided part removal tool (Fig. 7). Now that the part is loose, it must be washed and dried. Rinse the part in isopropyl alcohol (IPA, 96 percent or higher) for five minutes in Form Wash (or two minutes in an ultrasonic bath) to dissolve any uncured or excess resin (Fig. 8). When washing parts in an ultrasonic bath, transfer part to a new bath of clean alcohol solution and rinse them for an additional three minutes. Let the part dry or use compressed air to hasten the process.

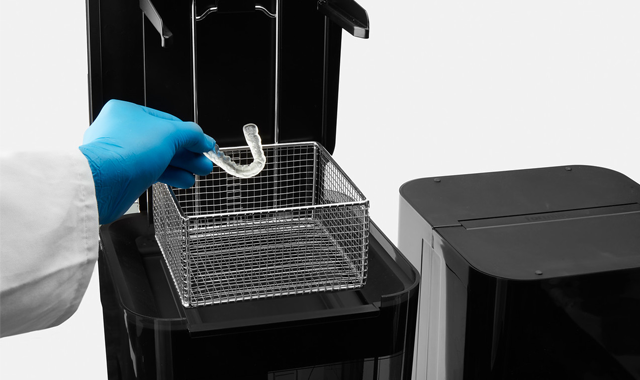

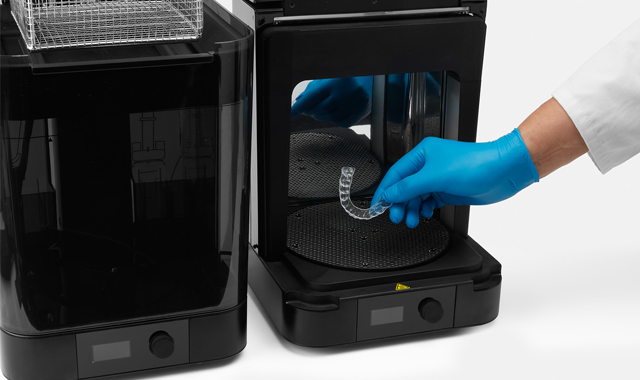
Fig. 8 Fig. 9
Once the part is dry, it’s ready for post-curing. Formlabs’ post-curing station, Form Cure, meets all the requirements for optimal post-curing. Simply set the temp to 60 °C for 10 minutes of post-cure time. If you intend to use a third-party post-curing unit, it must meet the following requirements: exposure for 10 minutes to 108 watts each of Blue UV-A (315-400nm) and UV-Blue (400-550 nm) light in a heated environment at 60 °C (140 °F) (Fig. 9).
Use the flush cutters included in the Formlabs Finish Kit to carefully cut the supports at the points where they attach to the part. Use caution when cutting the supports, as the post-cured material may be brittle. Supports can also be removed using other specialized appliances, such as cutting disks or round cutting instruments like carbide burs (Fig. 10).

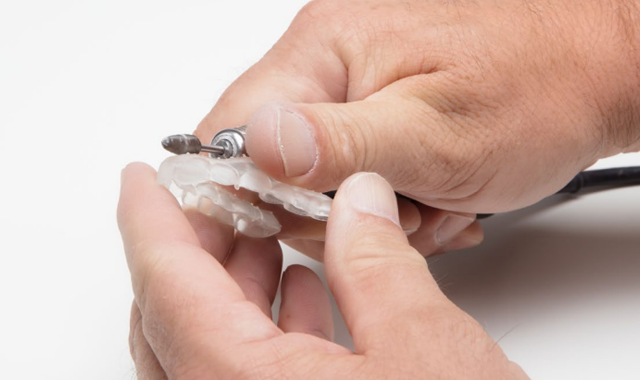

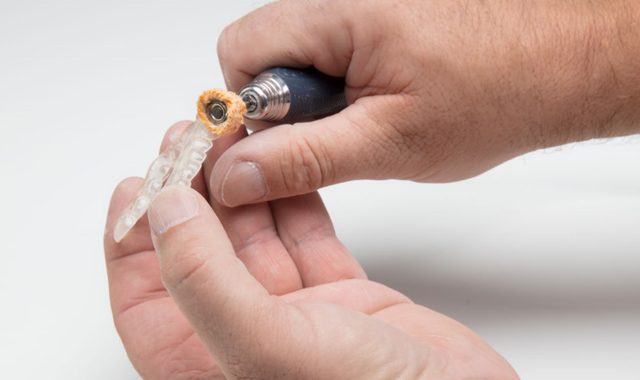
Fig. 10 Fig. 11
For a glossy surface finish, polish parts using a rag wheel and pumice at low speeds. After initial rough polishing, switch to a dry cloth polish. Finish with a high-grit acrylic buffing paste, such as Hi-Shine, at high speeds (Fig. 11).

Fig. 12
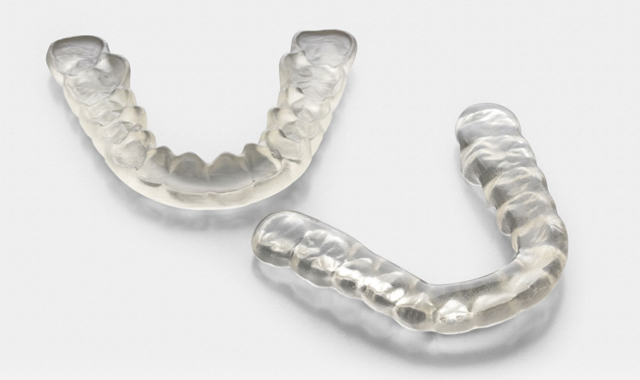
The finished 3D printed occlusal splint is ready for delivery and use chairside (Fig. 12). Before initial try-in, disinfect parts with non-chemical products. If chemical disinfection methods are necessary, ethanol solution is recommended.
Conclusion
Digital workflows create instant feedback and improved communication between patient, dentist and technician, which allows for every step of the process to be refined, repeatable and ultimately deliver better patient outcomes. As dental labs and practices look to stand out in the dental industry, offering patients complete treatment plans, including preventative wear occlusal guards, can be a great value add for just around $10 in material cost when 3D printed on the Form 2. If you’re a dental professional who has other indications to be printed, like models, surgical guides, diagnostic wax ups and custom impression trays, 3D printed occlusal splints might just be one more indication that makes the Formlabs Form 2 print system worth the investment.


