How to fabricate flexible removable partial dentures
Using modern materials and techniques allows for cost savings and superior dentures.
Traditional methods for fabricating removable partial dentures (RPDs) require the use of prefabricated sets of denture teeth made from polymethyl methacrylate (PMMA).
The practice of using prefabricated teeth often requires modification to the individual teeth in order to fit the shapes, sizes and contours of the natural teeth that abut and oppose the partial denture. The denture teeth are then combined with cast chrome-cobalt, polymerizing acrylic resins, injection molded polyamides or a combination of these materials. Processing these materials traditionally involves tasks that can be digitized through recent advancements in additive manufacturing. This case study explores the use of modern digital technology to plan, design and fabricate a set of maxillary and mandibular flexible partial dentures.
Overview
The practice of RPD fabrication by dentists and dental technicians generally focuses on how to properly survey and design a case to accommodate clasp placement based on path of insertion and undercuts for retention.


Fig. 1
Less emphasis is placed on the selection and arrangement of denture teeth for partially edentulous patients for whom the RPD is being prescribed. RPD patients commonly display situations that make tooth replacement challenging, such as wide or narrow spacing between abutments that have drifted, opposing dentition that has worn or supra-erupted, and natural morphology which is difficult and time consuming if not impossible to replicate by contouring prefabricated denture teeth.
Traditional hand-built techniques for constructing a custom resin-based crown are time consuming and generally cost prohibitive when used in combination with most RPDs. The evolution of digital CAD/CAM in restorative dentistry has made it feasible to construct custom resin crowns to be used in combination with a flexible or metal based RPD. This set of flexible RPDs will be constructed in just two patient appointments - the first to acquire digital final impressions and maxillo-mandibular relationship records, and the second to deliver the prostheses.
Case study
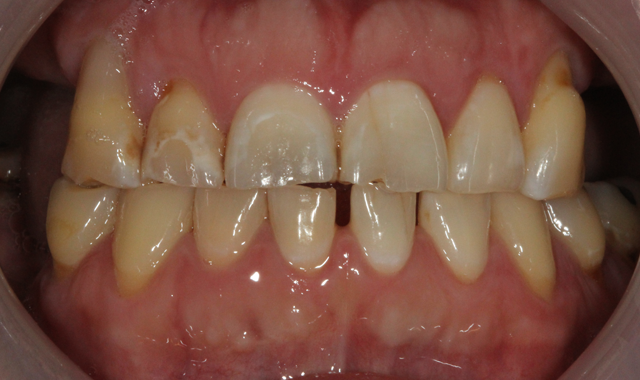
A young male who presented with partially edentulous spans on the maxillary and mandibular arches and in need of Kennedy

Fig. 2
Class I (maxillary) and Kennedy Class I Mod. I (mandibular) removable partial dentures (Fig. 1). The bilateral distal extension situation present in both arches made the patient a suitable candidate for flexible RPDs. This will incorporate stressbreaking function and the snowshoe principle into the dentures in an attempt to alleviate stress and torque on the distal abutments.
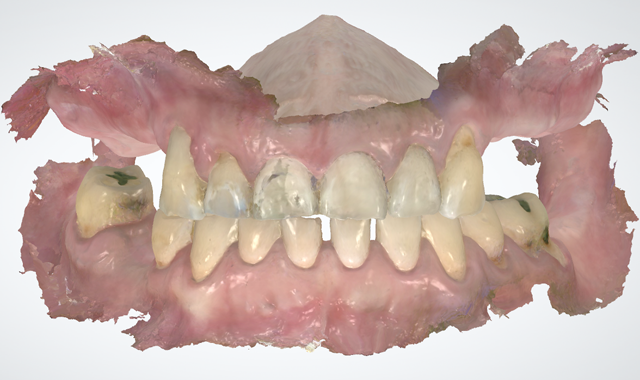
Final impressions and the jaw relationship record are taken at a single appointment in full color using the Trios Intraoral Scanner (3Shape A/S, Fig. 2). The scanner records color information and captures all tooth and tissue areas with ease, and transmits the scans electronically to the lab within minutes after being taken.
The digital impression allows for a completely mucostatic impression (mucostatic being the preferred impression technique for flexible RPDs), which will be critical to the fit of the final appliance as it is designed to be completely tissue-borne. Maxillary and mandibular arches are scanned and the order transmitted to the lab via 3Shape Communicate. Once received by the lab, the order is set up as a removable partial denture with artificial teeth for both the maxillary and mandibular arches.
Design

Fig. 3
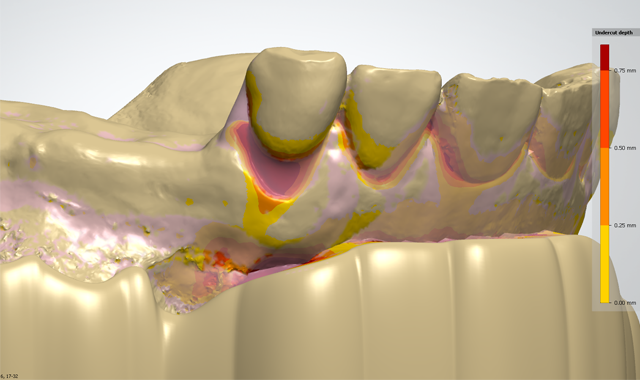
Within the CAD environment, intraoral scans are trimmed and the virtual casts positioned to appropriate antero-posterior and lateral tilts and surveyed to determine path of insertion. Undercuts are blocked out in virtual wax using the survey angle selected (Fig. 3).
Desirable tooth and soft tissue undercuts are identified and blockout is subtracted from facial surfaces using the virtual wax knife in order to design the retentive arms. Lingual, mesial and distal undercuts are characterized as undesirable and the blockout wax will remain below the height of contour in these areas.
A thin border of relief wax is placed at 20μ thickness along the labial peripheral border to alleviate typical pressure points from the maxillary flexible RPD. The same is done for the mandibular RPD in junction points where the clasps are joined to buccal flanges. Free gingival margins are relieved with a small amount of relief wax using the wax knife smoothing tool.
Recent updates in dental design software allow for the planning of virtual teeth for manufacturing with tooth pockets being subtracted from the denture base design. This permits the technician to design fully-customized replacement teeth for the patient rather than subtractively and arbitrarily modifying stock denture teeth to fit the indication. The teeth are initially placed, morphed and sculpted as needed and checked for contacts and interference (Fig. 4).
The major connector tool is used to draw a continuous outline of the proposed denture. After the initial placement individual points can be manipulated to refine the denture borders. A substructure thickness of 1.5mm and a wax thickness of 0.5mm in our material settings for a combined denture base thickness of 2.0mm.

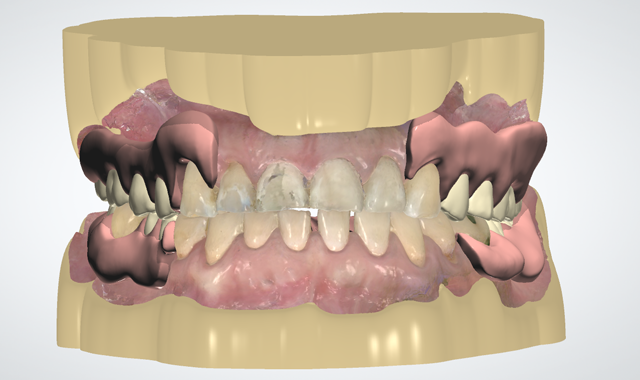

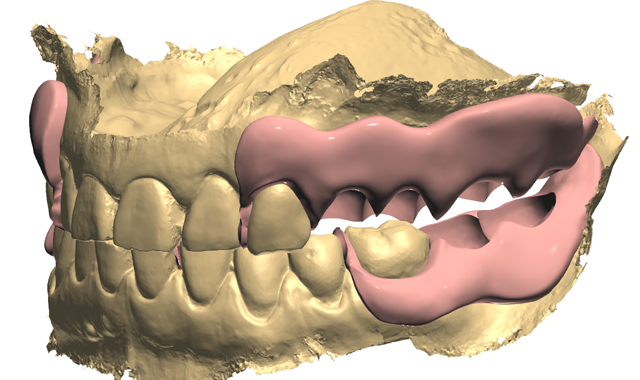
Fig. 4 Fig. 5
Though the target finished thickness of the denture is 1.5mm, the extra 0.5mm of thickness provides a more homogenous printing of the denture base and allows for some reduction during the finishing and polishing stages after the denture has been printed. Support bars are positioned to connect the clasps and reciprocating arms over the occlusal table to help stabilize them during printing. Wax is built up around the base of the denture teeth and into interproximal spaces. The denture base is then cut to the basal surfaces of the teeth to create tooth pockets, thus finalizing the denture design (Fig. 5). Models are designed with built-in articulator interfaces and vertical stops to position the models in occlusion after printing.
Fabrication
The fabrication stage will oversee three separate digital processes occurring simultaneously - CNC milling of the denture teeth, 3D printing of the denture bases and 3D printing of the maxillary and mandibular models. Using Sum3D software (CIMsystems) the teeth are positioned in a 16mm thick multilayered PMMA disc (Nobilium) The milling sequence is then initiated on a Roland DWX-51D 5-axis dental mill (DG Shape). The denture bases and models are positioned using Simplify3D software (Simplify3D, Fig. 6) for printing with the r.Pod® Desktop 3D Printer (Arfona, LLC).

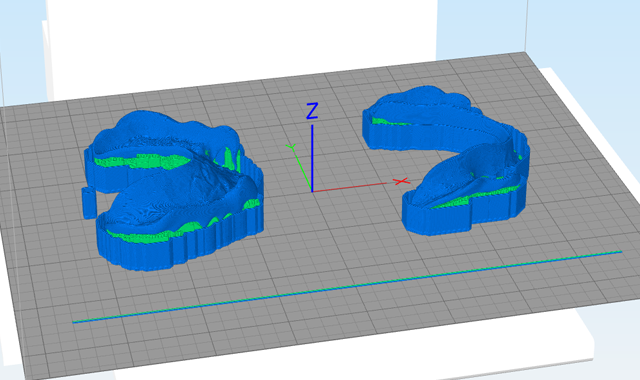


Fig. 6 Fig. 7
After printer and material presets are applied the 3D models and resulting toolpaths can be visualized using the cross-sectional preview in Simplify3D. The denture is printed at 100μ resolution using Valplast® 3D printing filament (Valplast Corporation). The dental models are also printed at 100μ resolution using the r.Pod® Desktop 3D Printer with Dental Model filament from Arfona, LLC.
After manufacturing, the teeth are removed from the milling disc and sprues are cut. The dentures are removed from the r.Pod printer (Fig. 7) and the breakaway support material detached manually. The denture base is trimmed on the outer surfaces using a crosscut carbide bur from the Valplast Finishing Kit. The intaglio surface and tooth sockets are then blasted at 100psi using Plasti-Blast™ Abrasive Media (Arfona). The dentures are contoured and fit to the models using a #13 Green Mounted Stone and smoothed using a Green Silicone Polisher.

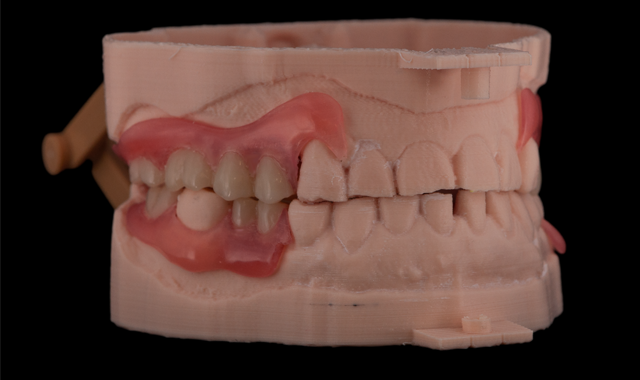

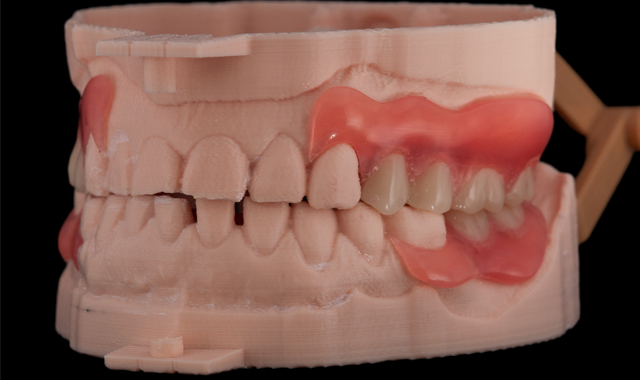
Fig. 8 Fig. 9
Prior to polishing, the tooth sockets are primed using Val-Fuse Repair Liquid (Valplast). The teeth are bonded chemically to the primed denture base using self-curing acrylic resin in a pressure vessel. The dentures are then polished with Polaris Synthetic Pumice, Gold Tripoli and Mirror-Shine from the Valplast® Polishing Kit and prepared for delivery (Figs. 8-9).
Conclusion
Fabrication and delivery of this case was carried out over the course of two clinical appointments and a single laboratory visit. No adjustments were made to the denture base or occlusion at the delivery to the patient (Figs. 10-11), representing a desirable outcome not just for flexible RPDs but for any type of removable prosthesis for partial or fully edentulous patients.

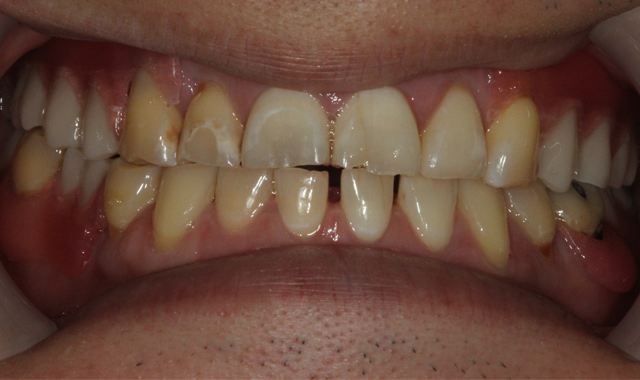

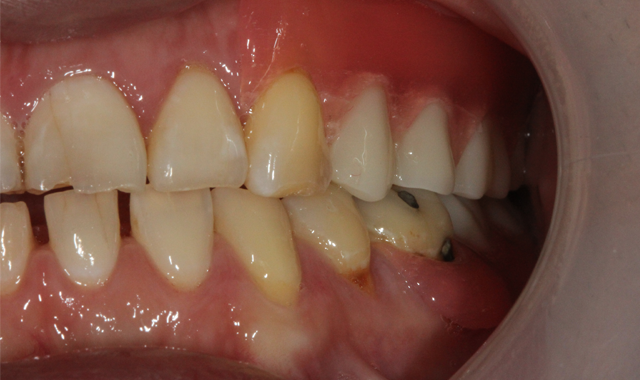
Fig. 10 Fig. 11
Thus, there are several advantages to using digital technology to scan, design and fabricate flexible RPDs:
- Reduced finishing and fitting after processing due to improved precision from digital design
- Complete customization of the replacement tooth or teeth that adhere to proper morphology, allowing for the improvement of RPD aesthetics and occlusion
- Reduced time arranging teeth and selectively grinding contacts and occlusion
- Reduced overall fabrication time from the absence of model duplication, hand-waxing, flasking, boil-out and injection molding techniques
- Significant time reduction over both digitally and traditionally fabricated framework supported RPDs
- Reduced material cost of the denture base over subtractive manufacturing processes due to the absence of wasted material from grinding or residual material in the milling blank
With the dental industry now decades into the development of CAD/CAM technology, clinicians and technicians alike should consider the possibilities of using digital equipment for the design and fabrication of removable partial dentures including flexible RPDs.


