How to efficiently place posterior direct composites
How to apply direct posterior composite restoration with bulk-fill dual-cure composite resin and sectional matrix/ring system.


In our esthetically focused society, tooth-colored posterior restorations are the choice for many patients. Ceramic inlays and onlays can provide excellent alternatives to amalgam and gold. However, the cost of indirect restorations is sometimes a limiting factor in today’s economy.
Direct posterior composites can be affordable alternatives for the patient, but have been challenging for the practitioner due to many factors. Conventional direct composites are light cured and often require layering in increments due to the restriction of curing depth with an LED curing light. Proximal contacts are difficult to achieve with traditional matrix systems. Polymerization shrinkage has sometimes resulted in tooth sensitivity and marginal leakage. And the time required to place these restorations often has resulted in low financial productivity.
Solution
Numerous bulk fill materials have been introduced to help solve some of these issues. One of the newest materials is Fill-Up! from Coltene.
It involves use of a dual-curing composite resin that sets on its own in three minutes. Since it has a self-curing mode, shrinkage is directed into the center rather than toward the curing light, resulting in less shrinkage stress and an excellent marginal seal when combined with its dual-curing bonding agent (ParaBond). No layering is needed, so the cavity preparation can be filled in one increment. The resulting shade is approximately an A2 Vita shade, which blends well with most posterior tooth structures. Room can be provided for an occlusal layer of composite if a different shade is desired.
Proximal contacts can be achieved predictably with a ring system, such as the Composi-Tight 3D system by Garrison Dental. By using a curved sectional matrix combined with a wedge and ring system, proper proximal contours are easily obtained.
Clinical example
The mesial of the first molar and distal of the second premolar (Fig. 1) exhibited proximal decay requiring repair. The patient (male, aged 18 years) chose direct composite restorations for their affordable cost and one-appointment procedure.
Preparation
I administered anesthetic, and my assistant placed a rubber dam. I prepared the proximal surfaces using a crosscut carbide bur (Fig. 2), being careful to be minimally invasive and leaving the transverse ridges intact. The finished preparations can be seen in Figure 3.
A sectional matrix was placed at the distal of the second premolar and secured with a small wedge (Fig. 4). A Composi-Tight ring was placed over the wedge and against the matrix using the forceps designed for the system. Figure 5 shows the system in place.
Composite placement
Phosphoric acid etching gel was applied to the enamel margins (Fig. 6) and then onto the prepared dentin and immediately rinsed thoroughly with water from the air/water syringe (Fig. 7). The prepared tooth was lightly air-dried using oil-free air from the air/water syringe.
One drop from each bottle of the bonding agent (ParaBond) was placed in a mixing well, mixed, applied to the prepared areas of the tooth and massaged in for 30 seconds using the applicator tip (Fig. 8). The bonding agent was air dried with oil-free air from the air/water syringe (Fig. 9).
Fill-Up! composite was injected into the cavity preparation using the auto-mixing tip (Fig. 10). Care was taken to apply the material from the bottom up, leaving the syringe tip in the material so that no voids would be created. In Figure 11, the filled preparation can be seen. The composite was allowed to self-cure for two minutes and a LED curing light was used to cure the surface for five seconds (Fig. 12). The Composi-Tight ring was removed with the forceps and the wedge and sectional matrix were then removed (Fig. 13).
Another sectional matrix was placed for the mesial of the first molar (Fig. 14). After the wedge and Composi-Tight ring were placed, a spoon was used to burnish the matrix at the contact position (Fig. 15). The tooth was then etched, rinsed and dried and the bonding agent was applied as before. The Fill-Up! composite was applied (Fig. 16) and allowed to cure as before. The cured composite can be seen from the occlusal surface in Figure 17.
The surface of the composite was contoured using a carbide finishing bur (Fig. 18). Figure 19 shows both posterior composites in place before rubber dam removal.
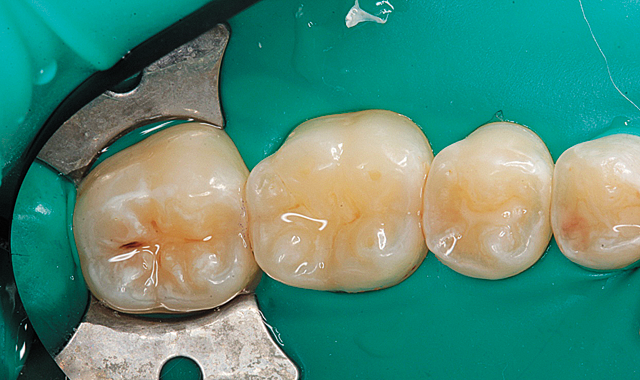
After the rubber dam was removed and the occlusion was adjusted, polishing of the composite resin was accomplished with Alpen SwissFlex polishers (Figs. 20-22). Floss was used to confirm a tight contact (Fig. 23). The final result can be seen in Figure 24 at a two-week follow-up appointment.
Conclusion
In this article, I described a predictable, time-efficient process for applying a direct posterior composite restoration using a new bulk-fill dual-cure composite resin by Coltene and sectional matrix and ring system by Garrison.


