The future will be in 3D
How CBCT scanners like the Planmeca ProMax 3D Mid are changing the way orthodontists practice.


Let’s pretend for a minute that for the last 40 years, within the specialty of orthodontics, we had routinely used only 3D radiography to diagnose and treat our orthodontic patients.
However, during this time period a new technology was introduced that would allow clinicians to image our patients in a very clear 2D imagery, but this new 2D technology delivered more ionized radiation than the existing 3D radiography. Do you really believe the specialty would embrace this new technology? We would say, “Are you kidding me-look at our patients in 2D? No thanks.” We would bypass this “new” technology and continue to diagnose and treat in 3D.
Related article: How embracing digital dentistry opens up possibilities
Why? Because with 3D we see more, know more and do more. The quality of care with 3D is simply better. The records that orthodontists are taking to diagnose and treat their patients are changing. The advent of the CBCT was intriguing to most of us 10 years ago. But those who have embraced the new technology are just now beginning to see how it changes our diagnoses and the treatment of our patients.
In our profession, quality care is directly correlated to a proper diagnosis, as well as the formulation of a detailed treatment plan. Treating orthodontic patients quickly also has a direct correlation with a thorough diagnosis and a detailed treatment plan. These are directly related to the quality of the records taken to formulate this diagnosis and detailed treatment plan. Orthodontists have changed the way we take records in orthodontic residency programs, and we are also changing the levels of ionized radiation that we are delivering to our patients.
Related article: How to transform a dental practice from low-tech to high-tech
Up next: What the 3D future means for you and your patients
The past and the future
In the past, orthodontists’ standard of care was the 2D pantograph and a 2D cephalogram. Many orthodontists continue to take a full mouth set of radiographs. Some also take a 2D posterior anterior image and a submittal vertex. In the 3D world this would be the sagittal, the coronal and the axial views.
Let’s just take into consideration the cephalometric and the pantographic radiographs. With most machines this would be approximately 38 microsieverts of effective dose of radiation. Now, with the introduction of the ultra low-dose utilized in the 3D world, the effective dose in a 12-year-old child with an average size head is approximately 13 to 14 microsieverts. We can then extrapolate a ceph. to diagnose from our traditional sagittal view. We can now evaluate the alveolar housing for the roots of the teeth that we should keep in bone. This cannot be imaged with 2D technology radiography.
Related article: Your guide to radiation in the dental practice
The days of using the same prescription to place a set of brackets on a patient is quickly fading. Numbers used to treat in the sagittal view are now becoming dependent on the anatomy, and not numbers attained from an “Old World flat image.” We will reserve the complete explanation to the above statement for another article.
Case study
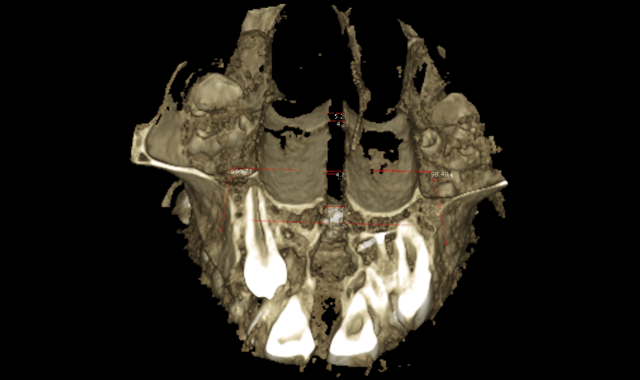
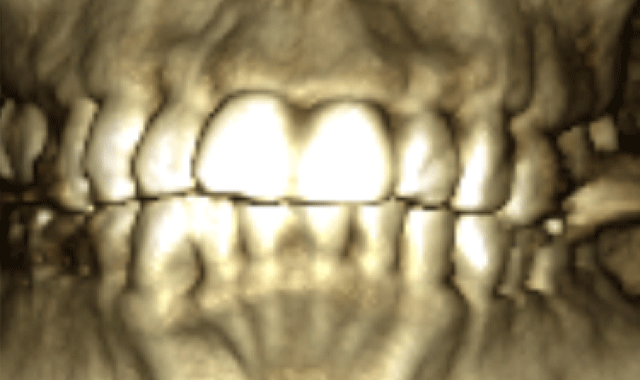
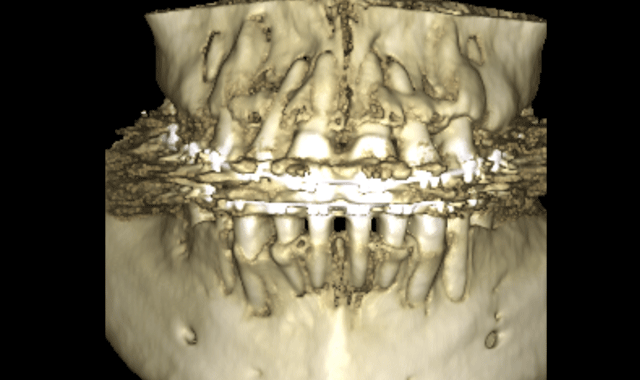
The initial scan was taken with a 400 μm voxel size at 90 kV, a 10 mA setting. The scanning time was 13.887 seconds. The machine used was a Planmeca ProMax 3D Mid. The radiograph in Figure 1 has a thickness of 5.2 mm. Though the alveolar housings are thin, the teeth seem to be well encapsulated in bone. Figure 2 is the 3D construction of this same area. A LFOV progress scan (dental only) was taken to evaluate the root alignments. The scan was taken at a 200 μm voxel size, 90 kV, 5 mA, in 4.044 seconds.

Fig. 1
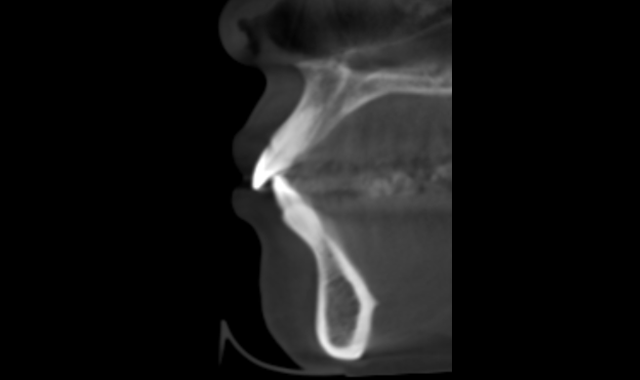

Fig. 2
Note in Figure 3 how the roots seem to be violating at the cortical bone of the alveolar housings. The thickness of this slice is 5mm. Figure 4 is the 3D rendering of the same scan. The brackets placed on this patient had a -6 degree torque. Perhaps this patient would have been better served with -1 degree torque. The upper incisors had a 17 degree torque. Perhaps more torque would have kept the roots of the teeth of the upper incisors in the alveolar housing. This is just one simple example of how the specialty must start looking at the anatomy of our patients.

Fig. 3
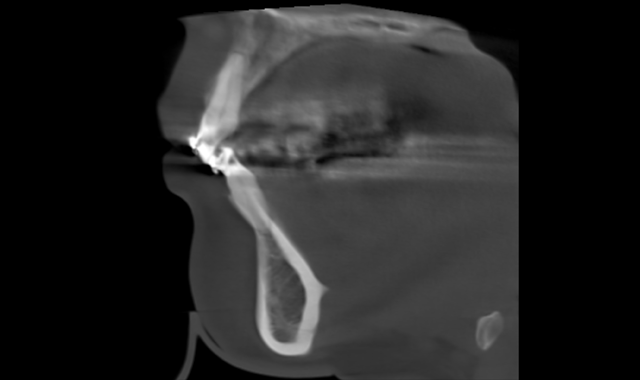

Fig. 4
Only then can we place the appropriate torque and/or the wire sizes to treat our patients. A pan image can now be extrapolated from the set of DICOM files attained with the CBCT. This 3D pan is, admittedly, not as pretty and clear as the traditional 2D digital pans, but the information gained from the 3D pan is far more reaching. We will not go into great detail in this article about this, but we will just mention a few advantages. The TM joints can be constructed as a tomogram. The width of the trough can be changed according to the over jet. The lengths of the roots of teeth can be imaged accurately and the occlusion is imaged.
None of these teeth are accurately imaged in a traditional pretty 2D image. Do we want a pretty image, or an image that gives us more information?
We can now extrapolate a coronal view that allows us to visualize many anatomical structures to formulate a diagnoses and treatment plan. The coronal view with a slice taken through the lingual roots of the maxillary first molars can be used to accurately determine the width of the maxilla and the inclinations of the maxillary molars (Fig. 5). We can then determine the mechanics needed for our patients in this dimension. The mechanics utilized on the patient in Figure 5 were expanded with skeletal fixation of the expander. No bands were attached to the molars.
Therefore, true horizontal expansion was achieved (Figs. 6a, 6b, 6c). These images were taken at the ULD settings on a Planmeca ProMax 3D Mid. Before placing stainless steel wires, many orthodontists will take a progress pan. to evaluate the roots of the teeth as far as proper bracket placements. This is an additional 35 microsieverts when using a traditional 2D panoramic machine. The ULD setting on the Planmeca Pro-Max 3D Mid machine with a limited field of view that only images the teeth is an effective dose of around 9 microsieverts.

Fig. 5
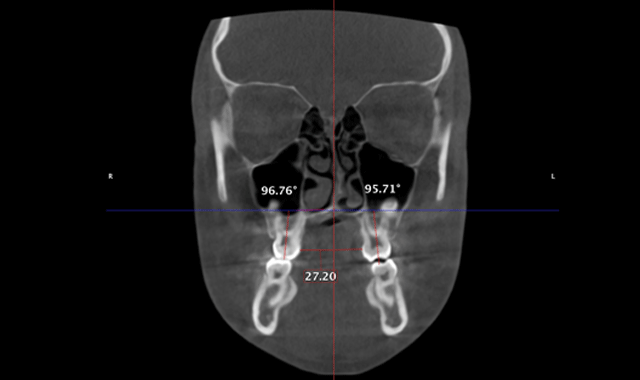

Fig. 6a
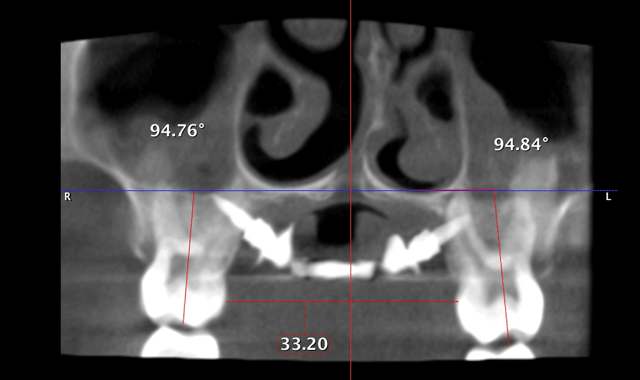

Fig. 6b
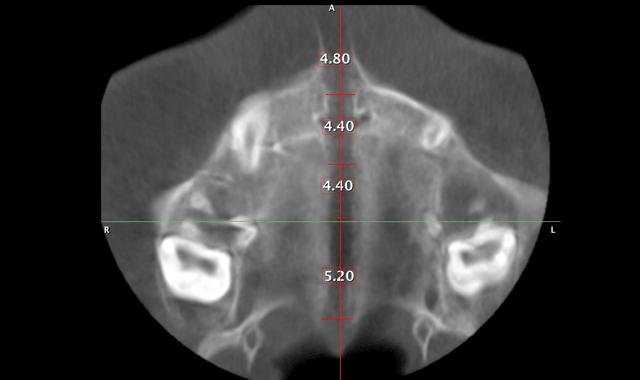
Fig. 6c
As far as final records: a full scan with the Planmeca ProMax 3D Mid machine is again 13 to 14 microsieverts. A ceph. and 2D pan can then be extrapolated from this set of DICOM files. The initial and final tracings can now be superimposed to evaluate the treatment. Yes, these are 2D images attained from a 3D scan. If a 3D image is superimposed on a traditional flat image, the super impositions will not be accurate, just as the arches of a human are not flat. However, the distortions are minimal. Comparisons are what need to be imaged. If we see more, know more and do more, our patients will ultimately benefit.


