The 10 golden rules for taking impressions
Following these tips can help to ensure that you take a perfect impression every time.

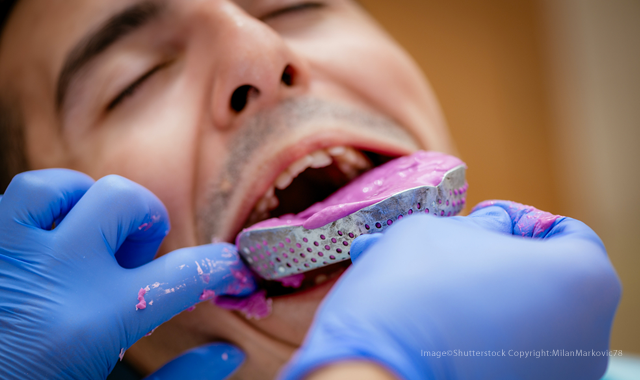

Whether for dentures, crowns, clear aligners or custom trays, taking impressions is a necessary procedure in most dental practices. Unfortunately, there are a lot of factors that work against the accuracy of an impression, and retaking an impression is a hassle for everyone involved.
Recently, 3M talked with a number of dental offices and laboratories about some typical challenges associated with dental impressions. Most agreed that while some impressioning best practices can be taught, a lot of the best techniques are learned over time through trial and error. Take it from these seasoned dental and lab professionals who suggested these 10 tips to improve the chance of getting a perfect impression the first time.
1. Keep the margins clear
Keeping the margins free of blood and saliva is key for an accurate impression. If a patient is bleeding a lot, dentists could consider using hemostasis agents, mechanical retraction with cords or retraction paste, or a combination of any of those to ensure that the margins remain visible and dry.
- Fay Ashley, New Image Dental Lab, Inc.
2. Use hydrophilic material
To counteract any unavoidable blood or saliva that does occur near the margins, impressioning with a hydrophilic impression material like 3M™ Impregum™ Soft Polyether Impression Material or 3M™ Imprint 4™ VPS Impression Material becomes more critical for success.
- Luke Presley, DDS, Kimche & Presley Cosmetic & Sports Dentistry
3. Tray size matters
Trying the tray inside a patient’s mouth prior to adding impression material makes the impression easy and predictable. It also gives the patient a practice round so that he or she knows what to expect when the actual impression is taken.
For a full arch, I typically make sure the tray fits over the bite registration. This trick ensures you’re using the right size tray before dispensing any impression material.
For sizing a triple tray, check the opposite side of the arch while the patient bites down on an empty tray. This provides a mental image of what the occlusion should look like, gives the patient a feel for what he or she needs to do, and gives you an opportunity to ensure the patient is biting down correctly when the actual impression is taken.
- Geetha J. Damodaran, DDS, Birch Lake Dental
4. Be conscious of the tendency to gag
For patients who are more susceptible to gagging, try using the least amount of material possible. Usually, an excess of heavy body material is what triggers the gag reflex. Also, it can help to have patients sit up straight, and sometimes even put their legs on the ground so that they are sitting sideways in the chair. This way, they can lean forward to lessen the feeling that the material is going down their throats. In more severe cases, we may have the patient focus on breathing through his or her nose or may try some distraction techniques like lifting a leg during the impression.
- Jared Lee, DDS, Juneau, Alaska
5. Air out the prep
One method to ensure the margins are visible is to syringe around the prepared tooth once with the material, lightly blowing air all around the preparation, and then continuing to syringe the remaining material.
- Dr Luke Presley
6. Pay attention to the packaging
A warped impression is occasionally a result of expired materials or improper mixing. To overcome this, it’s important to consult the Instructions for Use included with the material and make sure to keep track of the material expiration date.
- Fay Ashley
7. Use the art of distraction
An impression can become distorted if a patient gags and moves too much. Even if a patient has been given instructions, he or she might move on accident, so it’s helpful to have an assistant chat with the patient during the procedure. The conversation serves as a diversion that takes the patient’s mind off of any discomfort or gagging sensations. Reminding the patient to take deep breaths through his or her nose or wiggle his or her toes helps distract the patient from the process. Giving the patient verbal updates as to the time remaining is also very helpful.
- Dr Geetha J. Damodaran
8. Go slow
Take your time on parts that are most critical like packing the retraction cord. Make sure the cord is packed in well and has enough time to push the tissue. If the cord doesn’t have enough time to sit before taking the impression, then the cord does little other than to traumatize the area around the sulcus. Allowing the cord to do its job and maximize the periodontal space makes it much easier for labs in the long run.
- Dr Jared Lee
9. Get your timing right
The best way to make sure you’re giving the impression enough time to set is to follow the material instructions every single time. Especially since materials handle differently in varying temperatures, the manufacturer’s directions are your best bet to ensure perfect timing. If you’re not sure, talk to your manufacturer’s representative. He or she will be able to help you make sure your product is functioning to its optimal ability.
Once you know the instructions by heart, be consistent. In my practice, we have physical timers that we use to keep track of our mixing time and set time. This has allowed me to achieve incredibly accurate impressions and minimize my chair-side time at cementation.
- Ben Record, DDS, Record Dental Center
10. Get the full arch
Many labs would say that they appreciate all the information that full-arch impressions give them, and many dentists who are concerned about occlusion will often do full-arch impressions. A quadrant impression will allow the opposing arches to rock buccal and lingual.
With a full-arch impression, the opposite side of the arch stabilizes the occlusion and will also give more accurate excursive movements to better control occlusal interferences. To confirm that a full-arch impression is preferred, a dentist should have a conversation with his or her lab and come to a mutual decision.
- Mark Ferguson, Vulcan Custom Dental Laboratory
For more information, visit 3m.com/greatimpressions or 3m.com/DentalLabs.


