Technique: How to cooperatively fix a failed cosmetic case
A dentist and a lab technician show how to work together to repair a previously failed case.


Taking a comprehensive approach to diagnosing esthetic cases proves an invaluable first step in comprehensively treatment planning even the most seemingly straight forward of cosmetic cases.1,2
Then, applying the necessary skills to evaluate the biological, structural, functional and esthetic factors that influence the smile and the oral health that supports and maintains it becomes equally important to ensure long-term predictability.3,4 Most significant, however, is coordinating communication among all members of the interdisciplinary team-including the laboratory ceramist-to coordinate treatment and ensure the selection and use of the most appropriate materials and restorative designs.
Must read: Trends in cosmetic dentistry
Case study
The female patient, in her mid-30s, was retreated comprehensively after enduring poorly planned and executed cosmetic dentistry. The combination of dentist/patient communication, comprehensive evaluation and planning and detailed multidisciplinary team coordination allowed her to confidently proceed with a cosmetic treatment.


The patient showing her smile before the results of the case
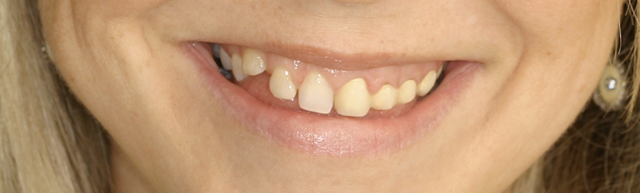
The patient showing her smile before the results of the case.
When the patient ultimately decided to pursue “true” comprehensive cosmetic treatment (Fig. 1; all figures in video on page 2), she had already been prepared and provisionalized (Fig. 2; in video and above) for a treatment from a different dentist. That treatment involved crowns and a conventional porcelain-fused-to-metal (PFM) bridge in which all teeth would be splinted on tooth Nos. 9 through 14. When she went for try-in and delivery of her final restoration, she was distraught by the sight of the unpleasant cosmetic result and immediately sought alternative treatment.
Related how-to: How collaboration between the dentist and lab can pay big dividends
During the initial visit and subsequent comprehensive examination, the patient explained and demonstrated that her chief complaints were her under-proportioned and small teeth and misalignment (Fig. 3). She wanted a larger, broader and more dominantly white smile. By evaluating her pre-operative photographs, radiographs and examination findings, the proposed and agreed-upon treatment plan would involve a multi-disciplinary approach that coordinated orthodontic, implant and restorative care. A laboratory-fabricated diagnostic wax-up was a common communication denominator during this collaborative planning process.
Next Page: Go step by step ...
Treatment Progression
01 It was agreed that treatment would be phased to focus primarily on the maxillary arch but establishing a functionally stable mandibular foundation for future treatment. Because tooth Nos. 6 and 11 were primary teeth in soft tissue only, as confirmed via radiographs, they were extracted. Tooth Nos. 9 through 14 were individually provisionalized. The patient was then immediately placed in orthodontic brackets, with bracketed denture teeth at tooth Nos. 6 and 11.
Step-by-step: Creating fluorescence through shade matching
02 Following 16 months of orthodontic treatment (Fig. 4), the laboratory fabricated a surgical stent based on the diagnostic wax-up and required incisal edge position for use in guided implant placement (Fig. 5). The periodontist then placed two 4.1 mm x 11 mm implants at Nos. 6 and 11. Minor crown lengthening was also performed on tooth Nos. 7 through 10. The patient wore an Essix retainer (DENTSPLY International) during the six-month healing period to fill and shape the pontic areas (Fig. 6).
03 After six months, impressions were taken and sent to the laboratory for creating a new diagnostic wax-up. This was transferred to the mouth via bis-acryl provisional restorations. To achieve functional esthetics and compensate for the under-proportioned tooth size, the right side was prepared for full-coverage restorations, similar to the previously prepared left side.
04 Temporary cylinders helped to create screw-retained temporaries on Nos. 6 and 11 to begin correctly shaping tissue contours (Fig. 7), and screw-retained provisionals were attached to the integrated implants (Fig. 8). The patient wore the temporaries for an approximate eight-week test drive to evaluate esthetics and function, as well as enable proper tissue healing around the screw-retained implant provisionals.
Restoration Fabrication
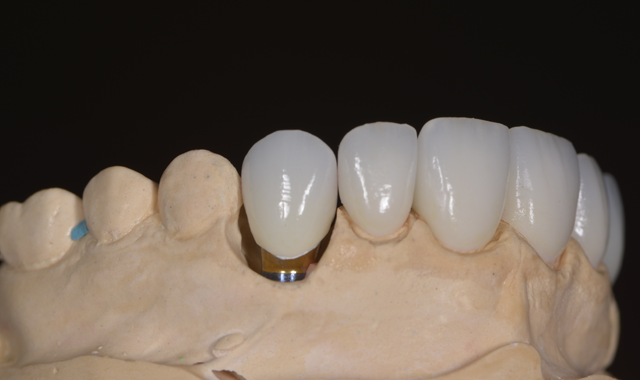
05 After eight weeks, the provisionals were removed, and a master impression was taken to enable the laboratory to design and fabricate the definitive crown and screw-retained implant supported restorations. At the laboratory, a scanner (3Shape) was used to create a digital, full-contour wax-up of the provisionals (Fig. 9). After creating the digital wax-up and preparation model, the technician split the digital file to allow the software to differentiate between the coping design and the fit of the wax-up units over them.
06 Several factors contributed to material selection in this case, including the patient’s under-proportioned teeth and the need to combine full-coverage crowns with screw-retained implant restorations. Therefore, functional and strength considerations dictated material selection as much as esthetics. Fortunately, zirconia demonstrates the strength, esthetics and crack inhibition properties demanded for this case.5,6 The selected zirconia system (Zenostar, Ivoclar Vivadent) is also biocompatible, durable and cost-effective.
Lee Culp explains why he loves Zenostar
07 The selected zirconia material was designed into copings and restorations using CAD/CAM software, milled, sintered and then pressed over using a lithium disilicate-compatible fluorapatite glass-ceramic (IPS e.max ZirPress, Ivoclar Vivadent). This allowed the ceramist to perform an esthetic cutback and layering technique by applying assorted ceramics to achieve the appropriate contour, shade and esthetics.7
08 To fabricate the restorations, a Translucent Pure shade of zirconia copings (Zenostar, Wieland Dental) and the modeling wax units (Zenotec wax, Wieland Dental) were designed and milled (Fig. 10). To maximize efficiency, the zirconia copings were sintered while the wax was milling, after which the copings were fit to the working model. The ceramist applied a zirconia liner (IPS e.max Ceram ZirLiner) to provide the white zirconia oxide frameworks with shaded character and enhanced bond.
09 The wax was seated over the zirconia copings, marginated and pressed with a high translucency lithium disilicate-compatible fluorapatite glass-ceramic in shade BL4 (IPS e.max Zirpress, Ivoclar Vivadent). After pressing, the restorations were divested, the sprues cut off and the contacts adjusted.
Free e-book: How to improve your bottom line with e.max
10 The ceramist cut back the restorations to allow 1 mm of subtle diffused layering. Multiple layers of a highly esthetic lithium disilicate layering ceramic (IPS e.max Ceram, Ivoclar Vivadent) were applied (Fig. 11). To evaluate the contours on a level color/shade gradient, the ceramist used silver colorant, since differentiating contours on white ceramics can be difficult. After contouring and evaluation, the restorations were glazed once, then hand polished with polishing paste (Diashine, VH Technologies) to prevent an overglazed appearance (Fig. 12). The restorations were then sent to the restorative dentist for evaluation (Fig. 13), try-in and definitive placement.
Conclusion
The interdisciplinary nature of this case was predicated on a comprehensive evaluation, coordinated treatment planning and collaborative communication among all team members, including the ceramist. With laboratory-fabricated diagnostic wax-ups as a foundation for planning and establishing long-term functional stability, the digitally designed and fabricated restorations achieved the patient’s esthetic objectives (Fig. 14).

The final result.
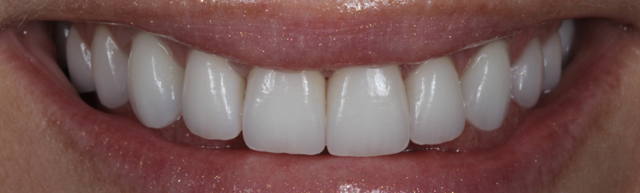
The final result.
References
1. Ali Z, Ashley M, West C. Factors to consider when treatment planning for patients seeking comprehensive aesthetic dental treatment. Dent Update. 2013 Sep;40(7):526-8, 531-3.
2. Calamia JR1, Levine JB, Lipp M, Cisneros G, Wolff MS. Smile design and treatment planning with the help of a comprehensive esthetic evaluation form. Dent Clin North Am. 2011 Apr;55(2):187-209.
3. Tortopidis D, Hatzikyriakos A, Lokoti M, Menees G, Tsiggos N. Evaluation of the relationship between subjects’ perception and professional assessment of esthetic treatment needs. J Esthet Restor Dent. 2007; 19(3):154-62.
4. Frese C1, Staehle HJ, Wolff D. The assessment of dentofacial esthetics in restorative dentistry: a review of the literature. J Am Dent Assoc. 2012 May;143(5):461-6.
5. Tartaglia GM1, Sidoti E, Sforza C. Seven-year prospective clinical study on zirconia-based single crowns and fixed dental prostheses. Clin Oral Investig. 2014 Oct 12. [Epub ahead of print]
6. Schmitt J, Wichmann M, Holst S, et al. Restoring severely compromised anterior teeth with zirconia crowns and feather-edged margin preparations: a 3-year follow-up of a prospective clinical trial. Int J Prosthodont. 2010;23(2):107-9.
7. Luo XP1, Zhang L. Effect of veneering techniques on color and translucency of Y-TZP. J Prosthodont. 2010 Aug;1(6):465-70.
This article originally appeared in the January 2015 issue of Dental Lab Products. For more great articles like this every month, click here to subscribe.


