Technique: Creating monolithic zirconia splinted crowns
A look at creating monolithic zirconia splinted crowns utilizing CAD/CAM techniques.


Computer-aided design/computer-assisted manufacturing (CAD/CAM) systems and machinable all-ceramic materials (e.g., zirconia, lithium disilicate) represent exciting new ways for dentists to deliver prosthodontic care to patients.
CAD software enables virtual smile design, drives the restorative process and ultimate CAM fabrication, and facilitates engaging patient education about the clinical, functional and esthetic rationale for proposed treatments.1 Cases can be treated in one dental appointment or, when more complex, in a more efficient and accurate manner when CAD/CAM processes (e.g., printed models, milled provisionals) are used.
Read more: How is dental technology REALLY being used?
The cornerstones of a CAD/CAM based workflow are digitally scanned intraoral images that replace analog impressions and form the basis of virtually and digitally designed CAD representations of proposed restorations.2 Digital diagnostic “waxups” can be used to assess the treatment plan, and once patients approve the design, the teeth can be prepared and digital intraoral impression scans can be taken.
Digital diagnostic “waxups” based on CAD designs can also be used to create CAM-fabricated provisionals that demonstrate the anticipated contours, shape, length, function and esthetics of the final restorations. After the patient approves the provisional restorations, those can also be digitally scanned for designing the final restorations, including shade determination, and the CAD software used to finalize the proposed restorations.3
Read more: Top 10 tech trends that will define 2017
Contributing to increasing applications of dental CAD/CAM has been the introduction of material advances (e.g., lithium disilicate, zirconia) specifically designed to produce esthetic, functional and cost-effective alternatives for prosthodontic cases.4,5 In fact, monolithic zirconia restorations (e.g., Zenostar/Wieland, Ivoclar Vivadent) that can be individually characterized are now possible with CAD/CAM to help dentists realize greater efficiency and patient comfort when treating multiple-unit cases.6-8
Case presentation

Fig. 1
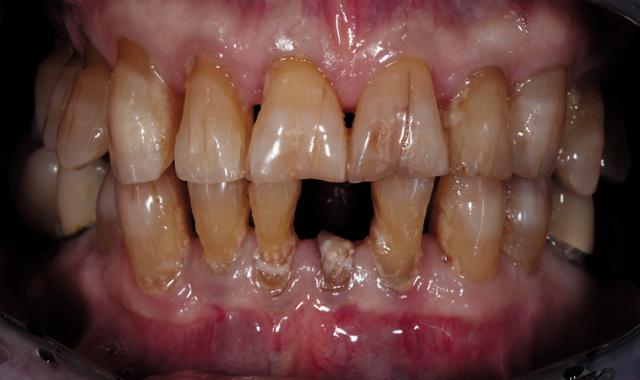
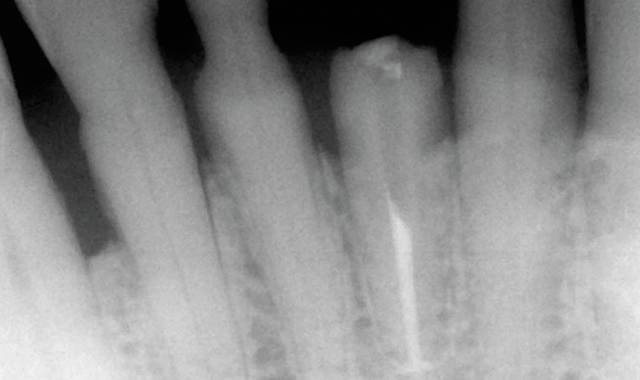
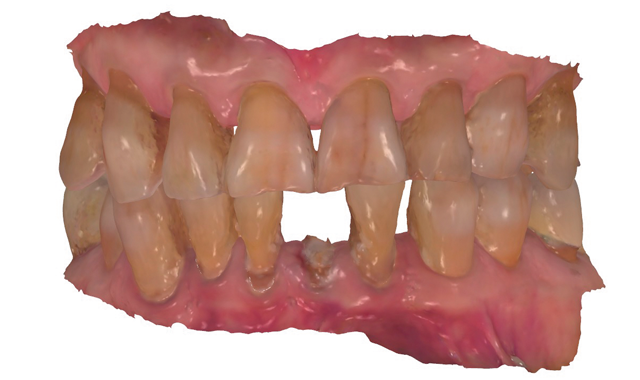
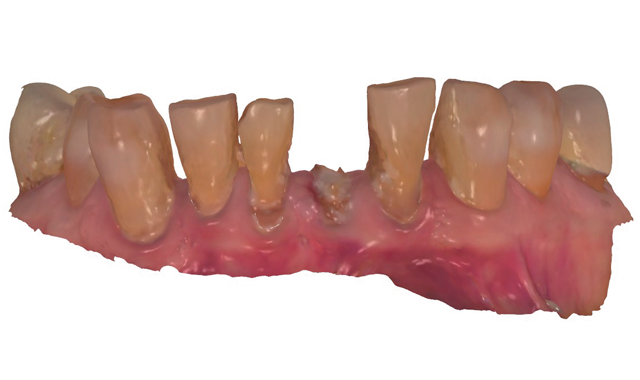
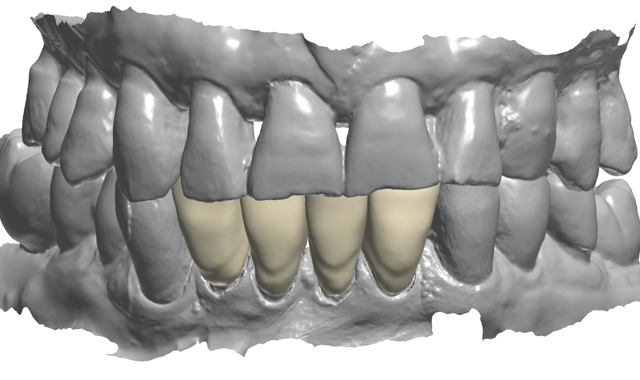
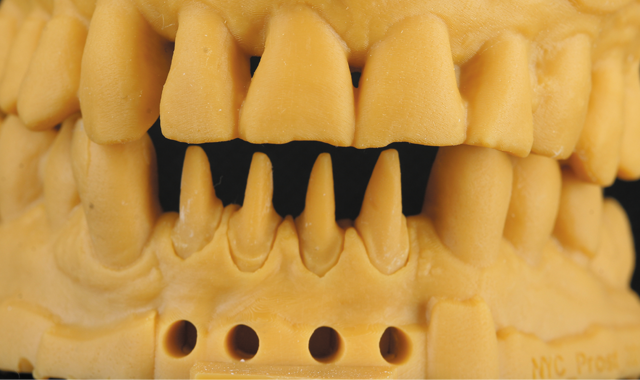
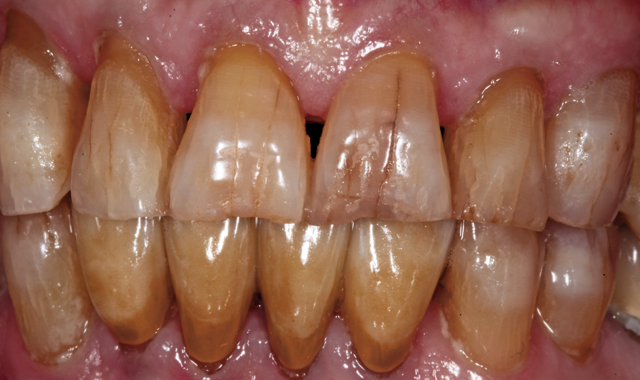
An 88-year-old man presented for restoration of tooth #25, which was fractured and had been endodontically treated (Fig. 1). A thorough intraoral and radiographic examination was performed, which revealed damage to the remaining anterior mandibular teeth incurred over the years as a result of scaling and curettage (Fig. 2). This damage to the

Fig. 2
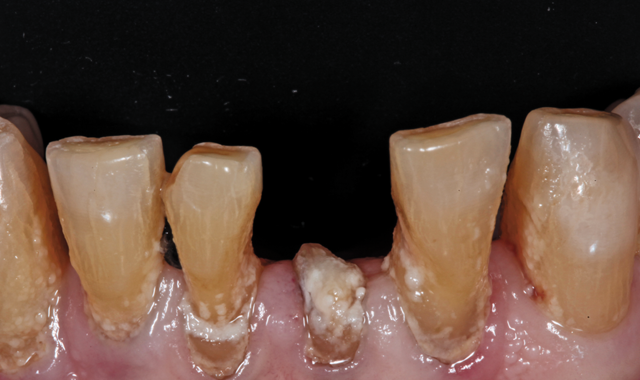
root surface of the lower incisors-which was visible on the radiograph (Fig. 3)-is known as “Riffle-ization.” Described by Dr. Riffle as a technique for removing every last bit of calculus during repeated root scaling, what is now known as “Riffle-izing," ultimately-over the years-changes the shape of the neck of the tooth to resemble an hour glass.
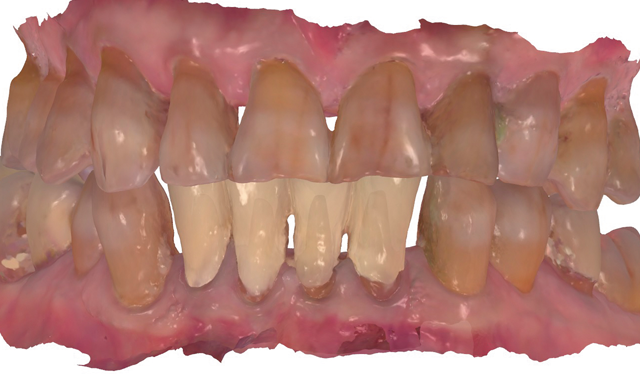
Therefore, based on the clinical and visual evaluation, the preferred treatment would be to restore the fractured #25 with a post and crown and four splinted crowns to restore the anatomy of the four incisors and increase their resistance to both mobility and fracture.

Fig. 3
However, four treatment options were presented and discussed with the patient:
- Extraction and replacement with an implant,
- Extraction and replacement with a six-unit fixed partial denture,
- Post/core and individual crown for tooth #25, and
- Post/core for tooth #25 and four splinted crowns for teeth #23 through #26.
Because the patient was concerned about undergoing lengthy implant treatment and preferred to avoid extraction if possible, the fourth option was selected.
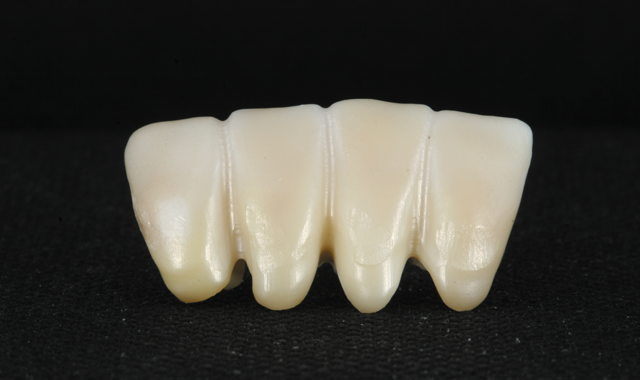
In the past, the splinted crowns required for this case had to be constructed with porcelain-fused-to-metal (PFM).9 Today, the use of zirconia allows for a stronger, more esthetic fixed construction.10 Therefore, after analyzing all of the case information, it was decided with the patient that the final treatment would consist of splinted monolithic zirconia (Zenostar/Wieland, Ivoclar Vivadent) crown restorations.
Digital treatment protocol

Fig. 4
Treatment began by taking an intraoral 3D impression scan (3Shape TRIOS 3) (Fig. 4), after which a digital diagnostic “waxup” was created using Dental Designer (Fig. 5). Using digital intraoral scanning and digital “waxups” eliminated the need for time-consuming conventional impression taking, saving the patient time and eliminating discomfort. Additionally, proper shading, tooth size and contouring could be determined by examining and manipulating the digital impression/model images and

Fig. 5
discussing the proposed changes with the patient.
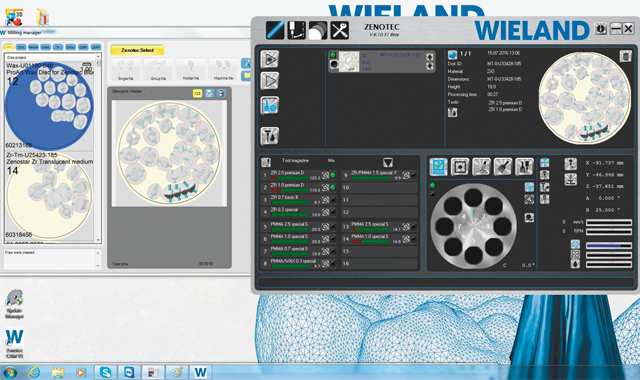
The diagnostic design, as approved by the patient, was then used to create dry-milled provisionals from PMMA using the Zenotec select Hybrid (Fig. 6).

Fig. 6
Additionally, a pattern was created for the post/core for tooth #25, cast in gold, and cemented with PANAVIA F. The lower incisors were prepared for all-ceramic crowns, and the milled provisionals were relined and cemented. There was no need for the dentist to hand-fabricate the provisionals, or for the patient to undergo impression-taking for creating matrices for provisional fabrication.
Final restoration design

Fig. 7

The patient returned a week later and expressed his satisfaction with the esthetic design of the four provisional units. During this appointment, the provisionals were now scanned with the intraoral scanner, and this “Pre-prep scan” was used to design the final restorations (Fig. 7). Once appropriately anesthetized, the provisionals were

Fig. 8
then removed and the preparations cleaned with chlorohexidine 2%, after which they were also scanned (Fig. 8). Prior to a digital workflow, these impression processes would have required the use of trays and elastomeric impression materials, pouring of models and considerable chair time. In this case, the digital scans were used to create digital

Fig. 9
preparation impressions and models.
The pre-prep scan was modified slightly to close the spaces between the lateral incisors and the canines, and then used to create the final design of the monolithic zirconia construction (Fig. 9). The software was simply instructed to morph the provisionals as necessary, margins were set using the CAD tools, and the software automatically

Fig. 10
ensured adequate space and thickness for the restorations.
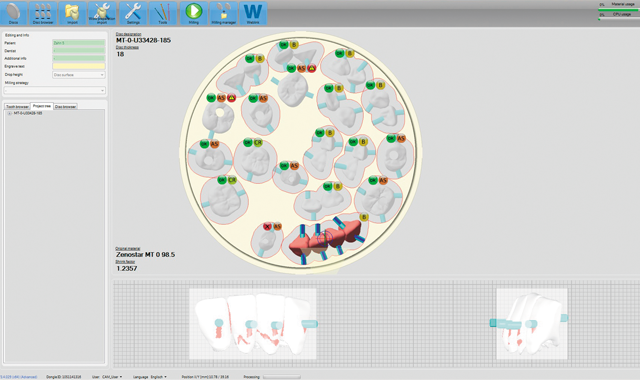
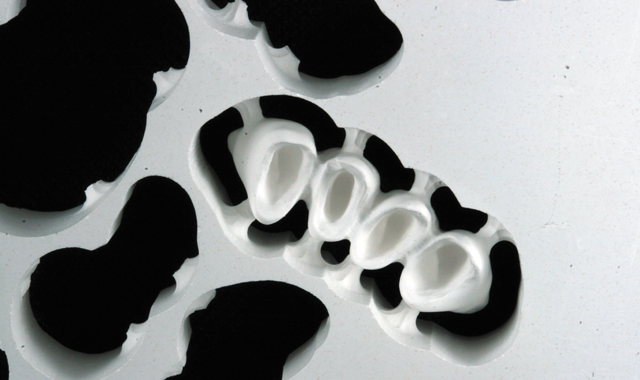
The file was sent to the Zenotec mill, and a Zenostar MT zirconia puck was selected, after which the design file was nested in the puck (Fig. 10). However, at the same time that the restoration CAD .stl file was sent to the laboratory for milling, the file was also used to enable production of a 3D-printed model with removable dies for verifying the proximal and occlusal contacts of the final

Fig. 11
restorations. Then, when the milled restorations were completed, they could be tried and characterized on the printed model, then glazed and hand polished.

Fig. 11a
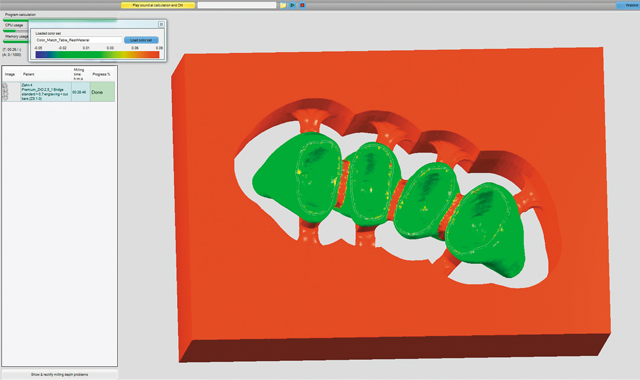
Prior to milling, the software created a simulation of the milled construction. This allowed the user to check for undercuts and preview the tool path (Figs. 11 and 11a). The Zenotec Hybrid Select then completed the milling of the zirconia construction (Fig. 12).

Fig. 12
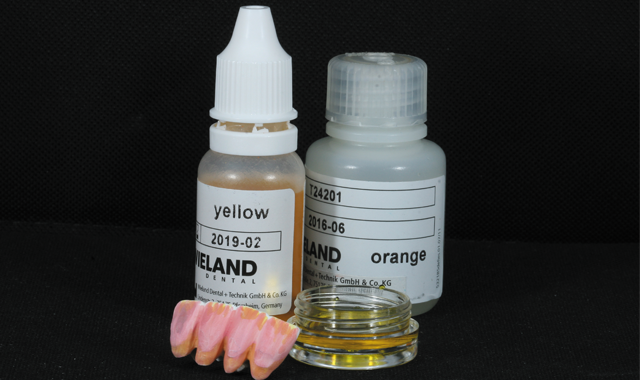
After milling, the frame was removed from the puck and prepared for coloring in the “green stage”, prior to sintering (Fig. 13). The Zenostar Color Zirconia was then used to color the zirconia. Coloring in the pre-sintered green stage allows penetration of the colors, thereby improving the esthetics (Fig. 14).

Fig. 13
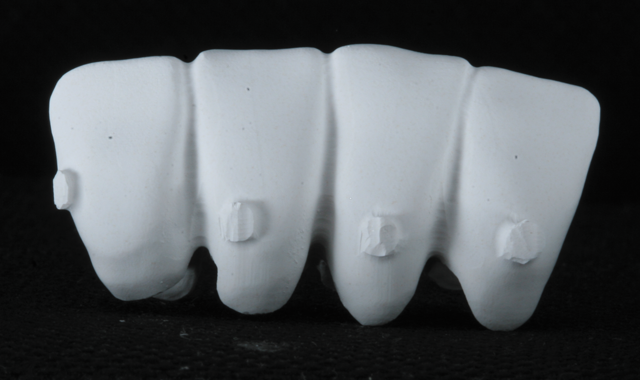

Fig. 14
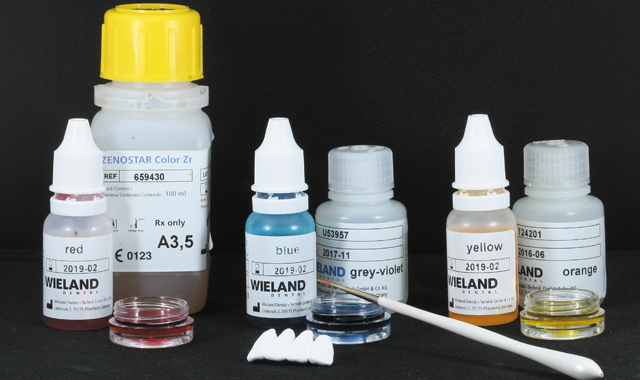

Fig. 15
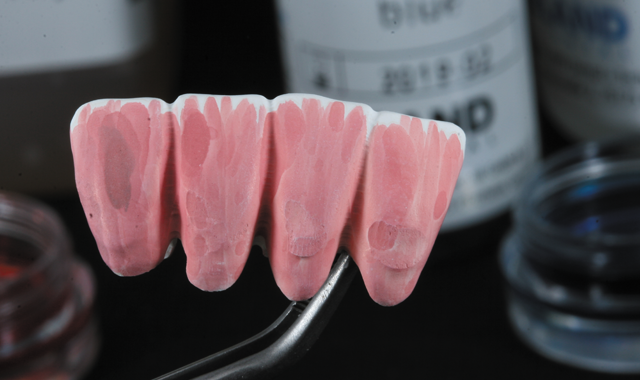
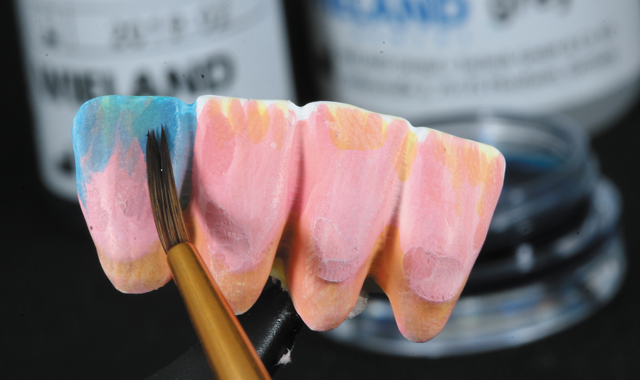
First, the dentin color was applied (Fig. 15), followed by the orange modifier to color the root area of the crowns (Fig. 16).
The next step was applying the incisal coloring

Fig. 16
(Fig. 17). The now colored green stage zirconia construction was then sintered using a sintering furnace (e.g. Ivoclar S1) on Program #5, which took approximately three hours and reached a temperature of 1530° C.
As previously described, a 3D-printed model was obtained using the CAD software (e.g.,

Fig. 17
3Shape Model Builder) module and a 3D printer (BEGO VARSEO). This model was used for the final check of contacts, occlusion, and surface texture (Figs. 18 and 19). To complete the surface coloration of the restorations, stains and glazes (e.g. IPS e.max) were used (Fig. 20).

Fig. 18
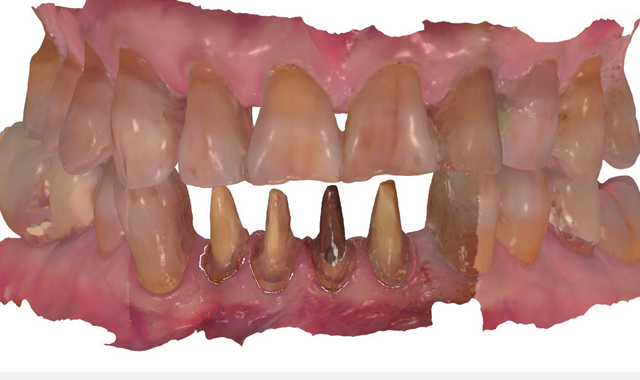
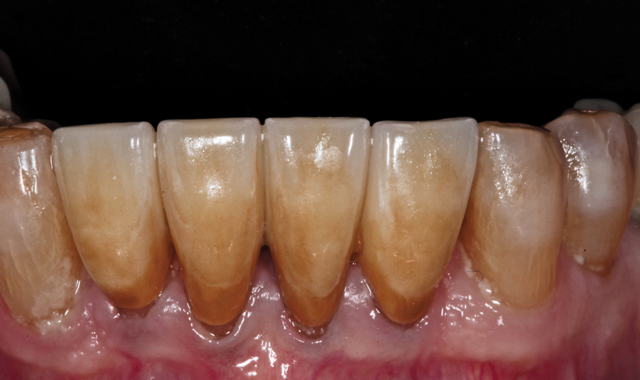
The patient then returned for final try-in and cementation of the definitive CAD/CAM restorations. Because the patient was directly involved in the diagnosis, evaluation, smile design, treatment planning and provisionalization evaluation-and because the final restorations were designed based on digital replicas of the approved

Fig. 19
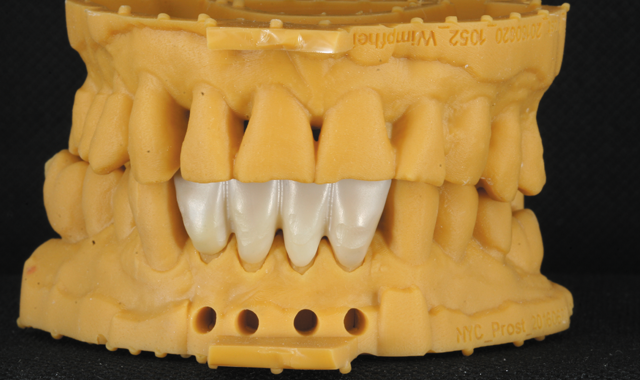
provisionals-there were no unanticipated results. In fact, no adjustments were needed to the contacts or occlusion, and the patient approved the esthetics. The splinted crowns were then cemented with resin reinforced glass ionomer cement (Figs. 21 and 22).
Fig. 20
Conclusion
Dental CAD/CAM systems and machinable all-ceramic materials have changed the face of dentistry and made the prosthodontic process easier and more efficient. Higher-quality and more esthetic restorations can

Fig. 21
be produced in far less time than would be with conventional, hands-on fabrication techniques, and the possibility of errors and discrepancies are greatly reduced. As demonstrated in the multiple-unit case presented here, CAD/CAM techniques enabled virtual smile design, drove the restorative process and ultimate CAM

Fig. 22
fabrication, and allowed the patient to actively participate in decision and evaluation processes.
References
1. Narashimhan HV, Dheeraj D, DarshanaD; Sreekumar AV. Contemporary concepts in treatment planning, reconstruction and rehabilitation of the maxillofacial region: an overview of methods used in practice. J Contemp Dent Pract 2012;13(6): 938-44.
2. Gtith JF, Keul C, Stimmelmayr M, et al. Accuracy of digital models obtained by direct and indirect data capturing. Clin Oral Investig. 2013;17(4): 1201-8.
3. Beuer F, Schweiger J, Edelhoff D, et al. Reconstruction of esthetics with a digital approach. Int J Periodontics Restorative Dent. 2011;31(2): 185-93.
4. Fasbinder DJ, Dennison JB, Heys D, et al. A clinical evaluation of chairside lithium disilicate CAD/CAM crowns: a two-year report. J Am Dent Assoc. 2010;141 Suppl 2:10S-4S.
5. Larsson C, Wennerberg A. The clinical success of zirconia-based crowns: a systematic review. Int J Prosthodont. 2014;27(1):33-43.
6. Wieland Dental. (2014) The Zenostar Concept: Guidelines for dental technicians/clinicians. Pforzheim, Germany.
7. Thalji GN, Cooper LF. Implant-supported fixed dental rehabilitation with monolithic zirconia: a clinical case report. J Esthet Restor Dent. 2014 Jan 2. [Epub ahead of print].
8. Beur F, Stimmelmayr M, Gueth JF, et al. In vitro performance of full-contour zirconia single crowns. Dent Mater. 2012;28(4):449-56.
9. Miller TE, Rudo DN. Emergency direct fabrication of a resin fixed partial denture by using a ceramometal crown with reinforcing woven polyethylene ribbon as a pontic. Gen Dent. 1995 Nov-Dec;43(6):560-3.
Ozer F, Mante FK, Chiche G, et al. A retrospective survey on long-term survival of posterior zirconia and porcelain-fused-to-metal crowns in private practice. Quintessence Int. 2014;45(1):31-8.


