Technique: Building a full-mouth hybrid denture
In this step-by-step technique, Luke S. Kahng shows how he creates a full-mouth solution using an implant-secured hybrid denture.


Screw-retained full-mouth dentures are becoming very popular with clinicians and technicians alike. Everyone is becoming more familiar with the techniques we can use to fabricate these restorations. Hybrid bars as a substructure are a near-guarantee, with the porcelain directly fused to the bar by the technician with ease.
Our case study will provide a few tips that should help technicians and dentists alike to work even more predictably with titanium.
Case Study
01 Before the extraction of all maxillary teeth (Fig. 1; all figures in video below), the patient had crowns on all teeth that were not pleasing in appearance. The gingival embrasure from the incisal edge is different in shape on each tooth and symmetry is off with Nos. 6, 7 and 8 being too long.
02 After extractions, Nobel Biocare implants were placed (Fig. 2). The patient was then given a pre-fabricated denture, which the doctor relined in order to correct the bite. Correct contour and temporization were both considered.
Product roundup: The latest in milling machines
03 Six months later, everything was healed according to plan (Fig. 3). The denture setting was then shown to the patient in order to communicate the final esthetics plan. This is an important stage because it is a proven test regarding many characteristics of the final prosthetic: mid-line, horizontal line, size of teeth and the occlusion.
04 A problem the author has encountered in the past occurs when the dentist indicates a titanium ceramic or screw-retained prosthesis and then changes his or her mind later. This is because if screw-retained is prescribed, the technician will open the anterior bite. But if titanium is used, he or she needs to create all centric contact. He or she will need to add to the lingual and increase incisal length also. Most patients will always want to replace the maxillary teeth first, but there has to be an occlusion plan in order to facilitate proper mastication. The final setting must be correct, and the teeth have to be in occlusion or there will be fracturing of the porcelain. It is important, therefore, to understand the patient needs and expectations before prescribing the denture with the laboratory. Some things to consider are any periodontal problems the patient may be experiencing or perhaps any diseases of the mouth.
Bench Mastery: How to foresee the final outcome of a case
05 Ceramic teeth are rigid compared to denture teeth. For this reason, the author recommends creating a mock-up of the opposing teeth, a stent and then fabricating long-term temporaries-sometimes to be worn up to one year. This way, the patient can test-drive the denture, and it can be determined if the final result will work for his or her chewing patterns. This pre-treatment and planning stage is very important to the continued success of the denture.
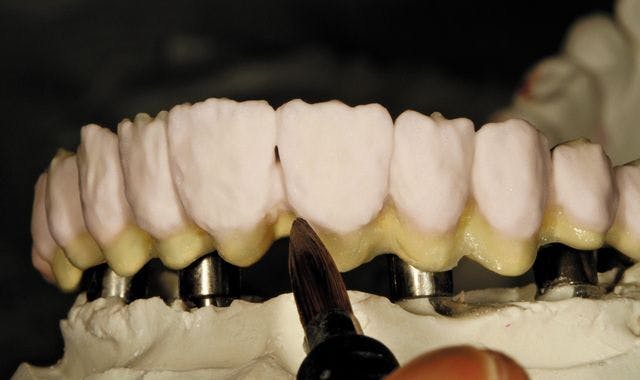
06 The denture’s pink gum tissue porcelain is thick and extended (Fig. 4). This can be increased or decreased according to the size of the final teeth. Ceramic teeth are different size-wise because of the occlusion issues, but we can add to the lingual and increase the incisal edge also, if this is determined to be necessary. For a big smile, during the denture try-in stage, we will need to look at the mid-line and other facial features in order to achieve proper symmetry in the final analysis.
07 On the cast model, occlusion contact was checked (Fig. 5) and then the acrylic denture was duplicated for scanning purposes (Fig. 6). The black line drawn on the duplicated model indicates where we need to decrease size to create less of a food trap (Fig. 7). Tooth No. 9 will be ground-following the concept behind a PFM crown-2mm facially.
08 The lingual palate was cut in the duplicate to make a modified ridge (Fig. 8) under the pontic in order to lessen the food trap issues the patient would otherwise encounter. Next, we have the prepped duplicate model (Fig. 9) that would serve as a blueprint for the titanium metal framework’s final teeth. In the occlusion view, there is a reduction in the occlusion area in order to accurately apply the porcelain (Fig. 10).
09 Our titanium hybrid bar was milled by the GC Milling Center (Fig. 11). The try-in denture, duplicate denture and bar are all ready for the preparation of the teeth on the model for the titanium denture bar (Fig. 12). The try-in denture, duplicate denture and treated denture with prepped teeth are all shown on the model (Fig. 13). The porcelain would later be fused to the titanium bar, shown here as a try-in the patient’s mouth (Fig. 14). The bite record was also needed in order to decide on the gingival line.
Step-by-step technique: Kahng on creating fluroescence through shade matching
10 The author applied GC Initial Titanium porcelain opaque two to three times, then porcelain and enamel after baking at 810°C. It is important to note that three minutes of cooling time after baking is required because of co-efficiency with this type of porcelain. This image (Fig. 15) illustrates the dentin application after which the enamel was applied, following PFM procedures. After contouring and glazing-appearance check follows (Fig. 16). A smile view with prosthesis in place is next (Fig. 17) for our patient. This 50-year-old woman was very happy with her case results!
Conclusion
A screw-retained titanium fused to porcelain denture fabricated in one piece is a fairly unique concept. The technician must first understand the procedure-especially when it comes to occlusion. Ceramic and frame design will protect the patient from porcelain fracture-if done correctly. The lab process is very important. Some tips for technicians include: grind the hybrid bar with your bur in one direction only and do not de-gas the bar because it has high oxidation. The bonder is very important, and when firing the porcelain, increase your cooling time. Cool your porcelain in the oven by dropping the temperature down 200° while cooling.
This type of restoration is really very valuable to our patients. This very sophisticated artistry is involved, but the patient appreciates the beauty he or she is given when it’s done. Titanium is a material in which we can be very confident and with the happiness we give our patients, we are fabricating with the best of the best!
Acknowledgement
Case courtesy of David L. Carlson, D.D.S., Wheaton, Illinois.


