Step-by-Step: Creating esthetic laterals with CAD/CAM
In this step-by-step technique article, Luke S. Kahng, CDT shows how to create more esthetic laterals using CAD/CAM technology and custom shade tabs.


Our patient, a female in her mid-30s, sought treatment from her dentist to replace her laterals. She presented to the lab for an appointment with the author to have a custom shade taken.
The natural color between her centrals was off slightly, which proved to be a challenge when the author was recording her custom shade. He noted more calcification on central No. 8 than 9 with brighter, deeper translucency. No. 9 was tan overall in color with less translucency and uneven symmetry between the two. The author utilized his ceramic custom shade tabs to be certain the incisal 1/3 area would be closely matched between the centrals and the laterals when the final restorations were fabricated.
Related technique: Using milled titanium to make a highly esthetic restoration
There were several options available to the laboratory for the final restorations, but the author determined he would ask the CAD/CAM technicians to utilize and mill a zirconia block for more translucency and less opacity overall.
Next page: The technique ...
Case Study
01 During the patient’s visit to the lab for the above-mentioned custom shade appointment, the author utilized his ceramic shade tabs to study and match her incisal 1/3 calcification versus incisal translucency. He determined he would use Enamel 59 Initial Porcelain color from GC America after examining the patient’s teeth (Fig. 1; all figures in video below).
02 The restoration would be created using the CAD/CAM method with an in-lab Freedom scanner and design center from DOF (Fig. 2).
Step-by-step technique: Using shade matching to ensure fluorescence
03 After the design was completed, the CAD/CAM technicians were able to mill the copings using a Ceramill Motion 2 milling machine also in-lab (Fig. 3). The copings would look similar to those in Figure 4 after sintering and pre-shading with a variety of colors available.
04 Seen here after being placed on the model, the patient’s copings were ready for porcelain build-up (Fig. 5) using the pictured GC Initial Zirconia Porcelain in BLD-2 coloration (Fig. 6).
05 The author later drew lines to best create his surface textures onto the copings (Fig. 7) and used a diamond burr to produce more detail (Fig. 8). He next polished his work with Wagner Diamond Polishing tools, before beginning the glazing process (Fig. 9) and placed the finished restorations on the model (Fig. 10).
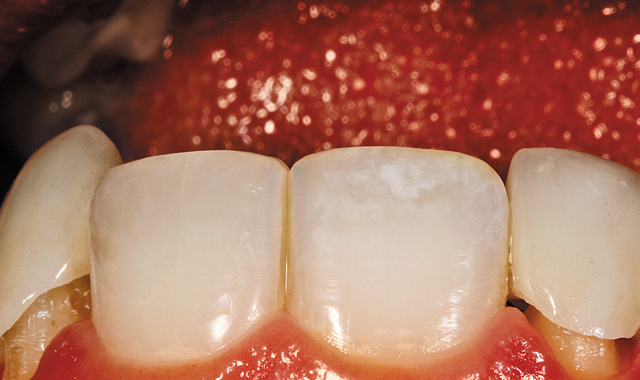
06 The restorations were later tried in the mouth,and he photographed the patient from an upside-down view (Fig. 11), a right side view (Fig. 12) and a left side view (Fig. 13). The author photographed the crowns pre-cementation in the mouth next for a try-in smile view and then in a rest position (Fig. 14).
Must read: The top 5 DLP techniques of 2015
07 These last five images (Figs 11-15) are meant to demonstrate the match in color between the gingival, middle area and incisal edge of the natural teeth versus the newly fabricated lateral restorations.
Conclusion
In the author’s opinion, natural teeth do not have the same consistency of color as the formula we see in traditional shade tabs, which is why he always uses his ceramic tabs. In fact, when natural teeth are segmented, some of the dentin color that is revealed-A, B, C or D-allows us to choose our base color and follow it as the formula we use for the dentin in our restorations. We can also utilize Enamel Effective color to overlay with different thicknesses outside and help create a staining effect on the final prosthesis. These three components create a perfectly matched restoration if they are used properly.


