How to use an intraoral digital impression scanner for restorative dentistry
Digital impressions and innovative new materials provide improved physical and optical properties.


Technology continues to impact the way we work, the way we learn and how we live, touching almost every aspect of our lives. It has also accelerated a product’s development from concept to market, and finally adoption.
Consumers now expect advancements in smartphones, entertainment and other devices most every year. Technology has also had a major impact across the entire health care industry, including dentistry. In the past six years alone, we have seen some game-changing technological advancements transform our field.
Technology has significantly changed our daily workflow from diagnosis to treatment, using highly advanced digital impression devices and innovative new materials. As dentists, it is important to stay informed on technology trends and invest in your practice’s future. By integrating technology into my practice, I have experienced its many profound advantages firsthand. These new technologies have helped our industry make dental procedures faster, easier and better than before, and have provided consistent, high-quality outcomes for patients.
Next-generation equipment
To stay ahead of the curve, my practice began integrating an intraoral digital impression scanner (3M™ True Definition Scanner) into our workflows more than five years ago, and we are now 100-percent digital for all crown and bridge procedures. The device offers unparalleled accuracy, ease of use and affordability for making fast, precise digital dental impressions. I can quickly obtain digital impressions for a specific tooth, quadrant or full arch, and obtain a bite check in a fraction of the time taken for a traditional impression. In my practice, we utilize digital impression technology for everyday dentistry, implants and cosmetic procedures.
Trending article: How to perform bioactive restorations using a "stamp" technique
If you have any issues with a traditional impression, you must retake the impression. With digital scanning, it’s easy to go over an area you might have missed. You can look at the prep on a large screen, which makes it possible to see things you would not have noticed with a traditional impression. You can review the scan before sending it to your lab and make sure margins, the bite and other parameters are as they should be. Since it’s digital, your lab can quickly confirm that everything looks good-sometimes even before the patient leaves the chair.
The open-architecture, digital files can be shared with a variety of different types of software at the lab and different kinds of milling/printing centers, opening up options for your practice, the lab and the patient. It allows a seamless transition on the digital front to easily move from the scan to software design to milling, and your lab can move forward with design and fabrication of the restoration prescribed much faster than with analog. Since we began using a digital scanner, we have seen how digital scan files can improve dentist/lab communication and contribute to an overall increase in efficiency and accuracy. It enables us to communicate more directly and promptly with the lab about a case, and eliminates the common back and forth that can happen with traditional impressions that leads to miscommunication and remakes. It also offers easier patient communication, especially on the mobile tablet version (3M™ Mobile True Definition Scanner), which is so much like technology that patients are already used to interacting with on a daily basis.
Our patients quickly experience the benefits of the digital scanner and realize that with this new, timesaving technology, traditional impressions are no longer necessary. In my experience, many patients dislike having impressions taken, mainly because they don’t like the feel of the material in their mouth. Digital scanning eliminates this issue and speeds up the process, making it a better experience. The growth of my practice has benefited from positive word-of-mouth as patients share their experience with family, friends and associates.
Continue to page two to read more...
Keeping up with new materials
Just as with digital equipment, technology is also playing a major role in the rapid progression of dental materials. Demand for new, advanced, full-contour, all-ceramic crowns and bridges are growing and being driven by patient demand. Patients are beginning to demand restorative materials that are metal-free, esthetic, durable and affordable. The newest generation of full-contour zirconia restorations (3M™ Lava™ Esthetic Fluorescent Full-Contour Zirconia) delivers the following:
- Inherent fluorescence, allowing for a more natural-looking restoration
- Natural shades and translucency
- Strength (800 MPa* full-contour crowns are stronger than glass ceramics)
- Efficient CAD/CAM production
- Ease of use for clinicians and simplified clinical workflow
I like this material because it more accurately mimics natural teeth. This is exemplified in the case below, where we have a better true shade match and a more vital, lifelike restoration. This is important because the fluorescence of natural teeth changes significantly when interacting with the ultra-violet (UV) light that is all around us, and it has a major effect on the level of perceived vitality.
Related reading: 3M honored for its technology innovations at 2017 Edison Awards
This advanced, full-contour zirconia material has a built-in color gradient featuring advanced color ion shading technology to provide the first gradient pre-shaded zirconia with inherent fluorescence for all shades. Its shading element concentrations are fine-tuned throughout the disc to achieve shade matching gradients, providing color from within that travels from the gingival of the tooth to the incisal.
This cutting-edge new zirconia material can be efficiently milled and is engineered for strength and light transmission. Full-contour zirconia is indicated for crowns, 3-unit anterior and posterior bridges, inlays, onlays and veneers, and can be milled to a 0.8 mm minimum wall thickness to accommodate tight margins, while still offering great strength (Lava Esthetic has an ISO 6872:2015 Class 4 flexural strength and fracture toughness). It also requires less occlusal reduction compared to glass ceramics. It’s a home run; it is a material that is strong, looks good and is easy to deliver. You can’t beat that.
This multi-crown case was completed using an all-digital, model-free workflow.
Continue to page three to read the case study.
Case study
A 40-year-old female patient presented with a molar with a porcelain-fused-to-metal crown (PFM) that was chipped on the lower left side, tooth no. 19 (Figs. 1 & 1a). The porcelain was chipped at the porcelain/metal interface. This created an open contact between that tooth and the tooth behind it, and the patient complained of food getting lodged in the space between her teeth. Additionally, she felt her teeth looked bad and she could feel with her tongue the sharp edge where the porcelain sheared off.


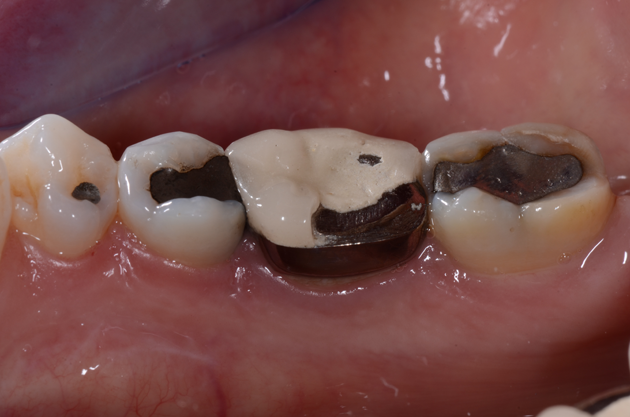

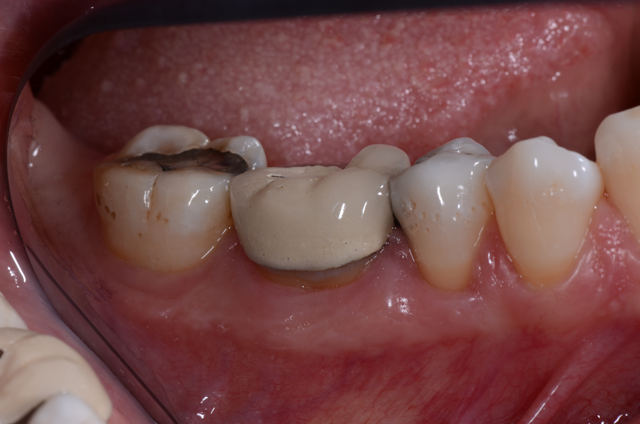

Fig. 1 Fig. 1a
Upon examining adjacent teeth, it was obvious the large amalgam restorations on either side, adjacent to that crowned tooth, required attention, teeth no.18 and 20 (Fig. 2). As it is always better to do quadrant dentistry to save the patient extra visits, we required a treatment plan for those two adjacent teeth as well.
We elected to treat the premolars (tooth no. 20 and 21) with direct restorations but tooth (no. 18) had significant cracks. We could have opted for a direct restoration as well but the size (more than half the width of the tooth) and multiple fractures present indicated the tooth should have cuspal coverage. Final treatment plan will was crowns on both (no. 18 and 19) and direct bonded restorations on (no. 20 and 21).
Direct restorations
First, we anesthetized the quadrant, placed a rubber dam on the teeth and then removed the alloy in the two premolars (Fig. 3). Using a total-etch technique, we began the bonding process using Scotchbond™ Universal Adhesive, 3M. For the direct restorations, I used a “snowplow” technique where a dab of flowable Filtek™ Supreme Ultra (A2) Flowable Restorative, 3M is placed at the base of the restoration and followed immediately with a bulk fill restorative (Filtek™ (A1) Bulk Fill Restorative, 3M) over it. Similar to a putty wash impression system, as you compress the bulk fill, the flowable ensures any small voids are sealed. After curing, the restorations were finished and polished.
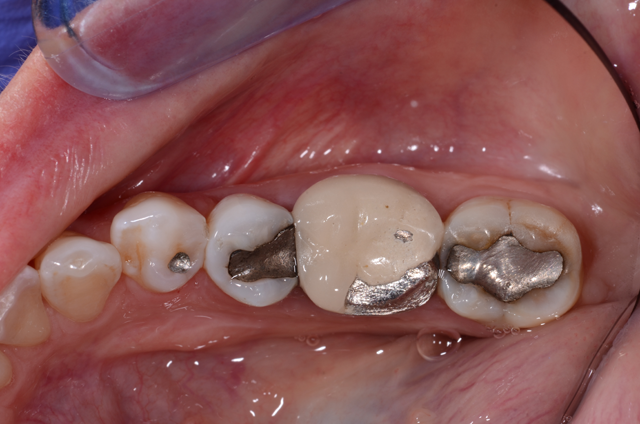

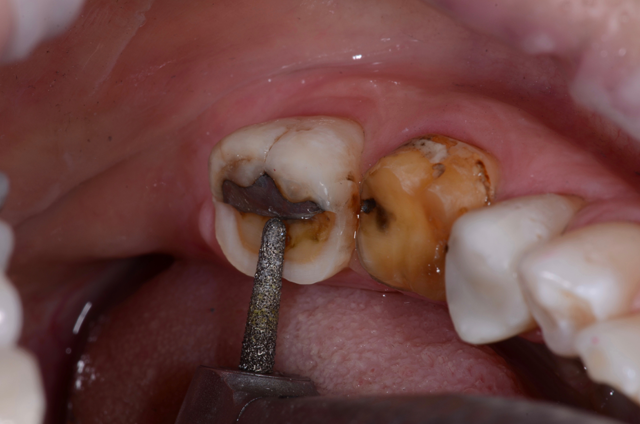

Fig. 2 Fig. 3
Crown preparations and impressions
We removed the PFM crown with a carbide burr and spreader (Fig. 4). Once the crown was off, we created occlusal clearance first. The amalgam was shallow, so a composite base was not needed.
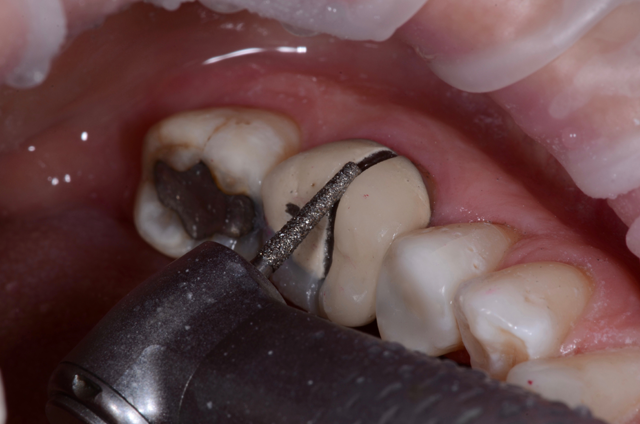


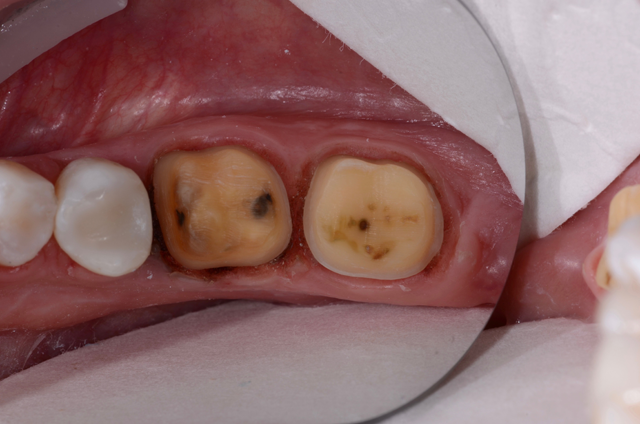
Fig. 4 Fig. 5
After occlusal reduction of about 1.2 mm was completed, axial reduction was completed. Our material of choice, 3M™ Lava™ Esthetic Fluorescent Full-Contour Zirconia, requires a minimum of 0.8 mm. The occlusal clearance was increased to create more ideal anatomy.
Once the axial areas were reduced, margins were cleaned and refined (Fig. 5), and we began the isolation and digital scanning process. We had the patient bite together to check for ample clearance (Fig. 6). You can also check for clearance using the digital impression system after scanning using the “prep clearance tool."

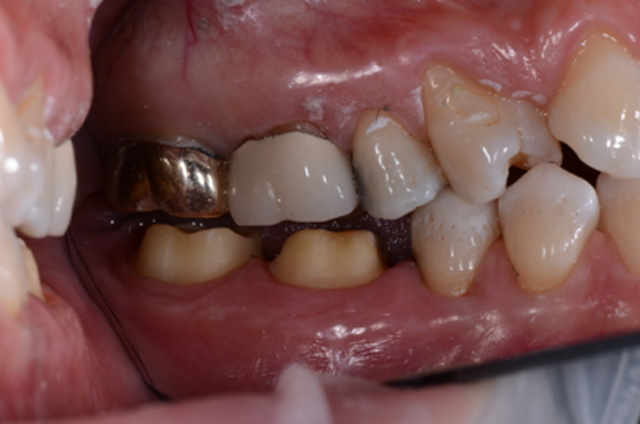

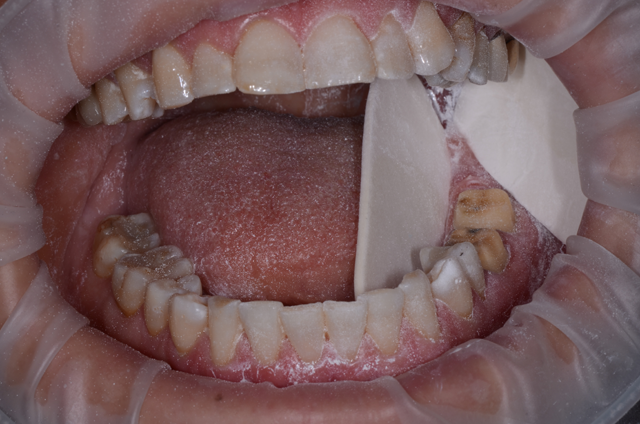
Fig. 6 Fig. 7
We isolated the teeth using a soft lip retractor (OptraGate®), and two dry angles were placed to hold the cheek and tongue out of the way (Fig. 7).
Tissue was retracted using retraction paste (3M™ Retraction Capsule). The tip allows for sub gingival placement around both preps (Figs. 8 & 9).
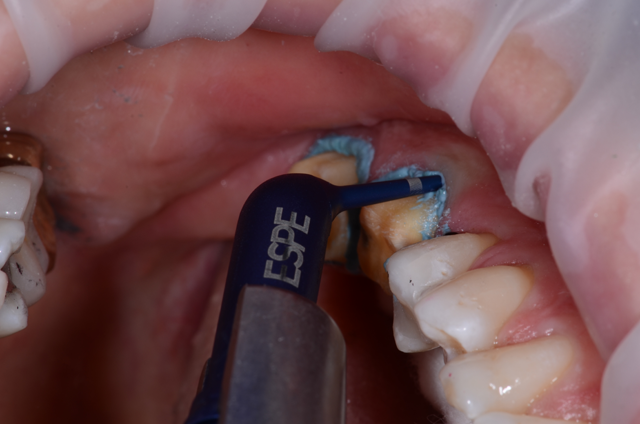


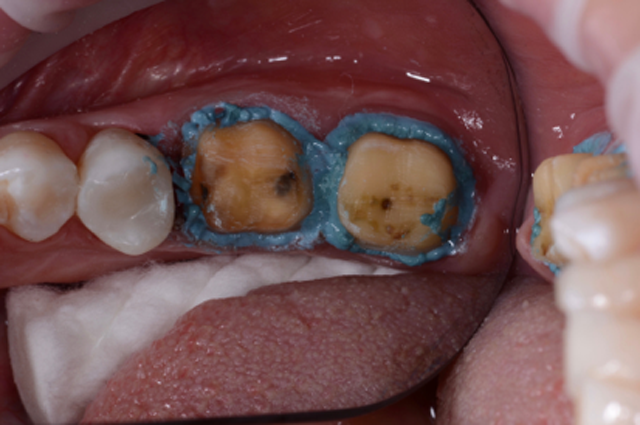
Fig. 8 Fig. 9
Continue to page four to read more...
Rinsing was done after two minutes, washing out the sulcus thoroughly. We dried the preps and applied high-resolution scanning spray blowing air in the sulcus to clear any excess spray. Digital impressions for the preps were completed using our intraoral scanning device (Mobile True Definition Scanner, 3M), (Figs. 10-12). The quadrant scans included up to the canine on both arches. We rely on quadrant scans for one to two crowns, but when working on three crowns or more, we scan a full arch.


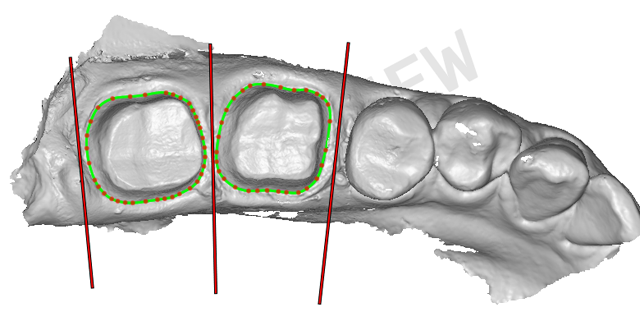

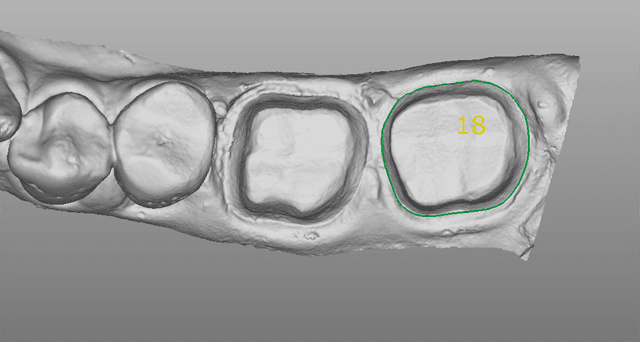
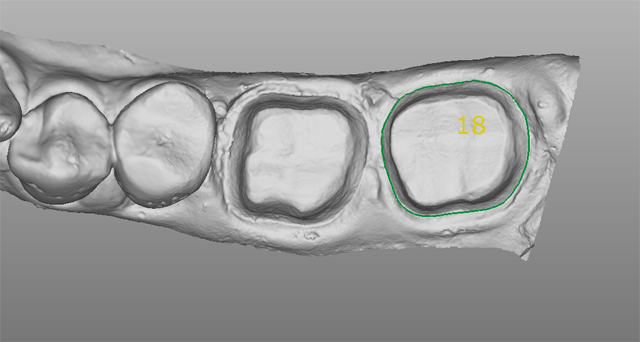
Fig. 10 Fig. 11
We also completed a patient bite scan in centric occlusion (Figs. 13 & 14).We have excellent results recording centric occlusion with a digital scanner versus using a traditional bite material because there is no material in between the teeth, which always causes patients to bite a little awkwardly. Digital allows you to get a much more accurate bite, in my opinion.


Fig. 12 Fig. 13
The patient was fitted with temporaries (Protemp Plus, 3M) (Figs. 15 & 16). The provisionals are important to hold the teeth in place and maintain occlusion. If your provisional is not accurate, you can get movement even over a period of a couple weeks and the permanent restorations will no longer fit accurately. Same-day, in-office milling dentistry can eliminate this issue, but when preparing and seating two or more crowns, it becomes a challenging procedure and a very long appointment for the patient.


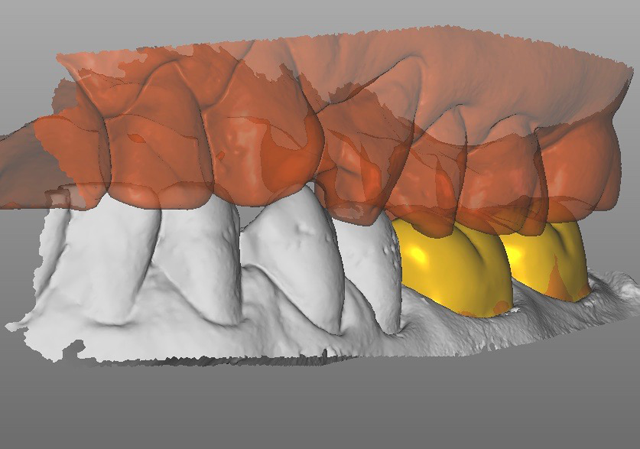

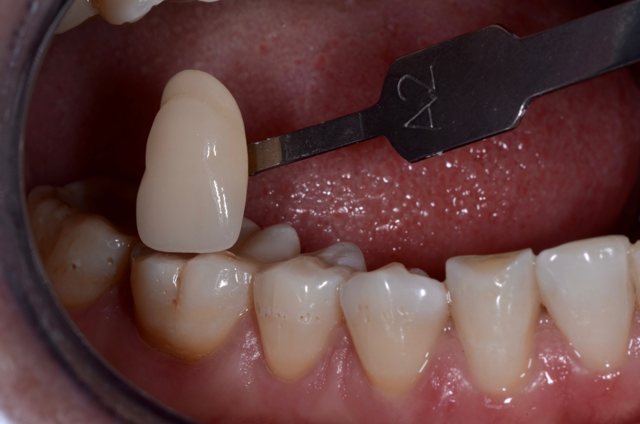
Fig. 14 Fig. 15
We completed the “on-screen” prescription and sent the case via Internet to the lab. They handle all the margin markings, design and milling of the restorations. With one- or two-unit restorations like this, we typically use a model-free workflow. When using digital impressions, we find that restorations have a very consistent, accurate fit that does not require models.
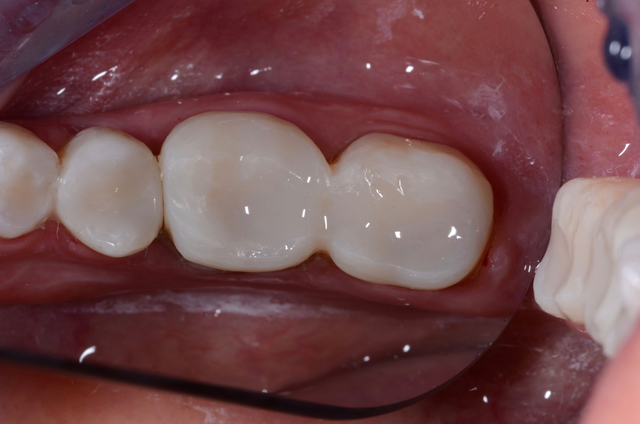


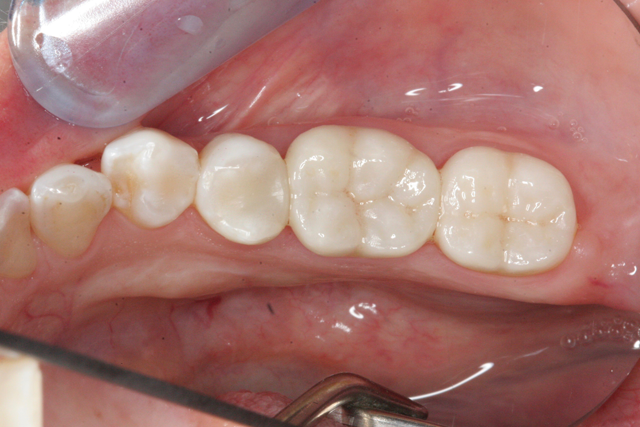
Fig. 16 Fig. 17
Seating crowns
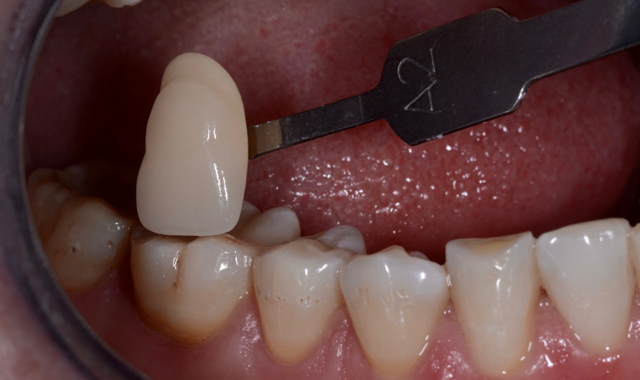
After verifying dry fit of both crowns, we noted excellent occlusion, proximal and marginal fit. To eliminate any possible contamination, the intaglio surface was scrubbed with a zirconia crown cleaner (Ivoclean), which has a zirconia oxide solution to remove salivary phosphates. After 40 seconds, it was rinsed creating a fresh bonding surface. A layer of Monobond Plus was applied and the crowns were then filled halfway with cement (3M™ RelyX™ Unicem 2 Self-Adhesive Resin Cement) and seated. The cement was then spot tacked for 1 second on each buccal and lingual. The excess cement is easily removed using this technique. The interproximal areas are then flossed, and occlusion rechecked. (Figs. 17-19).
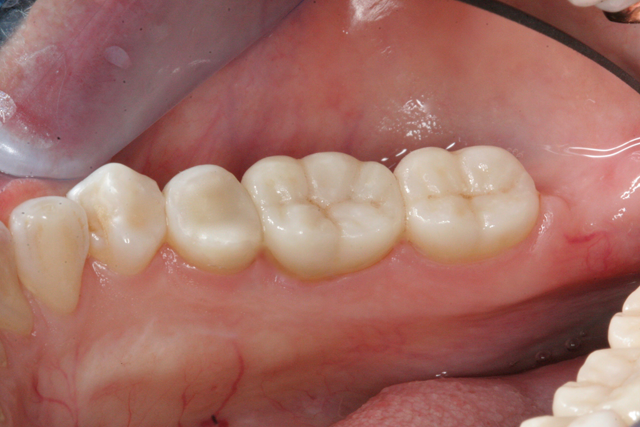


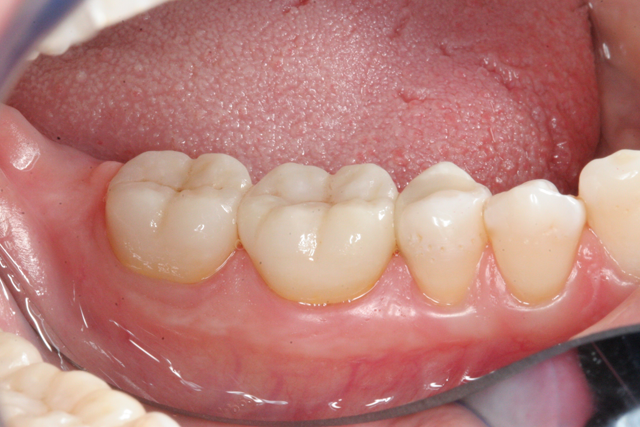
Fig. 18 Fig. 19
Since the time of this crown seating, research specifically looking at adhesion to Lava Esthetic zirconia was conducted by professor Martin Rosentritt at the University of Regensburg in Germany. His studies showed that after try-in a simple wipe with a 5 percent NaOCI solution, followed by a water rinse and air dry, provides for a surface that does not require any special cleaners or dedicated primers to prepare the crown for cementing with RelyX Unicem 2 cement**. This is a simple procedure that works well with zirconia restorations.
Related reading: Why making strong bonds efficiently makes a big difference
Conclusion
Utilizing a digital scanning device is no longer new to my practice, but it’s still new to many dentists. I would encourage others to try going digital; it’s been an amazing improvement and can add value to any practice. Additionally, explore new full-contour zirconia materials. Digital technology is only getting better and the future will see more options becoming available to clinicians. This case certainly demonstrates the excellent predictability of digital impressions and esthetic/strength combo that is now possible with modern materials.
References
* 3-point flexural strength per ISO 6872:2015; qualified for Type II, class 4 indications: crowns, bridges with one pontic between two crowns, inlays, onlays and veneers
** J Dent Res Vol # 96 (Spec Iss A): 2552, 2017


