How to use an innovative, prefabricated composite veneer
Dentistry’s renewed emphasis on minimally invasive treatments affords patients the opportunity to receive highly esthetic and natural-looking restorations that preserve as much of their natural tooth structure as possible.


Dentistry’s renewed emphasis on minimally invasive treatments affords patients the opportunity to receive highly esthetic and natural-looking restorations that preserve as much of their natural tooth structure as possible.
Yet, the artistic and clinical skills required to plan, create and deliver such treatments can challenge dentists in terms of material/restoration selection, preparation design, chair time, appointment requirements and realization of natural-looking effects and characteristics. Although the ongoing evolution of direct and indirect restorative materials and techniques has returned dentistry to a conservative focus, a more straightforward approach to achieving ideal esthetics, form and long-term function has been needed.
Materials available for conservative and esthetic treatments have included indirect composite veneers, direct composites and indirect porcelain or ceramic veneers. The prefabricated composite veneers developed in the 1930s introduced dentistry to the veneer restoration concept. Quickly abandoned due to technological limitations, veneering resurfaced in the 1970s with the availability of chemically cured first-generation direct composites, which also demonstrated significant shortcomings (e.g., difficult handling, high wear, low fracture resistance and limited shades). Continued composite development yielded materials with smaller filler particles for greater color stability and improved durability, but only the most skilled clinicians performed the time-consuming layering, sculpting and artistic coloration techniques.
More techniques: How to shape and clean root canals with Komet® endodontic instruments
As an alternative to full-coverage crowns, the indirect porcelain or ceramic veneers of the 1980s were additive and required little to no tooth reduction (i.e., 0.5 mm) for placement of these thin-layered restorations (i.e., 0.5 mm thickness).
However, minimal preparations that left insufficient room to accommodate esthetic porcelain layering and characterization resulted in overcontoured restorations and periodontal complications. Further, these materials demonstrated less-than-desirable strength. As a result, more aggressive tooth preparations (e.g., up to 1.5 mm) were undertaken to avoid overcontouring, as well as satisfy fabrication and cutback/layering requirements for more esthetic and durable pressed veneers (e.g., leucite-reinforced glass ceramic).
Although today’s metal-free materials enable a return to more conservative indirect veneer preparation designs, direct composite placement, whether guided or freehand, is still considered the most minimally invasive and least aggressive approach for restoring function, form and esthetics. However, despite dramatic advances in direct composite material handling characteristics and optical and physical properties, placement presents technique-sensitive challenges ranging from sculpting and contouring to line angle creation. Additionally, the process can be time-consuming and less than predictable.
More techniques: How to ensure a successful bond with Futurabond DC
Continue reading on Page 2 ...
Therefore, an ideal veneer restoration would demonstrate a balanced combination of the minimal preparation requirements and ability to achieve enhanced esthetics of direct composites, along with the convenience and predictability of indirect restorations.
Fortunately, prefabricated direct composite veneers can minimize the difficulties associated with guided and freehand composite placement. Already prepared to demonstrate an anatomical design and proper line angles/contours, they are ideal for clinicians without freehand composite design expertise and actually enable them to enhance their morphology, preparation, adhesion and smile-design skills. Indicated for lengthening teeth, correcting crooked teeth, masking discolorations, closing diastemas and restoring lesions and tooth fractures, prefabricated composite veneers require minimal tooth preparation and can be modified for esthetic characterization. However, clinicians must carefully determine the ideal shade and size to ensure a successfully intimate fit and harmonious integration with surrounding teeth.
Video: How to properly place GuttaCore
COMPONEER™
Introduced as an alternative to traditional direct and indirect restorations, COMPONEER™ (Coltène/Whaledent AG, Altstätten, Switzerland) is a direct composite veneering system comprised of prefabricated, preshaped and prepolymerized highly filled nano-hybrid composite veneers. With a variety of sizes (i.e., 30 different shapes; 6 shapes per size), tooth enamel shades and thin dimensions (i.e. from 0.3 mm), the system combines the advantages of direct composite restorations with those of laboratory-fabricated veneers. Overall, COMPONEER simplifies the direct composite veneer process by enabling clinicians of all artistic skill levels to create highly esthetic restorations in their day-to-day practice.
COMPONEER also represents a minimally invasive and cost-effective treatment option. Ideal for a variety of indications, only minor tooth reduction and shape finishing are required. The labial surface can be fully characterized for esthetic integration into the smile, and clinicians can customize restorations as desired and modify and repair them over time. The system can also be used as the anatomical base for reconstruction of a single tooth or multiple restorations.
Video: Learn how the NOMAD Pro 2™ can save both time and money
Continue reading on Page 3 ...
COMPONEER treatment requires only one visit for completion, improves convenience and saves chair time by eliminating the need for multiple appointments associated with typical indirect veneers. The entire treatment averages a total of 210 minutes (i.e. 30 minutes for preparation and conditioning, 60 minutes for dentin buildup, 50 minutes for enamel layering and 70 minutes for contouring, finishing and polishing).
Because COMPONEER restorations are cemented using the same composite material (i.e. Synergy D6), a completely solid and uniform restoration is created. The novel microretentive inner surface increases wettability and ensures a durable bond while the composite material demonstrates strength and functionality. An in vitro study recently determined COMPONEER demonstrated greater bond strengths than those of another prefabricated veneer system.
The following case demonstrates the simplicity with which the COMPONEER system can be used. It also illustrates the extent to which the prefabricated veneers blend harmoniously with natural teeth and those restored with freehand direct composite restorations.
More techniques: How to create optimal root-canal access using Komet specialty instruments
Case presentation
A 37-year-old male presented with a chief complaint about the overall esthetics of his smile.
Although he requested treatment, he insisted upon minimal tooth preparation. A comprehensive examination was performed, and pre-operative photographs were taken. The patient exhibited negative space at tooth Nos. 7 and 10, acute canting of the mesial aspects of tooth Nos. 6 and 11 and an ideal occlusion and end-to-end bite.
To conserve the greatest amount of healthy tooth structure possible, the treatment plan included a combination of directly placed freehand composite veneers on tooth Nos. 6, 7 and 11 and a prefabricated direct composite veneer on tooth No. 10. Tooth No. 10 required no preparation and was ideal for a prefabricated veneer, although the over-contoured tooth No. 7 required some preparation. The patient accepted this treatment plan.
Video: How to use Kerr SonicFill™ and SonicFill™ 2
Continue reading on Page 4 ...
The patient’s teeth were cleaned with a brush and toothpaste, and abrasive strips were used to roughen and clean interproximally. The COMPONEER Contour Guide was used to determine the appropriate shape and size for the prefabricated composite veneer. After the applicable shapes were placed over tooth No. 10, the blue transparent shade was used to enable optimum contrast on the tooth. A study model was also utilized to ensure the proper size veneer (e.g. large) was selected for optimal fit and integration.
Shades were selected using daylight lamps and the COMPONEER Synergy D6 shade guides. The enamel shells were compared first, then the dentin core shades. The dentin substrate was then placed under the shell of the enamel core to determine appropriate shading. Enamel Universal and Dentin White Bleach were selected to match the natural tooth structure and blend with the surrounding dentition. However, rather than using a single shade of Synergy D6 composite, the author used two (e.g., Dentin White Bleach [WB] and White Opalescent [WO]) to mirror the chroma in the cervical third of the adjacent teeth. These shades were placed on the tooth and blended. The prefabricated veneer was seated to preview the restoration and ensure ideal shading after which it was removed along with the composite. The teeth were then cleaned, rinsed and dried.
Because tooth No. 10 required no reduction, only aprismatic enamel was removed to enhance bonding. Rotary abrasion was used on all labial aspects of tooth No. 10.16 Mylar strips and wedges (Garrison Dental Solutions) were then placed to isolate the gingival aspect and prevent the teeth from sticking together.
Technique: How to improve Class II composite restorations
Etchant gel was applied to condition the preparation then spread evenly with a brush to the cervical limit. The gel set for 30 to 60 seconds and was then rinsed with water for 20 seconds. No trace was visible on the enamel, and an air blower removed any excess water to create a frosty-white appearance and dry canvas.
One Coat Bond adhesive was dispensed onto a brush and evenly applied to tooth No. 10 by “painting” onto the tooth from the cervical to incisal areas. The adhesive was blow dried gently with oil-free air in the same direction then light cured for 30 seconds.
The adhesive was then applied directly onto the internal aspect of the prefabricated veneer, which was held using the COMPONEER Holder. The veneer was then briefly blow dried with oil-free air but not light cured.
Shade WB of the Synergy D6 composite was placed on the cervical half of the tooth, after which Shade WO was applied to the incisal half. The composites were blended seamlessly together to reproduce the natural chroma observed in the cervical third of the adjacent teeth. This artistic technique enabled the author to develop a chromatic interpretation of the surrounding teeth similar to the esthetics produced by freehand direct composite placement.
Video: How to use preliminary impression materials in anterior restorations
Continue reading on Page 5 ...
Synergy D6 WB composite was then similarly applied to the cervical and Synergy D6 WO to the incisal of the prefabricated veneer. The two shades were sculpted and blended seamlessly together. A volume estimate was established to avoid complications with over and underfilling. Overfilled restorations create overcontoured teeth and lead to poor occlusion and predictability, while underfilled restorations are susceptible to voids and decreased longevity.
The COMPONEER was seated to the tooth using the Placement Tool and carefully moved to the final position with gentle and constant pressure, being mindful of hydraulic forces and axial drifting. Excess composite extruded from all aspects, as expected, indicating a likely void-free restoration. While the COMPONEER was held in position, excess was removed using a bladed instrument with the overhead light focused on the patient’s chin to avoid light polymerization. The restoration was then light cured for 60 seconds and the wedges and Mylar matrix removed. Placement was verified with the patient relaxed and facing straight ahead.
The cervical margin was gently defined using a fine diamond and water spray to avoid gingival tissue trauma. The incisal and proximal margins were then adjusted using Cross Flex Discs, and a polishing cup was used on the composite surface to ensure no voids were present. A polishing point was then used to polish the interproximal margins after which all margins were hand polished with a polishing brush to achieve a “bone-dry” shine for enhanced longevity and predictability.
Video: How to obtain predictable excellence with zirconium oxide
Freehand direct composite veneering was performed on tooth Nos. 6, 7 and 11 using Synergy D6 composite in shades A1/B1 and WO. The tooth No. 7 restoration was designed to mirror the COMPONEER restoration on tooth No. 10. Tooth Nos. 6 and 11 required no preparation, and composite was placed to correct the acute mesial aspect canting.
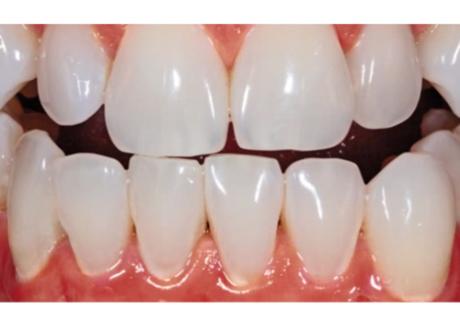
Once all of the restorations were completed, the patient was very satisfied with the highly esthetic results achieved with minimal tooth preparation. The freehand direct composite restoration on tooth No. 7 was compared with the prefabricated direct composite veneer on tooth No. 10 for esthetics, and both demonstrated symmetrical line angles, ideal polish and esthetic properties. Additionally, the mandibular occlusal view confirmed ideal contouring and curvature from tooth Nos. 7 to 11.
Conclusion
As more clinicians and patients pursue minimally invasive treatments, prefabricated direct composite veneers (e.g. COMPONEER) represent a predictable and cost-effective option for achieving a highly esthetic and durable restoration in an efficient manner. Overall, the case presented in this article demonstrates that prefabricated veneers mirror the artistic esthetics of expertly created freehand direct composite restorations. By combining the advantages of direct and indirect restorations, COMPONEER prefabricated composite shells reduce restorative chairtime without compromising optical and strength characteristics. Suitable for everyday practice procedures, COMPONEER is a conservative restorative solution for clinicians still developing their direct freehand composite placement skills and expertise.
Technique: How to use Pola Office+ by SDI
Continue reading on Page 6 ...
About the author
A graduate of the University of Minnesota School of Dentistry, Frank J. Milnar, DDS, AAACD, maintains a full-time practice in St. Paul, Minn., emphasizing the applied art of smile design. An accredited member of the American Academy of Cosmetic Dentistry (AACD) and a Board examiner for accreditation, Dr. Milnar is currently the Professional Education Committee co-chair for the AACD. A leader in dental esthetics, he has published numerous articles about direct placement of composites, shade selection and porcelain materials. In addition to co-founding the Minnesota Academy of Cosmetic Dentistry, he also lectures extensively with the U.S. Armed Forces, as well as internationally on his exceptional restorative and cosmetic techniques. He has been voted “Top Dentist” for the last several years in the Twin Cities by Minneapolis/St. Paul Magazine. A lifelong learner, Dr. Milnar is recognized for his strong commitment to patient care and his dedication to higher standards in the field of esthetic dentistry.


