How to get the perfect X-ray for you
Perfect X-rays are in the eye of the beholder.


X-rays can be evaluated much like fine art: Beauty is in the eye of the beholder. Just about everyone can agree on what a masterpiece of artwork is and what it looks like, yet everyone will still have different pieces by different artists which are their true favorites.
Just as with artwork, most doctors can all agree on what a good X-ray is. Also like artwork, most have personal preferences as to what their favorite is. The different reasons that doctors state that they prefer one image over another are generally items like sharpness (not sharp enough or too sharp) and brightness (too light or too dark). There are usually tools in the software that comes with the sensor which allows the provider to make adjustments after the image has been captured, but no one wants to manipulate images all the time just so they can see what they need to see.
Related reading: Applying the DentiMax Dream Sensor in your practice
Your sensor
For your sensor, you want to get a good, high-end sensor for a decent price. The high-end sensors can be differentiated from the lower-end sensors by the image they produce (the resolution of that image especially) and how well the manufacturer stands behind them.
The images that the sensors produce need to look like good, diagnostic images. The actual resolution of the resulting image needs to be a >20 line pair measurement (LPM) as well. If you hear a number for the resolution of the sensor’s image which is, say higher than 30, then the representative is telling you the theoretical LPM.
The actual LPM is what you can actually see with your eyes. This is the real resolution of the sensor’s images. This is the number you want to pay attention to when looking to see the quality of the sensor and the resolution of the raw image that it produces.
The theoretical LPM is a simple calculation made with the pixel size of the sensors module. It is a theoretical number and not real. The theoretical number would apply if it took into account things like the resistance of electricity when it travels through a copper wire. But unfortunately, it does not consider many of the physical elements that are part of the reality of how your digital X-ray image is produced. And since it doesn’t take into account reality, the theoretical number is just that: Theoretical.
DentiMax has many tools where practitioners can “dial in” the image so that they look like what you want them to look like right off the bat. These tools include a high-quality sensor with an amazingly great raw image, with an actual LPM of >20.
A raw image is the initial, unmodified image that any digital sensor produces. Most sensor manufacturers apply some type of enhancements to the initial image so that it doesn’t appear too blurry or underexposed. You can consider the raw image your starting point. If you take a picture with your cell phone or a digital camera, that initial image would be the raw image. If that image is pixelated for example, there is nothing you can do to “un-pixelate” that image. You would need to take that picture at a higher resolution in order to remove the pixilation.
DentiMax has pre-set “default” settings so that when you take the first X-ray, it may be just what you’re looking for. If it is not however, you can spend a few minutes remotely with one of the DentiMax support techs darkening or lightening the image, or adding or removing some of the sharpness in the image, so that you get the final result that is just what you are looking for.
Continue to page two for more...
Your software
When it comes to the imaging software for your digital sensors, you will want to get an open platform imaging system. Most software that comes with digital sensors are closed platform applications, so your really need to do your research on this topic. Most sensor manufacturers will give you their closed platform software for free when you initially purchase the sensors from them. While this seems like a cost savings and you would think to yourself “I just spent all of this money on these sensors from them, why wouldn’t I get the software to make them work?”
The problem with a closed application is that down the road when you are considering purchasing a new sensor, your choices will be severely limited. Maybe there is a new sensor on the market that takes advantage of some great new technology, a sensor at a great price, or you just want to use the same type of sensor that your colleague has used successfully. Well, sorry, the sensor you wanted to use for whatever reason won’t work very easily in your closed software and may not even be an option for you.
In order to use a different sensor in the “closed” application that came with your sensor, you will need to use a TWAIN driver.
A TWAIN driver is software which allows a piece of (usually imaging) hardware to communicate with a software application. TWAIN drivers are used all the time for flatbed scanners. They are also used to allow your digital panoramic unit to communicate with your imaging software. The extra steps involved with using a TWAIN and a digital pan are offset by the fact that you are only taking one image. When you have to take four or 18 images with a TWAIN driver and there are even two extra clicks in the process, then that can add up to a lot of extra clicks for capturing an FMX.
Some of the applications work with TWAIN drivers better than others. Some of them out there will not work with them at all! If one of your sensors breaks unexpectedly and you are forced to purchase a new one, depending on the manufacturer, this can be quite a hefty investment! Luckily, the DentiMax TWAIN driver has been optimized for most of the imaging applications out there so that the number of extra steps is minimized. You can contact DentiMax to find out if your digital imaging system will work with the DentiMax Dream Sensor and the DentiMax TWAIN driver. If not, you can always convert over to DentiMax’s open platform application.
Related reading: How DentiMax Dream Sensors made a big difference in one practice


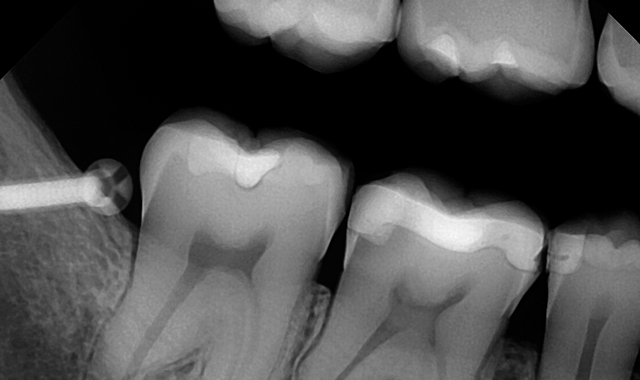
An example of a bad X-ray image


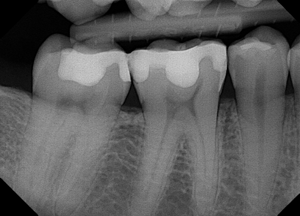
An example of a good X-ray image
Open imaging applications
Open imaging applications allow you to use pretty much any device on the market natively within the software (meaning it will work directly without a TWAIN driver and no extra set-up items). The open application will link or bridge with your practice management software, so there will be no double data entry. Many times, there is a nominal cost for the open platform imaging application, but you are paying for your freedom and the ability to continue to use the same software that you and your staff have grown to know and love-but with virtually any sensor on the market. It is a small price to pay for your freedom! Otherwise you will get stuck with a free, but closed imaging application.
The DentiMax Imaging software is an open application which works natively with just about every sensor on the market. This is great if you are currently stuck in one of those closed imaging applications and you want to be able to get out of it but still use what is left of your investment. You can purchase the DentiMax Dream sensor system along with the DentiMax Imaging software, and the support team will be able to set up your existing sensors in DentiMax software so that you can continue to use the remaining old sensors until they die, all while you begin using the new, high-end DentiMax Dream sensors.
Continue to page three for more...
The perfect X-ray image
When it comes to how your digital X-rays look, there is no right or wrong answer. As long as your images are diagnostic, then it really is “in the eye of the beholder.” Some doctors enjoy using the tools in the software to manipulate the images. This allows them to see things that they may have otherwise missed or ensures that they are really seeing what they thought they were seeing.
Many dental schools like to see their images more “raw” than those of private practices. This is good because it allows the students to see what the X-rays really look like when they are first returned from the sensors. It also teaches them how to manipulate the software to see what you need to see, make the image more diagnostic and to effectively use the important enhancement tools in the software.
Some doctors want to see their image very sharpened, even what we would call “over-sharpened.” This is OK for several specialties, such as endo, because it allows the apex that they are working on to stand out for more accurate measurements and a clearer canal. When the image is over-sharpened, the image is simply more pixelated than it would ‘normally” be, so if the pixilation doesn’t interfere with anything, then there is nothing wrong with it.
If your sensor can produce a great, good-looking image right off the bat and then you can make a few modifications to that image to get your perfect image, then you have a good, quality sensor.
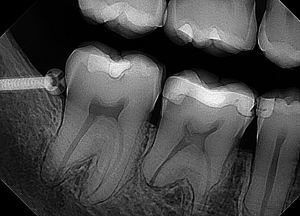
An example of an oversharpened X-ray image

An example of a good X-ray image
Related reading: I Use That: DentiMax Dream Sensor
Summary
If you have open platform software that provides the ability to modify images ever so slightly, so that they are exactly what you want to see, then you have something really special! You have your perfect X-rays!
The things you need to make this happen, so your digital imaging system produces the perfect images that you are looking for, are:
• Start with a high-end, highest resolution sensor that returns an excellent raw image. You can’t take a bad image and make it look good, but you can take a great image and make it look better.
• Start off with an open platform imaging software application. This will come into play three-to-five years down the road when your sensors start acting up.
• See how your sensor manufacturer handles broken or malfunctioning sensors. What is the timeframe of the warranty? What is covered under the warranty? If the sensor is not covered under the warranty, what are your options to get a replacement sensor?
• The ability to tweak the raw image so that it is customized for you. You will want the ability through your imaging software to make some minor adjustments to your sensors images. If you find that you are lightening every image slightly every single time, then it would be much better to have those images lightened automatically.
By following these simple steps and using these items as a guide, you too can have your perfect X-rays in your practice.


