25 tools that improve the restorative workflow
From analog to digital, here are the things that can make restorative dentistry better than ever.

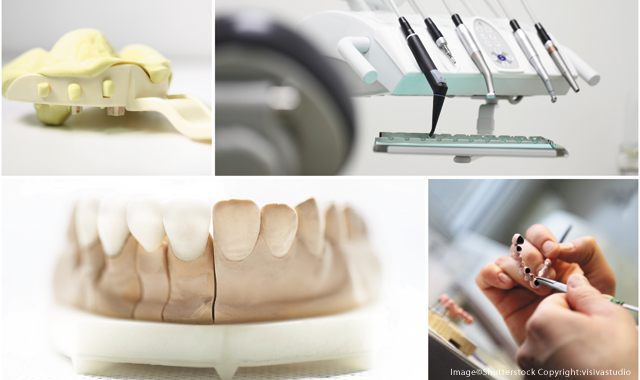

Creating the best dental work-be it crowns, bridges, implants or even dentures-requires a certain level of mastery from both the dentist and his or her laboratory. In some cases, those restorations can be achieved while the patient is in the chair. In other cases, the restoration must be sent to the laboratory. In either case, clinicians and labs rely on any number of tools-and on each other-to help get the job done.
Those tools can be anything from a simple, inexpensive carving knife up to a complete chairside milling system costing thousands (if not hundreds of thousands) of dollars.
For many dental professionals, the full arsenal of restorative tools remains a mystery beyond what they’re using day to day. But that segmented way of working doesn’t have to be the norm-dental technicians can benefit from knowing what’s going on chairside, and dentists must know what’s going on in the lab. That kind of full-workflow knowledge creates better results from start to finish, helps position dental laboratories as expert consultants, provides clinicians with the knowledge to ensure better patient outcomes and gives the folks in the dental chair the assurance their restorations are perfect every time.
Whether you’re a dentist, a dental technician or another specialist, knowing what equipment is most important can make all the difference. With that in mind, we talked with several doctors, lab professionals and dental technology experts to find out what they thought is essential gear for the restorative process in 2017.
Trending article: 5 new workflows that are now possible
Hand tools
Doctors and laboratories utilize specific hand tools to make their restorations look and fit just right. Some are very basic tools that have been around for decades (and may not even be popularly used anymore) and others are purpose-built for new technologies.
Facebow and articulator
“I don’t know if you’d call it technology because it’s been around so long,” Dr. David Rice, DDS, a general dentist in Amherst, New York, and founder of IgniteDDS.com, says. “But a facebow and an articulator go hand-in-hand. The facebow is the clinical piece that I use for the patient’s mouth, and the articulator is more on the laboratory side. What that allows for is a true representation of the patient’s mouth in the model phase, so the laboratory can not only know how the teeth come together, but they can predict how a jaw would move and at what angle.”
Dr. Rice observes that the tool might not be something many dentists have ever used. “It’s, sadly, sort of a lost piece of tried-and-true technology,” he says. “It’s something many dentists have shied away from using. Probably because they never learned how to in dental school or they have just gotten away from it, but it makes life so much easier when you use it.”
Carving tools
Dan Elfring, an in-house lab tech at Pickle Prosthodontics in Colorado Springs, Colorado, uses a variety of carving tools for sculpting wax. For instance, he has a tool used specifically for defining details in dentures.
“It’s used for carving around the gingival crest of a denture,” Elfring says. “So you wax it up and then you use it to carve that nice line around the gingival crest.”
Another tool he uses is a Lecron carver, used in denture base creation.
“When I’m waxing up a denture base, mostly I’m carving in wax,” Elfring says. “And it’s after I do a bulk wax and I carve it back.”
Trending article: How technology is REALLY changing the dental workflow
Leaf gauge
A leaf gauge is an inexpensive diagnostic tool-comprised of several thin leaves-and is used for measuring the bite.
“If you get really technical with teeth, the position of teeth is really determined by a few things,” Dr. Rice says. “It’s how they look, like when somebody smiles, but it’s also determined by the muscles, the musculature of the jaw, and something really simple, like a leaf gauge, helps me to make sure I’m building my bite with my teeth in harmony with the muscles and then the temporomandibular joint.”
Acrylic mixer
Some tools may seem simple, but they serve an important purpose. For instance, Elfring uses an acrylic mixer to ensure that the resulting product is smooth and bubble-free.
“It’s got a spoon on one end to spoon the polymer out of a bottle, and that’s got a little mixing spatula on the other end,” he describes. “So what’s kind of unique is that it’s kind of open so that it doesn’t create too much turbulence when you’re mixing.”
Clamps
Laboratories rely on clamps when fabricating restorations, and they can be used for very specific, specialized functions. For example, Mark Ferguson, general manager of Vulcan Custom Dental, notes that a clamp from Harvest Dental called Clip makes the manufacture of implant cases much easier.
“It’s a tool that is used to clamp hybrid implant bases to their ceramic counterpart,” Ferguson says. “Whether it be zirconia or e.max, it makes cementation of hybrid implant cases quite a bit easier.”
Trending article: How the digital workflow will enhance communication and reliability
Diamond-impregnated rubber wheels
Getting restorations to a smooth finish can be achieved by using rotary tools with progressively finer grits.
“With the trend of everybody going all-ceramic, with zirconia and e.max and lithium disilicate, the all-ceramic trend is changing the way we finish things,” Jason Atwood, CDT, Senior Digital Solutions Adviser of Core3dcentres, says. “Carbides are a thing of the past. Almost everybody is using diamonds and stones and rubber wheels to do their finishing and fitting. I recommend, when finishing your margins and things like that, on an all-ceramic crown to use a good, diamond-impregnated rubber wheel.”
For example, Ferguson notes that Wagner offers its “Berrys” line GoldenBerry, RedBerry and BlueBerry.
“They’re fantastic for polishing and working with zirconia and lithium disilicate,” he says.
Digital workflow
Dentistry and lab work in the 21st century is highlighted by the digital workflow. Starting at the doctor’s office with an intraoral scan and then finished and milled-either at the doctor’s office or at the lab-is the current trend in restorative dentistry. Doctors and labs can do as much of the workflow as they feel comfortable-or their budgets allow.
Digital cameras
Something as simple as a digital camera can help doctors and labs communicate on cases.
“If I’m in a traditional relationship where I’m taking physical impressions and sending them to the lab, one of the best tools is a digital camera,” Dr. Rice says. “The ability to take a photograph of what I see, so the laboratory can see it too, is very, very helpful.”
The pricier DSLR cameras are best, but Dr. Rice observes that you may have a good enough camera in your pocket.
“In a perfect world, it’s an SLR camera,” Dr. Rice says. “That’s going to provide much more information. In a less than perfect world, if I wasn’t going to go that route, my smartphone is a great adjunct. The cameras that are on the new iPhones and Samsungs are pretty good, and it’s a nice way to grab a picture. It’s easy. It’s really not intrusive to a patient, and then it makes it easy to text or email an image.”
Trending article: Exploring today's digital dental workflow
STL viewers
When digital dentistry cases are designed on a computer, the resulting file (an STL file) can be shared with other members of the team. While the file is normally viewed on a computer, it is possible to make viewing even easier, using an STL viewer.
“You can download [a viewer], even on your phone, which can improve communication between a lab and a doctor,” Ferguson says. “If I design something, I can send it to the doctor, and he can rotate it and look at it on his phone. He can say ‘change this,’ or ‘this looks good.’ There are a bunch of free ones, but you can share files so much easier now than in the past.”
Intraoral scanner
More and more doctors are foregoing traditional impression materials and using intraoral scanners to take digital impressions. The scanners are lauded for their ease of use and accuracy.
“It’s best to get a digital impression taken,” Dr. Paresh Patel, DDS, an implant specialist at Implants by Paresh in Lake Norman, North Carolina, says. “I think everybody would say the CAD/CAM fit is going to be better than taking a traditional impression, pouring it up, digitizing it, and then making a restoration from that.”
“We were fortunate to be the pilot lab for the TRIOS system when 3Shape was first looking to use it for their RPD application,” Justin Marks CDT, founder and CEO of 3D printing manufacturer Arfona, adds. “The results have been outstanding. Not only do we have a perfectly mucostatic impression (especially important for our Valplast partials), but perhaps more importantly the bite registrations are more accurate than traditional wax bites.”
Trending article: How to simplify the scanning workflow
Virtual prescriptions
The intraoral scanner makes it possible to send a virtual prescription to the laboratory, giving labs an unprecedented understanding of what the doctor wants.
“What’s nice is all of those systems allow you to do a virtual prescription,” Dr. Rice says. “That’s helpful from an ease-of-use standpoint, because I’m already using my intraoral scanner to capture my impressions. It’s also helpful because it’s real-time. So, it doesn’t really make much of a difference whose system you’re using, but if you have a great relationship with your laboratory and you do send that digital scan, they’re very capable of getting back to you within minutes, while the patient is still present. That’s really helpful because sometimes I want my lab’s input on a preparation that I’ve made and sometimes it’s helpful for the lab technician to be able to say, ‘Hey, you know what? That’s really good, but if you could just change that shape a little bit, or you could just give me this information in addition to that,’ my patient is still present.”
Conebeam scanners
Intraoral scanners are great for scanning the surface of the teeth, but in cases where more detail of a patient’s anatomy is needed, conebeam computed tomography (CBCT) scanners can be employed.
The scanners are expensive, but they allow the doctor to see inside the patient’s skull, giving detailed views of each patient’s unique anatomy. These scans are especially useful for implant placement, because they show exactly where the implant should go. Also, because the scan is digital, it can be merged with other data to help doctors and labs construct the best restorations.
“We certainly like taking a digital scan rather than taking an impression and then having that exported out as an STL file,” Dr. Patel says. “That can get it merged with CT data, a DICOM file, so we can now have the laboratory create us an entirely digital workflow for a surgical guide, so we can place the implant exactly where we want.”
Trending article: The top 10 states to be a dental technician
Chairside milling systems
Laboratories and doctors have a well established relationship-the doctor starts the case and the lab creates it. However, chairside milling systems-like the CEREC-blur the line between the two. Doctors can provide same-day crowns for patients by scanning the tooth and then designing and milling it in-house. And those milling systems are not limited to just crowns.
“They can mill a surgical guide right there with their CEREC,” Dr. Patel says. “And then they’ve also got the blocks so they can mill a screw-retained crown because the screw access hole is already premade into the e.max block. So you can design around that and create a screw-retained implant restoration, which I think it is an unbelievable technology.”
3D printing
Mills are the most prevalent means of manufacturing in CAD/CAM systems, but 3D printers are providing a new way to produce lab output.
At this stage in 3D printing, the final restorations are not possible. The machinery and technology is in place, but there are no FDA-approved materials for long-term restorations.
However, the printers can be used in the phases involved in creating the restoration. For instance, labs routinely use 3D printers to make models. They are also capable of creating the surgical guides used for placing dental implants.
Other tech
CAD/CAM is certainly the fashion in restorative dentistry, but it isn’t the only technology in the office or lab. Other equipment needs attention to produce the best restorative results.
A proper computer build
CAD systems require a certain minimum level of specs to do their work, but beefing up the systems will improve your capabilities.
“One of the things we’ve found, with the computer you use for doing your 3D designing, it’s never good enough just to use the minimum requirements for the PC,” Atwood says. “We found it’s very helpful to improve the efficiency if you increase the RAM and computing capability of the PC, over and above whatever the minimum requirements are. One of the tools that we’ve had that’s really improved our efficiency in our design center is upgrading the RAM in all our PCs, and it might be something that’s overlooked.”
Related reading: The latest advancements in digital dentistry
3D mouse
Something as simple as your computer’s mouse can help improve restoration quality and work efficiency. 3D mice (sometimes called “bats”) allow you to work within at least three degrees of freedom and simultaneously pan, zoom and rotate 3D models.
“A 3D mouse helps you to navigate the screen as you’re working,” Atwood says. “I’ve had some technicians that find it difficult to learn, but once they learn, they won’t go back, and they really like it.”
Trending article: What CAM software really does
Shade matching
Shade matching seems simple enough-just compare the patient’s tooth color to a shade guide and then proceed form there. However, that method relies on subjectivity and can be less than accurate. A digital shade matching system removes the potential for human error.
“There are systems out there that allow us to take shades of teeth from a patient that are technology-driven,” Dr. Rice says. “Several of the scanners out there like CEREC or 3Shape, in addition to scanning your image, they’ll scan shades of teeth. Anything that minimizes the subjectivity and makes things very objective is helpful.”
Doctors’ armamentarium
When the restoration comes back from the lab (or off of the in-office mill) and it is time to place it in the patient’s mouth, the doctor has a number of tools at his or her disposal to finish it with the best quality and esthetics.
Matrix systems
When interproximal areas need to be restored, a matrix system is best used. There are a number of matrix systems from different manufacturers, including sectional matrix systems, matrix bands and other configurations. Ultimately, they are all designed to be placed between the tooth being restored and the adjacent tooth to help create the outside contour of the restorative material.
“When you’re doing filling that [goes] between the teeth, this whole system helps you recreate the tooth structure,” Dr. John Flucke, DDS, Technology Editor for Dental Products Report, says. “So it is anatomically the same shape and touches the adjacent teeth correctly.”
Trending article: The digital workflow with 3M
Curing lights
Composite material can be cured either on its own through a chemical process or by using a curing light. Curing lights give the clinician enough time to place the composite precisely where he or she needs it before it starts to set.
There are a number of curing lights available, but Dr. Flucke likes Ultradent’s VELO.
“Other lights are made out of plastic, and this one is made out of aerospace-grade aluminum,” Dr. Flucke says. “It’s very durable. You can literally throw this thing and it won’t break.”
Also, be mindful of the type of composite that you’re using and at what wavelength of light it will cure.
Diode lasers
Of the three different types of lasers used in dentistry (carbon dioxide, erbium and diode), Dr. Flucke calls special attention to diode lasers and its capabilities.
“The laser has a really nice way of defining margins-where you stopped drilling and where the natural tooth starts,” Dr. Flucke says. “It really just provides the lab with a really great visualization of what you’re doing and what they need to see. For the lab, it just makes their job easier-it makes everything easier to see on their end, so they can do their job faster, easier, better.”
Related reading: How to simplify the scanning workflow with diode lasers
Improved cements
Cements are key to the restorative process, especially when indirect restorations must be placed. The use of cements does require an element of finesse, especially when removing the excess.
“There’s an interesting fine line,” Dr. Flucke says. “If you take it up too early, the cement is still really, really runny, it’s hard to remove and you can leave little drops. And if you leave it too long, it either adheres to the crown that you’re working on or adjacent teeth, and then it becomes really hard to get off. Most cements on the market go through a gel stage. As they start to set, they go from the viscosity of maple syrup to about to the viscosity of Play-Doh, and that’s called the gel stage. When they are in that gel stage, you can take an instrument, just drag it around the neck of the tooth, and the cement will just come right off. The gel stage is the easiest, best time for cleanup.”
However, Dr. Flucke notes that Kerr’s Maxcem Elite Chroma makes it easier to remove that excess, because when it reaches the gel stage, it changes color.
Related reading: A review of Kerr Restorative's Maxecm Elite Chroma
Putty
While intraoral scanning is a popular innovation, there is something to be said for old-school methods-especially when it comes to getting the lab’s best work.
“Sometimes the plain old use of thermal putty, and then taking the impression out of that, is a great way for doing it,” Dr. Patel says. “Staying away from using that triple tray for something like doing a crown on 18 or 19 and we have no distal stop. For the laboratory, it’s really difficult to mount that case if you just give them a quadrant impression, as opposed to a full arch. Doctors are funny: they can’t fathom the thought of spending five bucks to fill up a whole tray with the impression material, so they’ll just do a quadrant. But then the mounting is incorrect, most of the time, but then the crown comes back, and it’s high and they yell at the lab saying, ‘The lab didn’t know what they were doing.’”
Software
Computers are the backbone of both the dental practice and the laboratory, and software makes it all work.
CAD
Computer-aided design (CAD) software can be located at either the lab or the doctor’s office. This is the software on which restorations are designed before ultimately being sent to the mill.
“We are using this primarily for digital partials and dentures, and it enables us to be more precise with our designs and to create more esthetically pleasing restorations,” Marks says. “Partial denture labs will sympathize with me if I were to start describing what a pain it is to take prefabricated denture teeth and then trim them to fit a partially edentulous patient, particularly for anterior tooth replacement, when esthetics are a priority. Now with CAD, we can design custom denture teeth that are milled out of PMMA and characterized with the OPTIGLAZE color kit from GC. It takes RPD esthetics to a whole other level and provides a service that helps us stand out from other labs.”
Trending article: 10 improvements to your scanning software that can change the way you work
Communication software
Communication between doctors and labs is vitally important, and-happily-software vendors have provided the tools to make that process easier.
“One of the biggest drags in the restorative workflow is trying to get information back and forth, when or if something changes,” Jeffrey Noles, CEO of LabStar software, says. “If you have a question about a case, if you’re a dental lab, how easy is it to get in touch with the doctor? Or if you’re the doctor that wants to make a change, how easy is it to get in touch with your lab?”
“Communications portals, such as 3Shape Communicate, have been vital to the way we communicate these cases with our dentists,” Marks adds. “Though originally designed simply for transmitting scans from the dentist to the lab, the tool has become quite robust and can be used to preview a case before starting on it, proposing a design and seeking approval before manufacturing and to keep a digital record of the entire treatment plan. The portal can be viewed in the CAD program or via web browser or smartphone, giving me freedom away from the physical constraints of the lab and allowing me to work offsite more and more.”
Trending article: How the digital workflow will enhance communication and reliability
Security
It can’t be overstated just how important it is to be security-minded. HIPAA violations can result in penalties of between $100 and $50,000 per offense, so if there is a breach, those fines can add up.
To avoid security breaches, Noles recommends software that contains email capabilities to keep your communications secure.
“There’s secure, HIPAA-compliant email,” Noles says. “Email is not HIPAA compliant, just by its very nature. Emails always go through some sort of an unencrypted zone, so you always want to make sure that you don’t use regular email.”
Using software that is HIPAA-compliant protects both the doctor and the lab.
“Because it’s all based on an encrypted platform, it never goes through regular email,” Noles says.
Related reading: Can email really be HIPAA compliant?
Collaboration
Some restorative cases are more complex than others, and the more complex a case is, the more the doctor and laboratory have to communicate. Making that process easier are software collaboration capabilities.
Collaboration tools allow doctors and labs to share pictures, notes, impressions and so forth.
“It’s the same thing as attaching Dropbox to your lab management software, so you can share attachments back-and-forth,” Noles says. “If doctors wanted to send a picture, they can send it through LabStar. They could drag-and-drop it right into their client portal.
“It’s hard to manage all those details on pieces of paper or Excel spreadsheets,” he adds.
The tools and technologies at the doctor’s and lab’s disposal range from very simple to very complex. Each has its own role in the doctor-to-lab workflow, and understanding how everything fits together can improve the patient care by dental professionals of every expertise and job title.


